
|
|
|
|
|
|
||
|
|
||
 1st February 2019, 06:45
|
#11 |
|
Gets stuck in

Rover 75 2.5 V6 in Wedgwood Blue Join Date: Dec 2015
Location: Felbridge, East Grinstead
Posts: 982
Thanks: 250
Thanked 294 Times in 206 Posts
|
Just to give a comparison in prices re the coolant filler cap. Rover part (from somewhere other than Rimmers) about £8. Land Rover part about £6.50. Replacement rings (including postage) about £4 plus a bit of sellotape and a few minutes to fit them.
__________________
 Conformity is not morality. Consensus is not truth. |

|

|
|
1st February 2019, 07:44
|
#12 | ||||||||||
|
Newbie
Rover 75 Saloon Join Date: Jan 2019
Location: Sibiu
Posts: 27
Thanks: 17
Thanked 2 Times in 1 Post
|
Quote:
Quote:
Quote:
Quote:
Quote:
Quote:
So should I pull that out or is it normal for that to be in there? Also, should I add something (aditives) to clean the deposits inside the camshaft? Quote:
Quote:
 Quote:
* Another thing I noticed when pulling the door covers to fix the electric windows, the inside of the door had water and was filled with rust debris. What should I use inside the door to prevent rust from forming and where exactly are the water leak holes to clean them so water gets out from the door? I will have to check the plenum this weekend to see if it's clear or clogged. Maybe even do the peek-hole hack. Last edited by madsega; 1st February 2019 at 07:56.. |
||||||||||
|
|
|
|
1st February 2019, 07:45
|
#13 | ||
|
Doesn't do things by halves
Rover 75 2.5 Connoisseur Auto (1999) Dealer launch model. Join Date: Mar 2007
Location: Former Middlesex
Posts: 20,376
Thanks: 1,587
Thanked 3,749 Times in 3,181 Posts
|
Quote:
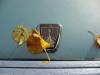
Your year 2000 V6 would originally have had a 3 speed fan but this might have been changed for the later 2 speed system. We first need to find out which you have and fortunately that's easy. Have a look at these photographs taken through the radiator grille. Do you have the resistor present or not? Quote:
Simon
__________________
"Whatever is rightly done, however humble, is noble." Sir Henry Royce. |
||
|
|
|
|
1st February 2019, 07:55
|
#14 | ||||
|
Doesn't do things by halves
Rover 75 2.5 Connoisseur Auto (1999) Dealer launch model. Join Date: Mar 2007
Location: Former Middlesex
Posts: 20,376
Thanks: 1,587
Thanked 3,749 Times in 3,181 Posts
|
Quote:
Quote:
Quote:
Quote:
Simon
__________________
"Whatever is rightly done, however humble, is noble." Sir Henry Royce. |
||||
|
|
|
|
1st February 2019, 12:32
|
#15 | ||
|
Newbie
Rover 75 Saloon Join Date: Jan 2019
Location: Sibiu
Posts: 27
Thanks: 17
Thanked 2 Times in 1 Post
|
Quote:
 @SD1too Quote:
I will have to wait for the manual and also order a torque wrench then remove the camshaft cover and see what's going on in there. |
||
|
|
|
|
1st February 2019, 13:03
|
#16 |
|
I really should get out more.......
Rover 75 Saloon Join Date: Jul 2011
Location: Gävle
Posts: 2,534
Thanks: 395
Thanked 823 Times in 652 Posts
|
Personally I wouldnt wait too long to investigate the wire mesh inside the front camshaft cover as I wouldnt like to think what could happen if it moves. The normal two mesh filters fit inside a recess and I cant see them moving as they're quite stiff but your picture does seem to match the gauge and appearance of these filters.
You could always have a look and torque up the bolts later, to be honest Ive done this job of replacing the mesh filters (or separators) on three cars and never bothered with my torque wrench as I reckon Ive got a good feel for now tight they were and should be. As SD1 too suggests, your fan is of three speed type and can often be repaired by just renewing one or two of the four carbon brushes, I suggest you order two. You can get them here https://www.old-germany.de/ecommerce...g2s1smq9p6pq86 Regards |
|
|
|
|
1st February 2019, 17:18
|
#17 | |
|
Newbie
Rover 75 Saloon Join Date: Jan 2019
Location: Sibiu
Posts: 27
Thanks: 17
Thanked 2 Times in 1 Post
|
Quote:
Regarding the carbon brush, I will have to check and see if I can find it somewhere else  , they don't ship to my country unfortunately. , they don't ship to my country unfortunately.Also, earlier I picked something from the trunk/boot and noticed that there was water inside and the textile was soaking wet. What would I have to check. Maybe some clogged water drain holes and where would I look?  Thank you guys so much for all the help  |
|
|
|
|
|
1st February 2019, 17:42
|
#18 |
|
I really should get out more.......
Rover 75 Saloon Join Date: Jul 2011
Location: Gävle
Posts: 2,534
Thanks: 395
Thanked 823 Times in 652 Posts
|
OK plan b supplier .... https://www.engineeringcarbonproduct...on-brushes.php
I won't use them even though they are a UK supplier as their postage rates to Europe are so inflated and in my opinion unfair. You'll also find that you have to order a set of four even though you probably only need one or two. My latest 75 saloon had a wet boot too which I found came through the rear lights. The seals had split (very common) and allowed water to drain in, I stitched (one only) the broken ends together and then used glue to finish the joint. They've been fine since. Regards |
|
|
|
|
1st February 2019, 18:06
|
#19 |
|
This is my second home
Rover 75 cdt club + Rover 2.5 KV6 Conni SE Join Date: May 2008
Location: Birmingham
Posts: 11,394
Thanks: 6,587
Thanked 2,262 Times in 1,729 Posts
|
Take the rear lights off the body.Remove the seals and wipe all round the area where they fit. Dry the seals out and then run a bead of silicon sealant round the seal inner side, and fit to the body. Run another silicon bead on the outside where the lens fits. It will never leak again. There is a split in the seal, make sure you close the gap when fitting the seal to the body.
__________________
Great Barr, Birmingham. |
|
|
|
|
2nd February 2019, 13:07
|
#20 |
|
Gets stuck in
Rover 75 2.5 V6 in Wedgwood Blue Join Date: Dec 2015
Location: Felbridge, East Grinstead
Posts: 982
Thanks: 250
Thanked 294 Times in 206 Posts
|
The other potential cause of water in the boot is badly fitted vents. Pull back the lining from the sides of the boot and you'll see a louvred plastic vent. The outside of it is behind the rear bumper and not particularly protected from all the spray thrown up by the rear wheels. If in doubt then apply the same generous helping of silicon sealer as prescribed for the rear light units.
__________________
Conformity is not morality. Consensus is not truth. |
|
|
|
 |
|
|


 Linear Mode

