
|
||
|
|
||
|
|
||
|
|
#371 |
|
Regular poster
75 CDTi SE Auto Join Date: Jul 2012
Location: Coventry
Posts: 42
Thanks: 6
Thanked 2 Times in 2 Posts
|
Having shown the carpet no mercy my new compensator is now fitted. All for the cost of 13mm deep socket. Will return the slack one tomorrow. Thank you.
|
|
|

|
|
|
#372 |
|
Newbie
Rover 75 Tourer Join Date: Jun 2012
Location: Tunstall, Kent
Posts: 1
Thanks: 0
Thanked 0 Times in 0 Posts
|
Certainly the proper solution is to replace the Compensator with a new or modified unit by either stripping out all the interior or getting access underneath and dropping the exhaust - both big jobs.
I needed to fix mine for next week's MOT and so I just made a spacer from a 3/8" nut with a 8.5mm square hole to fit over the square part of the adjuster bolt. I welded a short rod on it to ensure I could line up the square hole with the square part of the adjuster bolt on the end of the cable. I could then adjust the lever to the correct point. It works well for the moment at least until the Compensator unit bends even more. |
|
|

|
|
|
#373 | |
|
Give to Learn
Freelander 2 Join Date: Aug 2010
Location: West Midlands
Posts: 18,736
Thanks: 1,155
Thanked 6,407 Times in 3,874 Posts
|
Quote:
I would advise not to do this as you could end up having to replace the front cable as well as a compensator, it must have taken you longer welding the short rod and fitting the 3/8 nut than it takes me to fit the compensator 15 mins if i rush click the blue banner at the bottom of any post of mine to see how best to fit  Arctic Arctichttp://www.the75andztclub.co.uk/foru...d.php?t=115958
__________________
Arctic Givology Learn to Give Everything is Achievable  ad altiora tendo. Check out our Nano meet dates http://www.midlandsnanomeets.co.uk/ http://www.the75andztclub.co.uk/index.php?thepage=howto " You do the work , we supply the expertise " |
|
|
|

|
|
|
#374 | |
|
This is my second home
75 Contemporary SE Mk II 2004 Man. Sal. CDTi 135ps, FBH on red diesel, WinCE6 DD Join Date: May 2010
Location: Leeds
Posts: 17,273
Thanks: 2,160
Thanked 2,061 Times in 1,586 Posts
|
Quote:
__________________
Harry How To's and items I offer for free, or just to cover the cost of my expenses... http://www.the75andztclub.co.uk/foru...40#post1764540 Fix a poor handbrake; DIY ABS diagnostic unit; Loan of the spanner needed to change the CDT belts; free OBD diagnostics +MAF; Correct Bosch MAF cheap; DVB-T install in an ex-hi-line system; DD install with a HK amp; FBH servicing. I've taken a vow of poverty. To annoy me, send money. |
|
|
|

|
|
|
#375 |
|
Posted a thing or two
Rover 75 2.0 V6 Auto Join Date: May 2011
Location: Sandnes - Norway
Posts: 1,560
Thanks: 64
Thanked 283 Times in 174 Posts
|
Hi Artic,
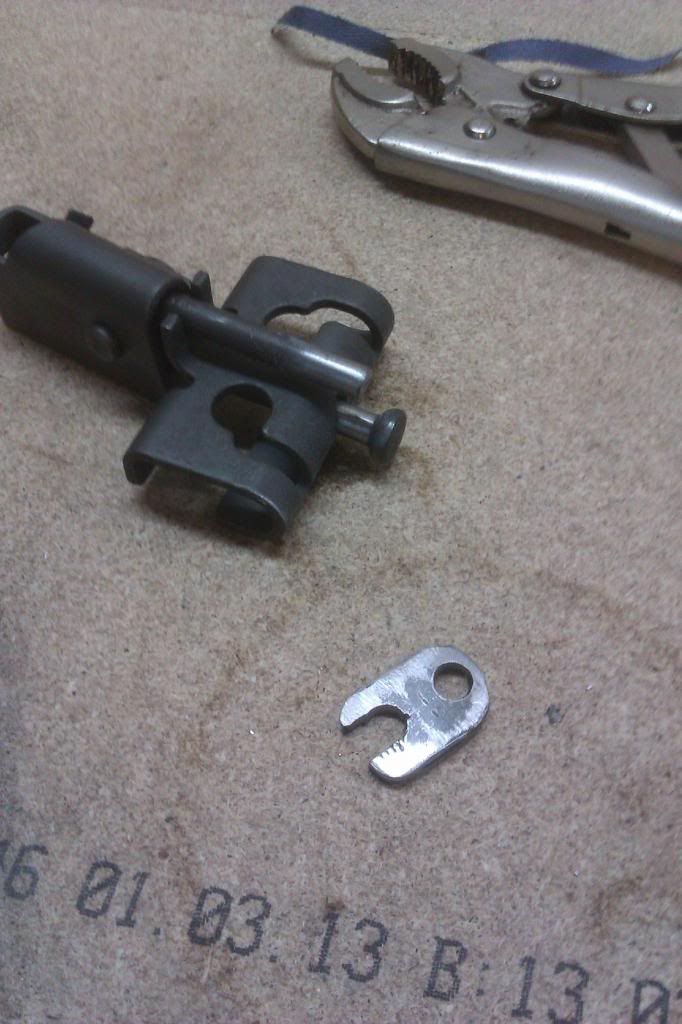
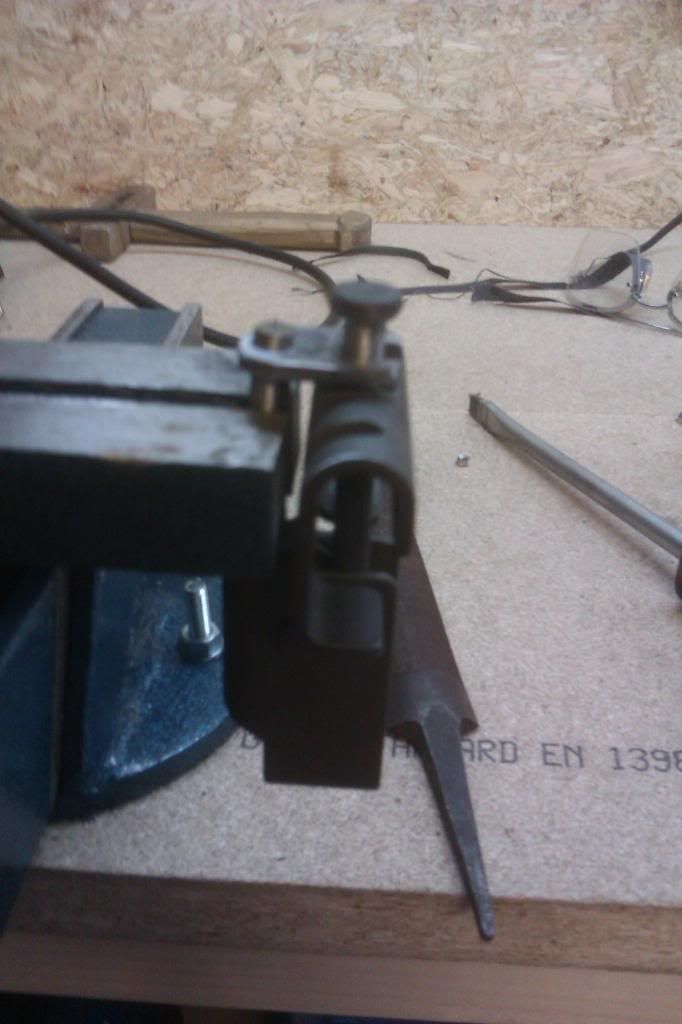
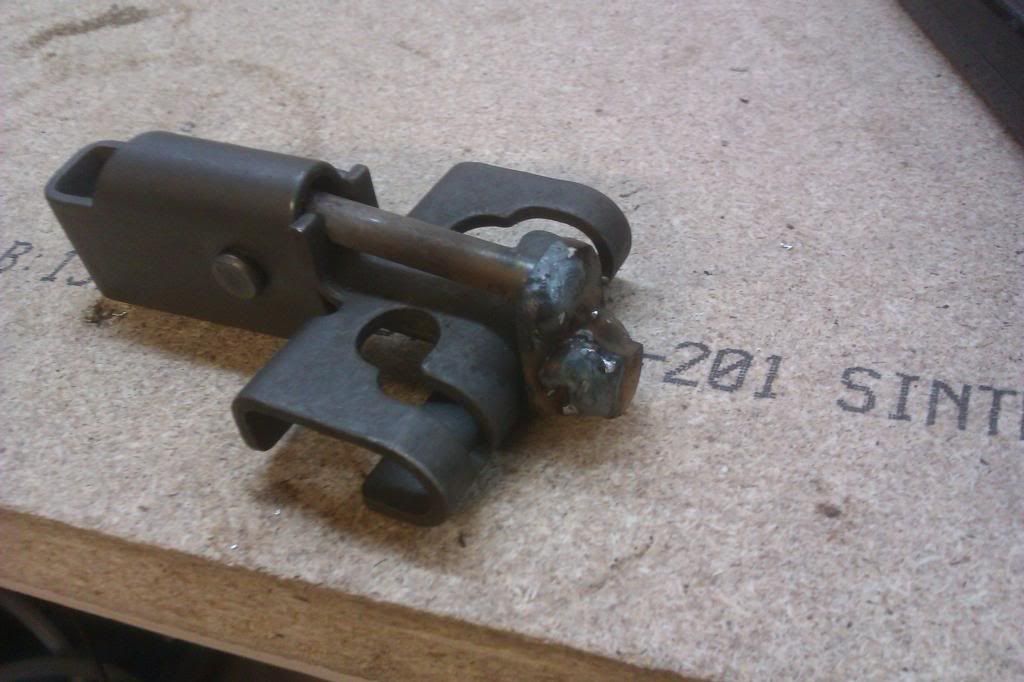
Love your modification  it seems strong and reliable and will probably last longer than the car. it seems strong and reliable and will probably last longer than the car.I modified mine yesterday, but in another way. I have to admitt that I did not bother to do the hassle to drilling up the bracket and removal of the crosspin to fit the shackle. Instead I fabricated a simple spacer/stiffener from 3mm sheet metal and MIG welded it in place. I think this should be more than good enough  Just thinking of mass-modification, these sheet metal pieces could be made by lazer/water jet cutting for a price each cheaper than the shackle itself if you order 50-100 pieces of them from the specialist`s. The mounting is pretty quick and simple. Just clean up the ends on the compensator, fit the spacer in the correct position and weld it in place. Some piccies:    P.S. My welds have never looked good.... Last edited by beinet1; 4th June 2013 at 08:24.. |
|
|

|
|
|
#376 | |
|
This is my second home
75 Contemporary SE Mk II 2004 Man. Sal. CDTi 135ps, FBH on red diesel, WinCE6 DD Join Date: May 2010
Location: Leeds
Posts: 17,273
Thanks: 2,160
Thanked 2,061 Times in 1,586 Posts
|
Quote:
The amount of stretch varies considerably. Some are so stretched that there just would not be room on the upper end for you to weld your bit of plate. Some are also bent or distorted sideways, due to the uneven adjustment at the hubs. Uneven adjustment makes the two cables different lengths, if this is beyond the range of the compensators ability to compensate, then the compensator bends. Which is why I keep stressing that when a modified compensator is installed, that the adjustment must also be done at the hubs, at the same time - be it one of Arctics, one of my compensators or a modification you devise yourself. A new or modified compensator can only adjust for a difference in the two cables of around 6mm. The method you used was one of the first methods I tried, but I rejected it due to to so many of the stretched compensators, not only being stretched in length, but being also being twisted due to imbalance at the hubs, plus the difficulty of fine tuning the gap between the two brackets. The 2 - 3mm gap needs to be there, to allow the unit pivot, to work as a compensator. I grind the end off the small peg or crosspin, strip out then reform the long 'nail part' to correct dimensions, reassemble then weld it all back up including welding the two ends of the 'nail' together so it can never suffer stretch again. I'm presently offering these ready modified compensators for just £7 including delivery, but please do not request one if you have no intention of returning your old one - I have now had several members take one of my modified units and run, which makes it difficult for me to maintain the service for more honest members.
__________________
Harry How To's and items I offer for free, or just to cover the cost of my expenses... http://www.the75andztclub.co.uk/foru...40#post1764540 Fix a poor handbrake; DIY ABS diagnostic unit; Loan of the spanner needed to change the CDT belts; free OBD diagnostics +MAF; Correct Bosch MAF cheap; DVB-T install in an ex-hi-line system; DD install with a HK amp; FBH servicing. I've taken a vow of poverty. To annoy me, send money. Last edited by HarryM1BYT; 4th June 2013 at 08:48.. |
|
|
|

|
|
|
#377 |
|
Give to Learn
Freelander 2 Join Date: Aug 2010
Location: West Midlands
Posts: 18,736
Thanks: 1,155
Thanked 6,407 Times in 3,874 Posts
|
Hi Einar
With it welded that close to both ends doe's it compensate left and right  or is it stiff, also i think i will stick to my tried and tested stainless steel version or is it stiff, also i think i will stick to my tried and tested stainless steel version  Arctic. Arctic.
__________________
Arctic Givology Learn to Give Everything is Achievable  ad altiora tendo. Check out our Nano meet dates http://www.midlandsnanomeets.co.uk/ http://www.the75andztclub.co.uk/index.php?thepage=howto " You do the work , we supply the expertise " |
|
|

|
|
|
#378 | |
|
Posted a thing or two
Rover 75 2.0 V6 Auto Join Date: May 2011
Location: Sandnes - Norway
Posts: 1,560
Thanks: 64
Thanked 283 Times in 174 Posts
|
Quote:
Thanks for clarifying that up  Mine seems to work quite well now. It wasn`t to badly stretched making me able to do the mod I did. I have 1-2mm gap in the compensator and it allowsfor neccesary sideway play. I have still not adjusted the drums, but I plan to open them up sooner or later and maybe replace the brake shoes also. |
|
|
|

|
|
|
#379 | |
|
This is my second home
Rover 75 Saloon Join Date: Aug 2007
Location: Avignon
Posts: 4,466
Thanks: 94
Thanked 661 Times in 554 Posts
|
Quote:
I did exactly the same thing as you and works perfectly without drum adjust . (MOT congratulations  ) ) |
|
|
|

|
|
|
#380 | |
|
This is my second home
75 Contemporary SE Mk II 2004 Man. Sal. CDTi 135ps, FBH on red diesel, WinCE6 DD Join Date: May 2010
Location: Leeds
Posts: 17,273
Thanks: 2,160
Thanked 2,061 Times in 1,586 Posts
|
Quote:
I consider the adjustment at the hubs to be an essential part of the process, simply because the compensator design (be it as original, welded, or with a shackle) does not permit very much compensation in its design.
__________________
Harry How To's and items I offer for free, or just to cover the cost of my expenses... http://www.the75andztclub.co.uk/foru...40#post1764540 Fix a poor handbrake; DIY ABS diagnostic unit; Loan of the spanner needed to change the CDT belts; free OBD diagnostics +MAF; Correct Bosch MAF cheap; DVB-T install in an ex-hi-line system; DD install with a HK amp; FBH servicing. I've taken a vow of poverty. To annoy me, send money. Last edited by HarryM1BYT; 4th June 2013 at 11:41.. |
|
|
|

|
 |
|
|