
|
|
|
|
|
|
||
|
|
||
 16th August 2011, 22:22
|
#221 | |
|
This is my second home
Rover75 and Mreg Corsa. Join Date: Nov 2006
Location: Sumweer onat mote o'dust (Sagin)
Posts: 21,753
Thanks: 341
Thanked 3,660 Times in 2,924 Posts
|
Quote:
Anyone know how much thread is there on the cable? Is it only 25mm plus the depth of the nut? TC |
|

|

|
|
16th August 2011, 23:08
|
#222 | |
|
Give to Learn

Freelander 2 Join Date: Aug 2010
Location: West Midlands
Posts: 18,716
Thanks: 1,155
Thanked 6,407 Times in 3,874 Posts
|
Quote:
Note the gap Fig 1/2  1 1 2 2In this fig 3 note top bar is 41mm  3 3In this stretched one it's only 30mm Fig 4  4 4Now in Fig 5 you see a stretched one which as been modified by Harry  top bar length is again 41mm problem solved top bar length is again 41mm problem solved  and for the price of a few stamps bargain of the year i would say. and for the price of a few stamps bargain of the year i would say.  5 5All three together Fig 6  6 6If i get chance i will put a tube spacer on Carls car with my stretched compensator and pull it as hard as i can once it as been adjusted to the 25mm and see what happens Arctic My Stainless Steel compensator 
__________________
Arctic Givology Learn to Give Everything is Achievable  ad altiora tendo. Check out our Nano meet dates http://www.midlandsnanomeets.co.uk/ http://www.the75andztclub.co.uk/index.php?thepage=howto " You do the work , we supply the expertise " Last edited by Arctic; 28th March 2012 at 01:40.. |
|
|
|
|
|
17th August 2011, 14:02
|
#223 |
|
Newbie
Rover 75 CDTi Conn SE Join Date: Sep 2009
Location: Uckfield
Posts: 22
Thanks: 7
Thanked 1 Time in 1 Post
|
Thanks to all for the info and conclusions with the compensator. Intend to do the mod, however while the rear carpet cutting technique is quick I would prefer to not be so damaging and get to the compensator the hard way. Is there a 'How to' to remove all the components and to peel back the carpet etc to gain access to the compensator. I gather there is no need to remove the front seats.
Thanks in anticipation. |
|
|
|
|
17th August 2011, 18:33
|
#224 | |
|
This is my second home
75 Contemporary SE Mk II 2004 Man. Sal. CDTi 135ps, FBH on red diesel, WinCE6 DD Join Date: May 2010
Location: Leeds
Posts: 17,273
Thanks: 2,160
Thanked 2,061 Times in 1,586 Posts
|
Quote:
__________________
Harry How To's and items I offer for free, or just to cover the cost of my expenses... http://www.the75andztclub.co.uk/foru...40#post1764540 Fix a poor handbrake; DIY ABS diagnostic unit; Loan of the spanner needed to change the CDT belts; free OBD diagnostics +MAF; Correct Bosch MAF cheap; DVB-T install in an ex-hi-line system; DD install with a HK amp; FBH servicing. I've taken a vow of poverty. To annoy me, send money. |
|
|
|
|
|
17th August 2011, 19:15
|
#225 | |
|
This is my second home
Rover 75 CDT Manual Connoisseur SE, Rover 75 CDT Automatic Connoisseur SE & a Freelander Td4. Join Date: Jul 2009
Location: Hampshire
Posts: 11,550
Thanks: 3,470
Thanked 3,119 Times in 2,247 Posts
|
Quote:
Can't remember if there was enough room to unclip the rear cables to the compensator without removing the centre consul though, but if you slacken the adjusters it might be do-able. Mike Last edited by Mike Noc; 17th August 2011 at 19:57.. |
|
|
|
|
|
17th August 2011, 19:31
|
#226 |
|
Newbie
Rover 75 CDTi Conn SE Join Date: Sep 2009
Location: Uckfield
Posts: 22
Thanks: 7
Thanked 1 Time in 1 Post
|
Thanks guys for the suggestions, I want to avoid going under the car and disturbing the exhaust etc. What I was looking to do is the minimum strip out to get to the cover plate that covers the compenstor. I realise cutting the carpet is the easiest route, as mentioned I don't want to damage the carpet. Wondered if there is a 'How to' guide explaining the steps to remove all the necessary parts, I thought I read somewhere that the radio and centre consul come out first and mention of how the carpet is lifted behind the seats to get to the cover plate. Grateful if someone can point me to the information.
|
|
|
|
|
17th August 2011, 20:13
|
#227 |
|
This is my second home
ZT400 Join Date: Oct 2006
Location: Ellesmere
Posts: 5,948
Thanks: 0
Thanked 43 Times in 29 Posts
|
A really good thread troops
I didn't know you could even get at stupid thing from the top, I never even looked! I have worked on them from below, ideally you have to drop the exhaust to get sufficient access via the rubber access panel, it is easy enough to get the compensator out but it is an absolute pita releasing the clips using the tool as described in the "manual" to remove the rear cables the top access method would be a much better diy (albeit time consuming) way if also changing the cables. I had never seen a "healthy" compensator so had not twigged the stupid thing was unwinding itself under use. 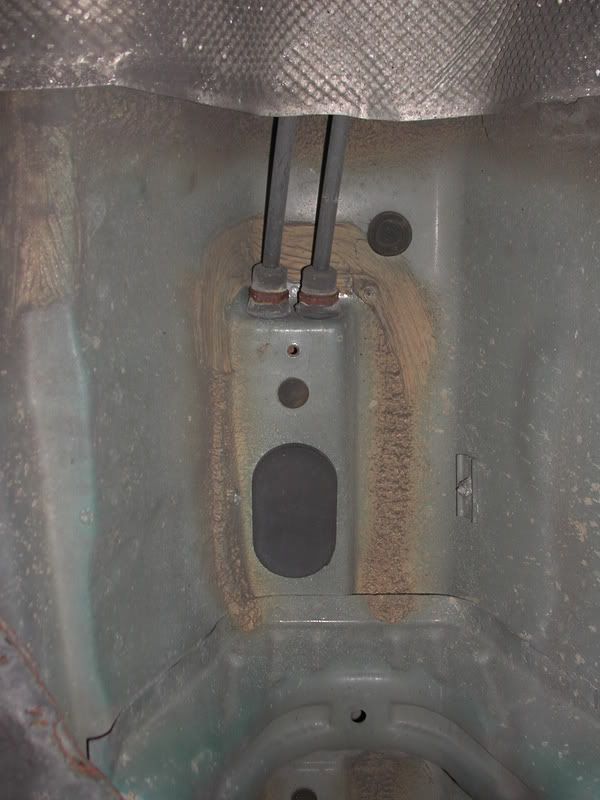 Ironically on my V8 the handbrake is well sorted but should I ever start to go down the ripping the handle out the floor and still not holding route then I will be welding the little ****** up. |
|
|
|
|
17th August 2011, 20:58
|
#228 | |
|
Give to Learn
Freelander 2 Join Date: Aug 2010
Location: West Midlands
Posts: 18,716
Thanks: 1,155
Thanked 6,407 Times in 3,874 Posts
|
Quote:
check out from post 21-27 Stocktake (Dave) taking his console out and carpet back http://www.the75andztclub.co.uk/foru...t=88200&page=3 The new way to fit compensator http://www.the75andztclub.co.uk/foru...46&postcount=2
__________________
Arctic Givology Learn to Give Everything is Achievable ad altiora tendo. Check out our Nano meet dates http://www.midlandsnanomeets.co.uk/ http://www.the75andztclub.co.uk/index.php?thepage=howto " You do the work , we supply the expertise " Last edited by Arctic; 30th March 2014 at 11:16.. |
|
|
|
|
|
19th August 2011, 14:33
|
#229 |
|
Give to Learn
Freelander 2 Join Date: Aug 2010
Location: West Midlands
Posts: 18,716
Thanks: 1,155
Thanked 6,407 Times in 3,874 Posts
|
Hi Matt1960 & Members.
I managed to source a stainless steel shackle with just enough inside length to fit into the compensator this could well be the best it is going to get  i have been thinking along with other members, of every which way to do this from the one i bent round and had welded which is now on my car to this one i managed to put together today after taking my old one apart which and stretched by 14mm. i have been thinking along with other members, of every which way to do this from the one i bent round and had welded which is now on my car to this one i managed to put together today after taking my old one apart which and stretched by 14mm.After some fettleling drilling and grinding i think i may have come up with the best this mod is going to get as far as stretching the compensator bar is involved replaced the U bend bar with a stainless steel one  this could not bend or distort surely anyways here are the pics below. this could not bend or distort surely anyways here are the pics below. First i ground down the pin and tapped it out then cut of the old flatened end of compensator bar so it could be removed then i set about grinding doen the one end of the shackle so it would fit through the compensator i had to drill the hole to help this also. Note no welding on this compensator Fig 1  1 1I center punched the pin then cross punched it making it tight once again Fig 2  2 2The top of the new stainless steel rod the pin would need to be ground down Fig 3  3 3In this photo you can see from above the 3mm gap which is needed as on a new compensator. Fig 4  4 4Note how the end of the shackle as be ground down to fit through the rear part of the compensator which the two cables fit Fig 5  5 5Now the top of the shackle pin as be ground down to make it nice and tidy also to fit under the fixing plate Fig 6  6 6This last photo shows once the pin and been tightened i have punched the thread open so it can not work loose Fig 7  7 7
__________________
Arctic Givology Learn to Give Everything is Achievable ad altiora tendo. Check out our Nano meet dates http://www.midlandsnanomeets.co.uk/ http://www.the75andztclub.co.uk/index.php?thepage=howto " You do the work , we supply the expertise " Last edited by Arctic; 19th August 2011 at 19:15.. |
|
|
|
|
19th August 2011, 15:55
|
#230 |
|
Loves to post
2.0 v6 auto connoisseur Join Date: Jun 2011
Location: cupar,fife
Posts: 352
Thanks: 0
Thanked 0 Times in 0 Posts
|
if rover was still on the go you'd get a job as a design engineer
|
|
|
|
 |
|
|


 Linear Mode

