
|
|
|
|
|
|
||
|
|
||
 22nd May 2012, 22:21
|
#21 |
|
This is my second home
Rover less ! Join Date: Jun 2011
Location: Tarbolton
Posts: 3,442
Thanks: 393
Thanked 888 Times in 542 Posts
|
This is the bracket I referred to in post 19.
This is situated on the diesel models just under the rear bumper on drivers side. 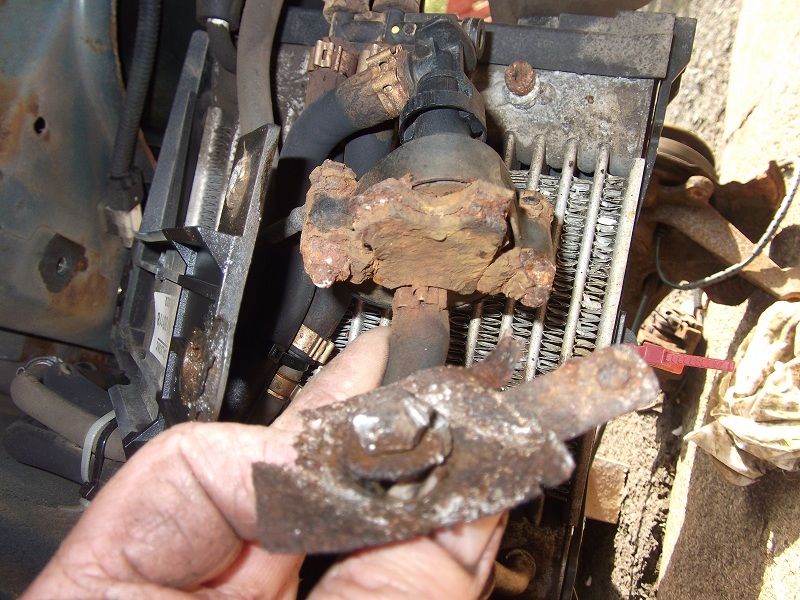 and this was the remains after removal, it has completely disintegrated. I have manufactured a new and simpler bracket. The wire is obviously just to earth the radiator I assume as an anti static safety measure.  And the missing upper links. I refered to them as the lower links in an earlier post but they do sit at the top of the rear suspension assembly. My confusion was because they sit below the springs. 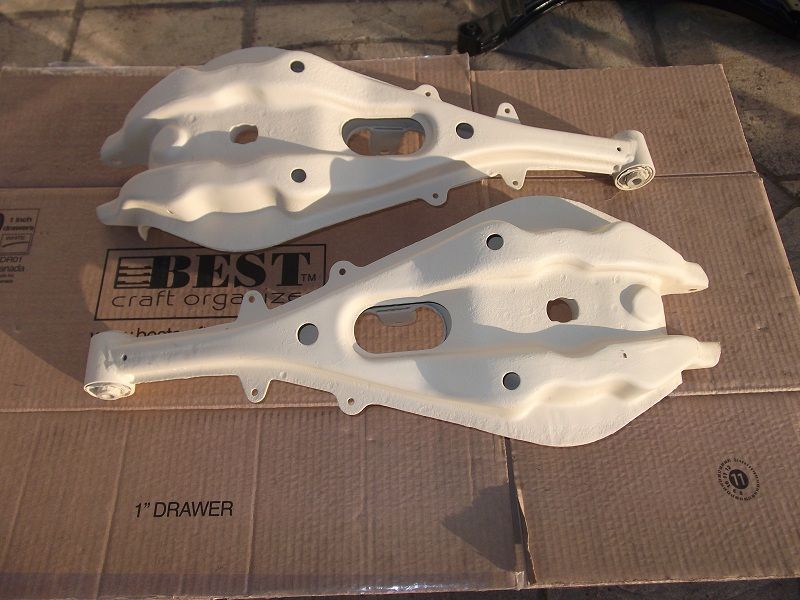 Anyway they have now been given the paint treatment. You may note I'm now on a different primer, my second 1 litre tin and that's just the primer. This is a view of the underside. It shows most of the spot welds have some corrosion around them, also there is a small area of corrosion on the spring supports. 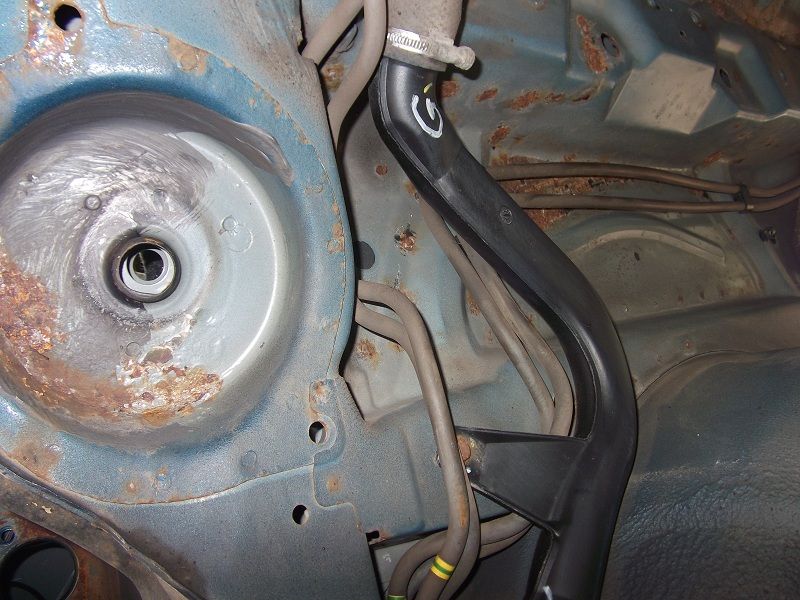 These have also been sanded down to bare metal, primed and painted as shown below. 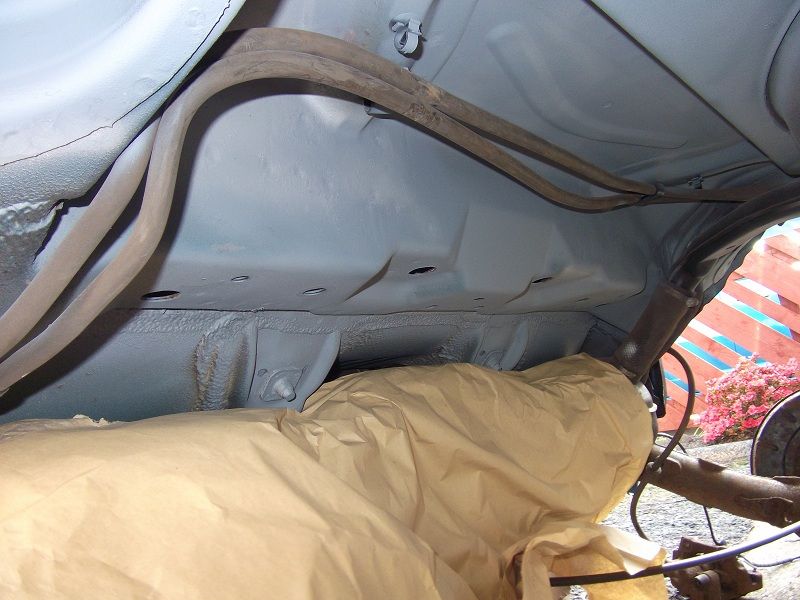 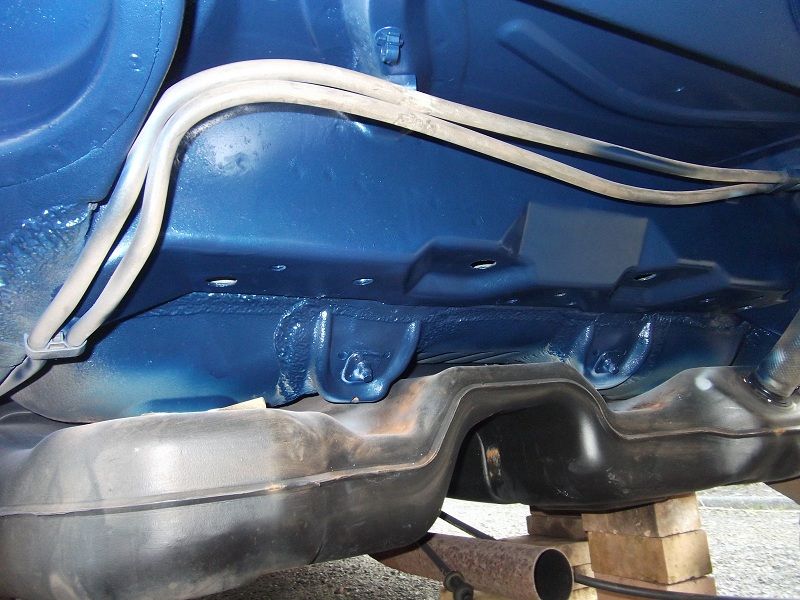 I had some spare 2 pack paint in two different blues so I mixed them to get as close to the body colour as possible. As this amounted to about 3/4 litre I has sufficient paint left to tidy up the inner wheel arches as well. First of all I removed the plastic liners and gave them a thorough clean removing 10 years of tar spots. 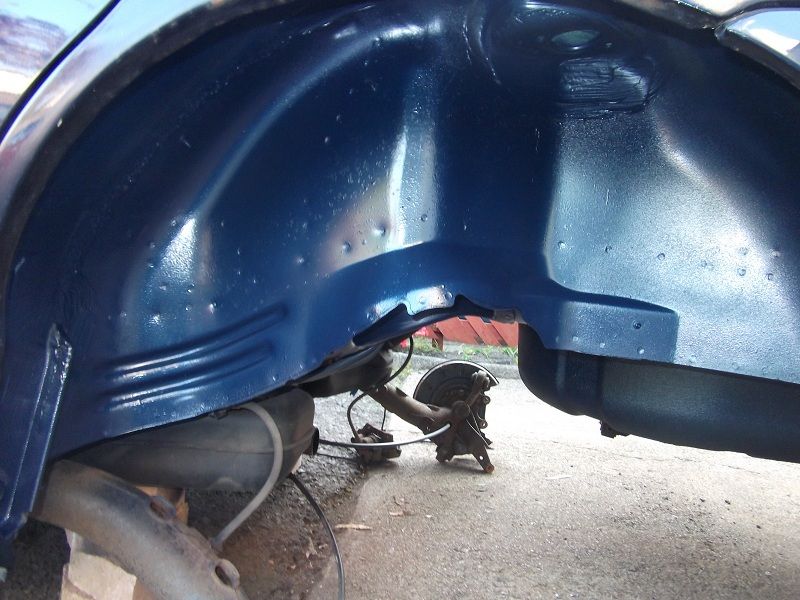 Today I finally managed to start rebuilding something and re fitted the tank support bracket and some other small items. I have also fitted the upper arms and anti roll bar fitted onto the subframe in preparation for re fitting to the car. I have also rebuilt the shockers back onto their mounts ready for fitting and finally the trailing arms have been de rusted and painted. I'm going to have a rest tomorrow as the weather is beatiful up here in Scotland so me and the missus are going out for lunch. JYJ |

|

|
|
22nd May 2012, 22:31
|
#22 |
|
This is my second home
None * DROWNED Join Date: Aug 2007
Location: Cardigan
Posts: 33,339
Thanks: 1,257
Thanked 1,664 Times in 1,081 Posts
|
__________________
Andrew Ich Dien Problem solving is... lateral thinking SEARCH FIRST ...ASK LATER...  |
|
|
|
|
25th May 2012, 22:25
|
#23 |
|
This is my second home
Rover less ! Join Date: Jun 2011
Location: Tarbolton
Posts: 3,442
Thanks: 393
Thanked 888 Times in 542 Posts
|
The missus says I've been over doing things a bit lately and I don't mean the suspension work. I've had to take a little break as my old joints are starting to act up but I have actually managed to get the rear put together.
My son also says I'm crazy and that his Mothers' car will be the cleanest 75 in the scrapyard in a few year time.  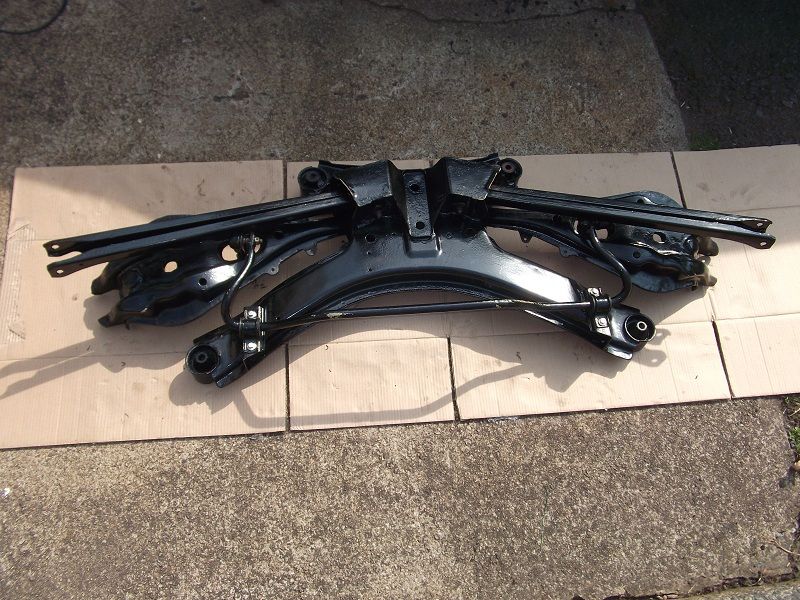 I assembled the subframe before fitting to the car and used the old bolts for the inner side of the suspension links but fitted new ones to the outside/hub area. I lubricated them with a little copper grease to prevent any future siezures. My first attempt at placing it under the car using the trolley jack resulted in the anti roll bar getting some paint scraped off it, so back out it came. I then tied both upper and lower arms together with wire to stop them flapping about and slid completed subframe under the car using a sheet of cardboard then by raising the whole unit up a little at a time and resting it on wooden blocks until it was high enough to place the trolley jack under the centre position for best balance as shown below. 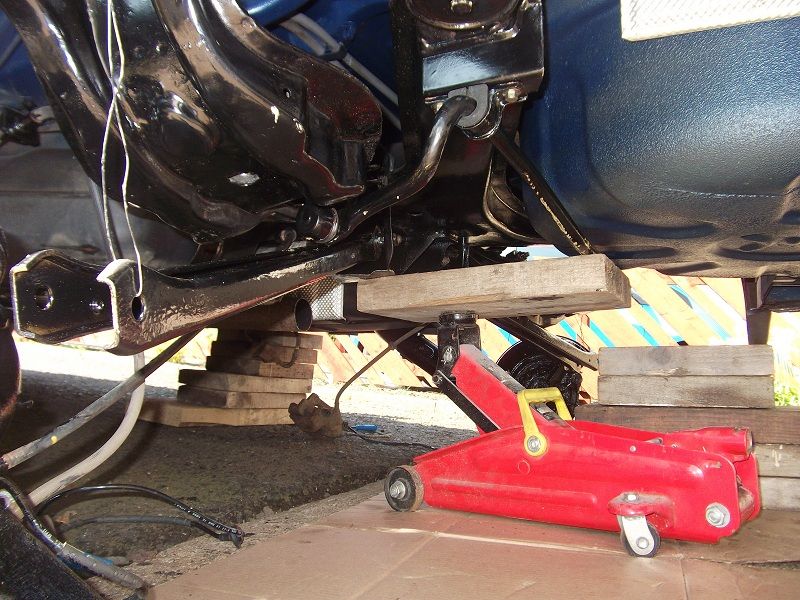 Note the trolley jack and woooden board support the subframe and bridging back onto the anti roll bar. If placed under the subframe alone it would tilt backwards. Then it was just a case of raising the jack up to the required height and screwing in the four subframe mount studs. I then had to drop the anti roll bar by removing the bushes and brackets to allow movement of the upper links for spring re fitting. I then re fitted the new springs after giving the ends of the coils both top and bottom a liberal coating of copper grease and making sure the coils on both springs were facing inwards. Attaching the upper links was relatively easy but with careful use of the jack and block of wood it was a squeeze getting the lower ones on, only for them to come back off again as I forgot to re locate the caliper assembly through between the two links.  The rest was easy, re fitting the aerofoil to the O/S lower link, the now assembled shock absorbers and re routing the ABS sensors using new fixing clips. Finally I gave the rear disc/drum a good clean up (they were renewed just last year) and manually adjusted the handbrake again, and re fitted the caliper assembly using new studs this time as the old ones were now rather rusty. So here it is after almost a month off the road the car is ready to be turned around and the front end started. 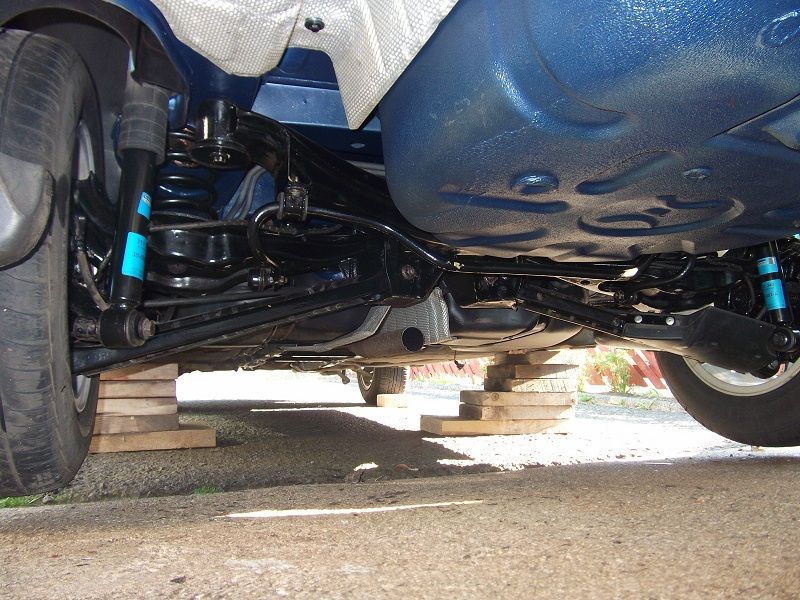 But just before lowering the car I removed the rusty bracket which should have been securing the FBH fuel pump. This is located just forward of the fuel tank. 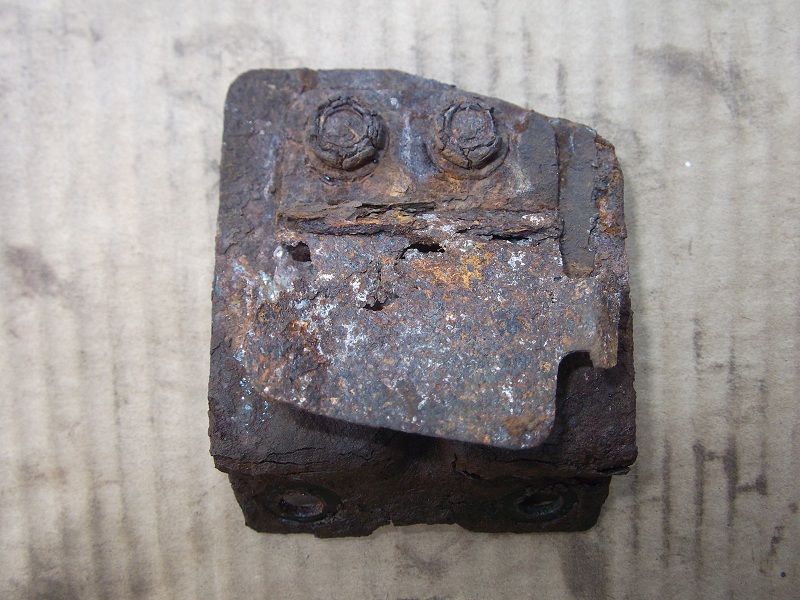 This bracket has already been de rusted a dipped in paint twice but as it is a two part bracket with the second part completely rusted away I will need to fabricate something else to re mount the fuel pump which is also very rusty and This will be removed for further testing before I de rust it completely. I have already started the car up with no silencer and it's amazing just how quiet it is but of course diesels' are always quiet It has now been turned round on the driveway facing the workshop and jacked up ready for part two but just before retiring for the evening I have given all the nuts etc a good spray of penetrating fluid, especially the strut clamp bolt. JYJ Last edited by Jim Jamieson; 25th May 2012 at 22:33.. Reason: Additional text (Itallics) |
|
|
|
|
25th May 2012, 22:44
|
#24 |
|
This is my second home
None * DROWNED Join Date: Aug 2007
Location: Cardigan
Posts: 33,339
Thanks: 1,257
Thanked 1,664 Times in 1,081 Posts
|
Well done Jim,

__________________
Andrew Ich Dien Problem solving is... lateral thinking SEARCH FIRST ...ASK LATER... |
|
|
|
|
25th May 2012, 22:54
|
#25 |
|
This is my second home
01 75 tourer cdt,1973 Rover 3500S,,1974 Rover 3500 Auto,1998 216 SE Coupe, 1968 Morris Minor 1000 Join Date: Jul 2010
Location: bangor/down
Posts: 4,839
Thanks: 62
Thanked 184 Times in 158 Posts
|
Jim my hats of to you
I would have only one big problem, after all that.I would be scared to drive it and get it dirtied or chipped.The car car looks excellent underneath.
__________________
Regards Neale [SIGPIC][/SIGPIC] 121st 75 Tourer to be made 15th 75 Tourer CDT Club SE to be made 36th 75 Tourer in Zircon Silver Metallic to be made Membership No 903 I was one of the 541
|
|
|
|
|
26th May 2012, 11:27
|
#26 | |
|
This is my second home
fiat panda Join Date: Sep 2009
Location: haverhill
Posts: 6,720
Thanks: 96
Thanked 586 Times in 526 Posts
|
Quote:
__________________
fiat panda 1.2 eco |
|
|
|
|
|
30th May 2012, 21:42
|
#27 |
|
This is my second home
Rover less ! Join Date: Jun 2011
Location: Tarbolton
Posts: 3,442
Thanks: 393
Thanked 888 Times in 542 Posts
|
Many thanks for all your comments, it's been a long slog and also a bit painful for me with dicky knee joints, perhaps I should be getting them overhauled instead but here we are on part two ;
The front suspension has now been entirely stripped out of the car including the sub frame. It took me a good days work and strangely enough the only two awkward parts were ; 1/ Removing the newest part fitted to the car namely the drop links. For some reason the nut was so tight to remove I had to use copious ammounts of penetrating oil to get it off. These were fitted just over a year ago so it surprised me just how tight they were. 2/ Removing the two studs which secure the transmission oil cooler one of them decided to seize up mid way with the lock nut (which is brass) turning inside the casing. After wasting a good half hour I decided to disconnect the entire cooler from the two water pipes and oil supply lines. Once it was off it was much easier to get at and release the offending nut so I re fitted the cooler back onto the respective hoses. Back to the removal of the suspension, well it was relatively straight forward, after the car was securely mounted up on blocks, as I've stated before I prefer wooden blocks to axle stands. After removing the wheel, brake caliper assembly, drop link (lower end only), ABS & brake pad sensor, anti roll bar and track rod end I was now ready for what I thought would be difficult, the strut pinch bolt and lower arm bolt but both came off with ease. With the hub assembly now off and placed on support blocks the main struts were removed. I then set about removing the sub frame as besides wanting to de rust it and paint it, I also reckoned it would be easier to remove the lower arm rear rubber bush assemblies which were being replaced. Removal of the sub frame involves removal of the exhaust system but as you will note I have already removed the tail silencer so removing the remainder was easy. You also have to undo the 4 studs securing the steering rack and tie it up for support, the 2 power steering pipe clamps, the auto transmission oil cooler (if applicable) and the lower engine support bracket bolt. I used a trolley jack with a wooden block to support the underside of the engine to assist removing this bolt. I then supported the subframe on a series of blocks and removed all six mounting studs. This done it was case of lowering the subrame by removing the blocks carefully until the sub frame was on the ground. I found I could temporarily remove the jack supporting the engine and slide the entire sub frame out from under the car then I placed a block back in place to keep the engine supported. Here is the sub frame complete with anti roll bar and lower arms etc still in place. 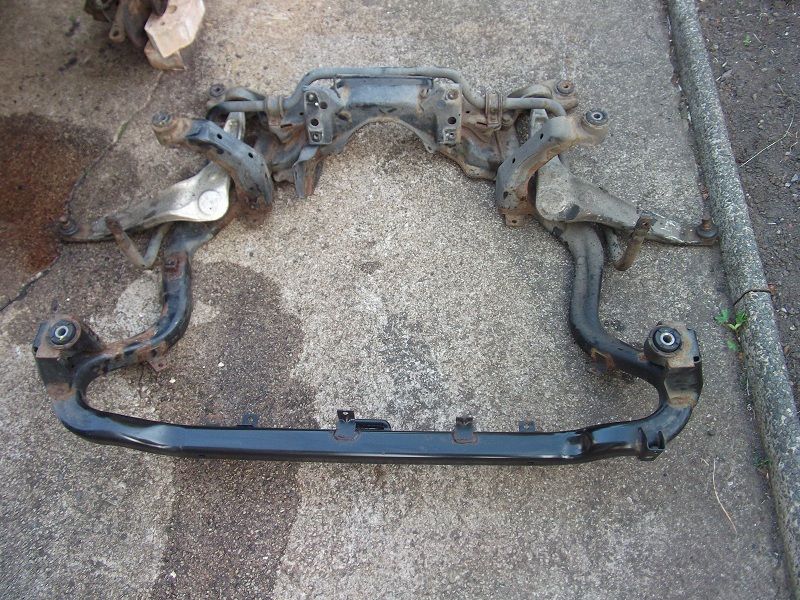 I have removed the anti roll bar and lower arm rear mounts but the lower arms are still in place because I was having difficulty in removing them, however as they are not worn I can simply clean them up still attached to the sub frame. I would like to replace the rubber seals and re grease them before re fitting though. Now onto the struts here is the N/S one showing the assist spring completely destroyed. On stripping this down the shock absorber was completely un serviceable. 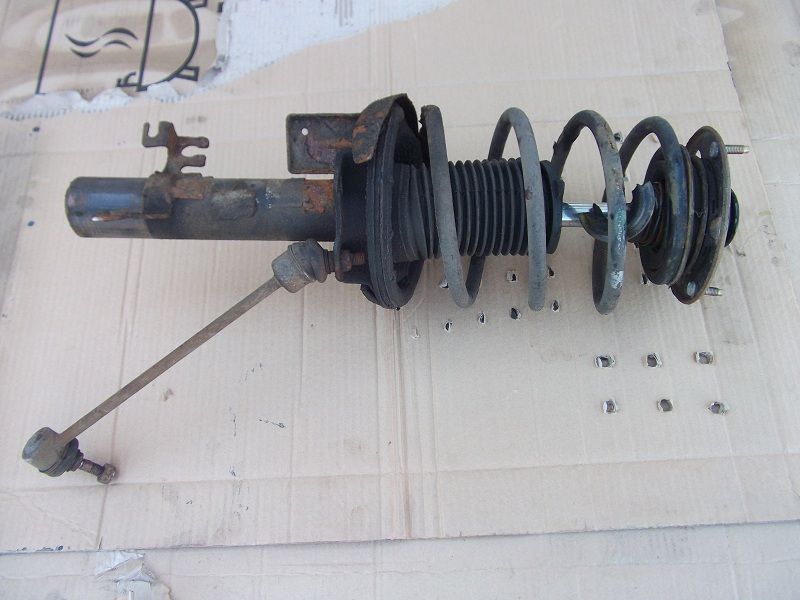 Here is one of the struts prior to stripping, I purchased this tool rather than borrowing one which I have always had to do previously. Note the locking plates around the spring to prevent disconnection, you certainly don't want one of these slipping off during the removal process. 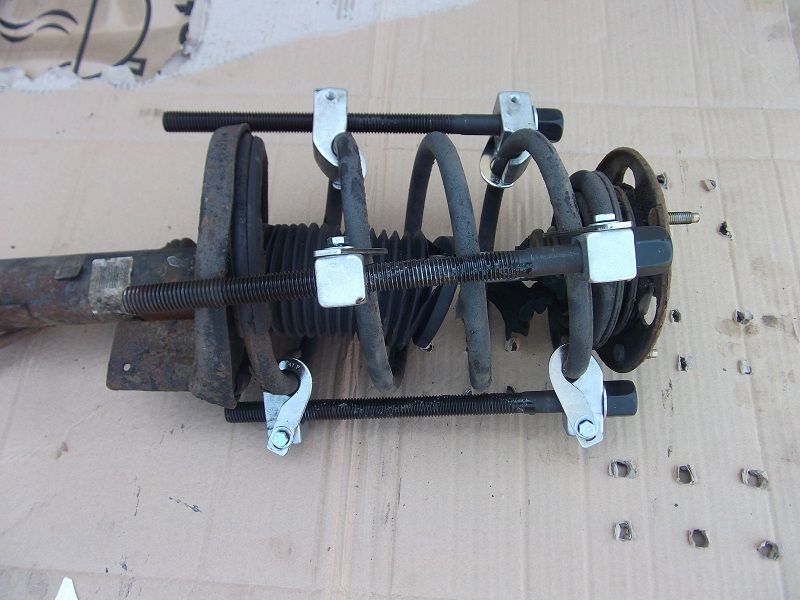 And this shows the O/S strut stripped down. This one is actually still in a serviceable condition, even the rubber gaitor and assist spring are still in good condition as are both front springs. 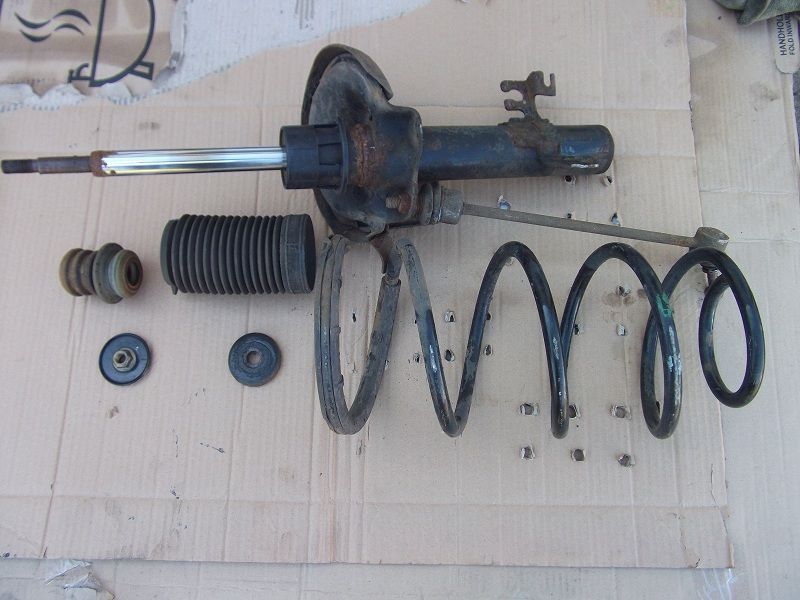 This shows both the old and the new springs. 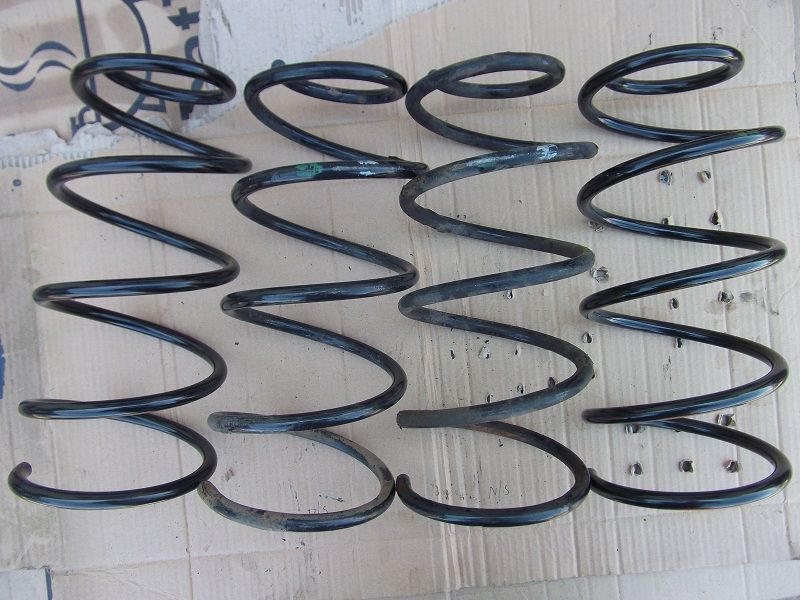 And the old and new rubber gaitors & assist springs. 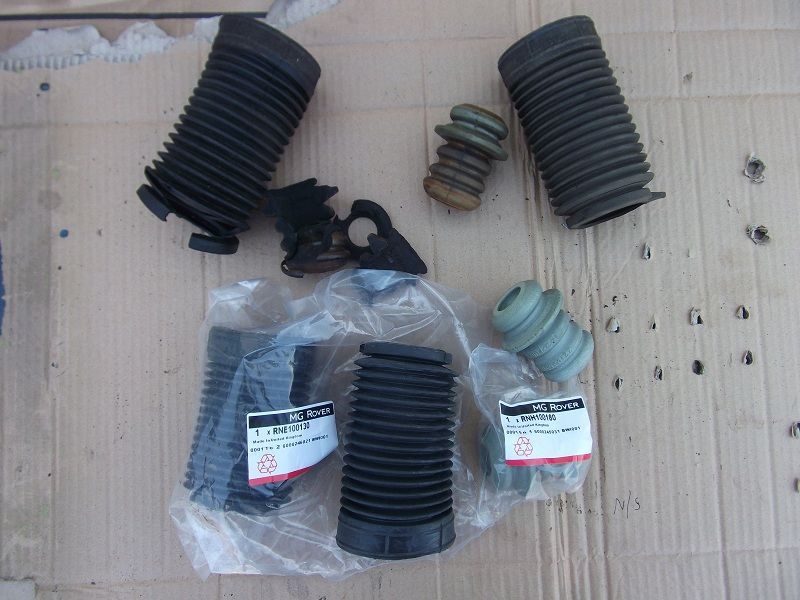 In preparation for re assembly of the struts I have devised a way to remove the upper bearing for cleaning and re greasing. By carefully inserting a small electrical screwdriver under the seal/retainer ring, this can be removed. Then remove the metal ring and the bearing assembly as shown. After cleaning I inserted some grease into the bearing casing then pressed the bearing assembly into the grease followed by the outer metal ring. Then re fit the seal/retainer back into postion noting it is located on the respective lugs. Any excess grease will be pushed out as shown on the next photo. This can then simply be wiped off leaving the upper bearing now ready for re assembly onto the top of the strut. 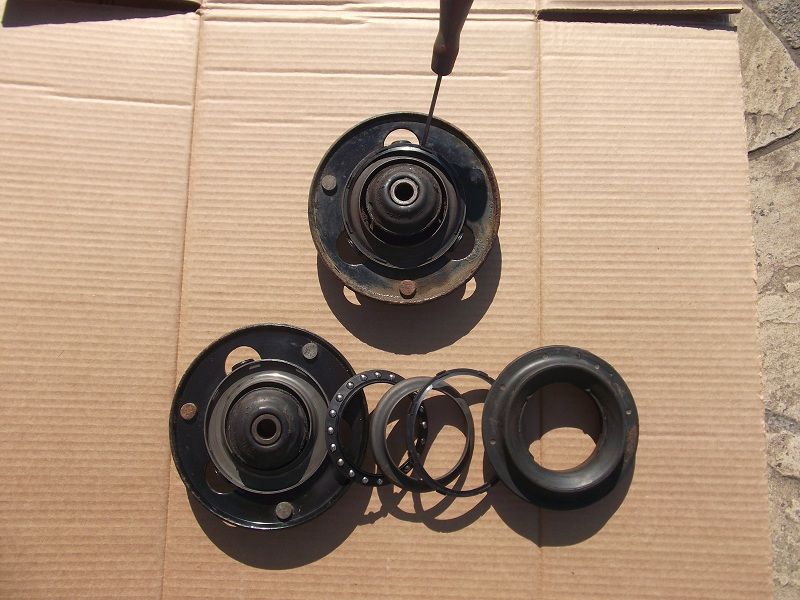 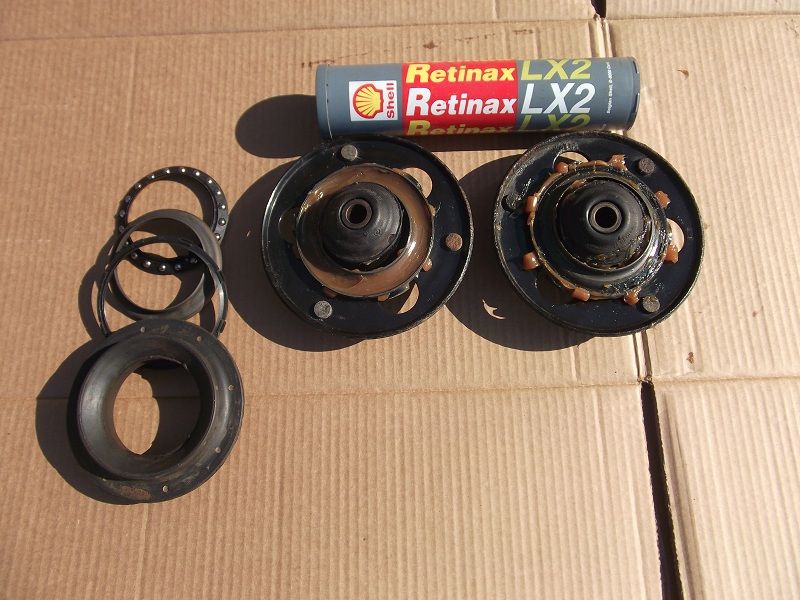 I use Shell Retinax LX2 grease for this but any good quality grease should suffice. My next task is to clean up the sub frame and paint it, this time using the air grinder as it is not as badly corroded as the rear sub frame was. I will be replacing the rear mounts on the lower arms then after a thorough clean up on the underside of the car the sub frame will be re fitted. JYJ |
|
|
|
|
4th June 2012, 22:52
|
#28 |
|
This is my second home
Rover less ! Join Date: Jun 2011
Location: Tarbolton
Posts: 3,442
Thanks: 393
Thanked 888 Times in 542 Posts
|
Now that I've had a couple of days rest, today I spent a good few hours just cleaning up the front hubs and brake calipers for painting.
I note from a few other posts on this subject many just wire brush the rust away. Well IMO the rust will be be so hard simply brushing will not remove it. For many years I have used the same method as passed to me by a old mechanic whilst I was just an apprentice. That is chip all the rust away using a sharp chisel, we actually used a hammer but that was with HGV stuff. With a sharp chisel, I prefer using a selection of ordinary wood chisels i.e. a narrow one and a wide one and chip the rust away until you are down to the bare metal. It's painstaking work and a word of caution ensure that you wear protective goggles as the small rust chips will fly all over the place so beware. The finished job is only as good as the preparation and yes I know sand blasting would also get a very good finish but this means extra cost and the parts have to be removed from the car. I have decided that spending time removing the rust manually would be just as quick as using the sand blast method. After all the rust was chipped away I dressed up some of the easy to get at surfaces with the grinder then gave the area a good blow out of all the dust with the air blow gun. Finally a wipe down with a rag soaked in thinners then it was on with the first coat of Hammerite brushing it in well to all the nooks and crannies. I will leave this for at least one day before a second coat and in the meantime I am now ready to re assemble the front struts tommorow and will post some more photos then. Remember to use proper eye protection JYJ |
|
|
|
|
5th June 2012, 10:04
|
#29 |
|
I really should get out more.......
ZT CDTi 135, ZT260SE Join Date: Feb 2011
Location: Dundee
Posts: 2,877
Thanks: 10
Thanked 331 Times in 213 Posts
|
Jeeesus, I thought I was OCD.
Well done Jim, thats a fine lot of work and looks great. Thats far too much grease for the top bearings though, it will just attract dirt! They only need a good smear! |
|
|
|
|
5th June 2012, 15:30
|
#30 | |
|
This is my second home
Rover less ! Join Date: Jun 2011
Location: Tarbolton
Posts: 3,442
Thanks: 393
Thanked 888 Times in 542 Posts
|
Quote:
JYJ |
|
|
|
|
 |
| Thread Tools | |
| Display Modes | |
|
|


 Linear Mode

