
|
|
|
|
|
|
||
|
|
||
 24th February 2023, 08:53
|
#11 | |
|
Gets stuck in
75 Saloon Join Date: Apr 2022
Location: North Somerset
Posts: 559
Thanks: 13
Thanked 20 Times in 8 Posts
|
Quote:
 I think I found all the pieces. I think I found all the pieces.
__________________
Matt 2001 Rover 75 Connoisseur SE 2.5 (BRG) 1999 Rover 75 Club 2.5 (Dorchester Red) 1973 Triumph Dolomite (Honeysuckle) |
|

|

|
|
24th February 2023, 09:05
|
#12 | |
|
Vis Whiz

Rover 75 2.5 auto Saloon Join Date: Jun 2007
Location: LEEDS
Posts: 20,593
Thanks: 2,057
Thanked 3,056 Times in 1,621 Posts
|
Quote:

__________________
Dave...  Lost a few stones  and a Gall Bladder and part of a bile duct and all of my dignity in the suppository incident and a Gall Bladder and part of a bile duct and all of my dignity in the suppository incident
|
|

|
|
|
25th February 2023, 15:52
|
#13 |
|
Gets stuck in
75 Saloon Join Date: Apr 2022
Location: North Somerset
Posts: 559
Thanks: 13
Thanked 20 Times in 8 Posts
|
Here's the stripped down and cleaned mechanism:
 I hope this is everything after the disassembly explosion! There are six screws missing from this picture that are in a separate tray. It'll get a final check over and before being reassembled. Looking down on the gear mechanism, it rotates anti-clockwise when raising the blind, so it's important that the spring is correctly tensioned to assist this.
__________________
Matt 2001 Rover 75 Connoisseur SE 2.5 (BRG) 1999 Rover 75 Club 2.5 (Dorchester Red) 1973 Triumph Dolomite (Honeysuckle) Last edited by Matt_75; 25th February 2023 at 15:54.. |
|
|
|
|
25th February 2023, 20:17
|
#14 | |
|
This is my second home
Rover 75 Saloon & Tourer Join Date: Sep 2012
Location: Lincoln
Posts: 14,938
Thanks: 1,630
Thanked 3,032 Times in 2,181 Posts
|
Quote:
 macafee2 |
|
|
|
|
|
25th February 2023, 20:19
|
#15 | |
|
This is my second home
Rover 75 Saloon & Tourer Join Date: Sep 2012
Location: Lincoln
Posts: 14,938
Thanks: 1,630
Thanked 3,032 Times in 2,181 Posts
|
Quote:
macafee2 |
|
|
|
|
|
25th February 2023, 21:20
|
#16 |
|
Gets stuck in
75 Saloon Join Date: Apr 2022
Location: North Somerset
Posts: 559
Thanks: 13
Thanked 20 Times in 8 Posts
|
I decided to do a dry reassembly run before greasing it all up. Here is how I put it back together.
1. Attach the spring to the large diameter wheel, ensuring the outer tang locates properly in the groove as shown at the top of this photo.  2. The inner tang now needs to locate in this slot near the brass bushing in the main body. This is a bit fiddly and I used a pick tool to help locate it.   3. Insert the torx screw that acts as a stop for the mechanism to prevent over-rotation. In hindsight, this could be done first.  4. Locate the shaft of the smaller diameter wheel in the corresponding blind hole.  5. Put the brown coloured smaller diameter wheel onto the shaft ensuring it meshes with the large diameter wheel properly.  6. Now it's time to tension the spring, which is a bit tricky. Rotate the brown wheel anti-clockwise, which in turn will rotate the large wheel clockwise, until it hits the stop screw. Holding it in place, insert the motor and mesh the worm gear to keep everything still. Make sure the worm gear stays meshed as the brown wheel has a tendency to want to lean away from it which could cause it to disengage and unwind the spring. 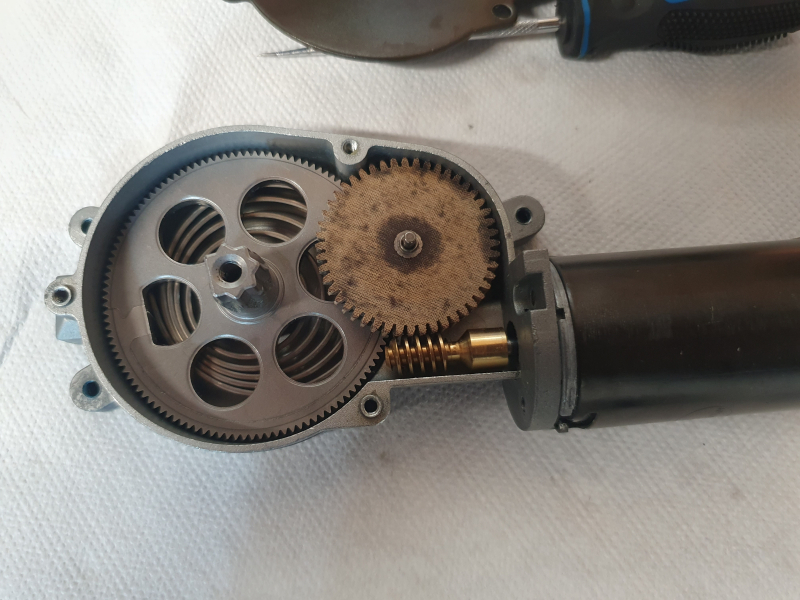 7. Insert the screws into the motor ensuring the spring/gear assembly doesn't move.  8. Put the top plate on. I used a thin trim tool to push the shaft of the brown wheel to get it to locate properly in the brass bushing of the top plate. Insert the top plate screws.  That's it. I did a quick bench test with a 12v battery and it seemed to work properly. I've now disassembled it ready for final assembly with grease.
__________________
Matt 2001 Rover 75 Connoisseur SE 2.5 (BRG) 1999 Rover 75 Club 2.5 (Dorchester Red) 1973 Triumph Dolomite (Honeysuckle) |
|
|
|
|
25th February 2023, 23:59
|
#17 | ||
|
Give to Learn

Freelander 2 Join Date: Aug 2010
Location: West Midlands
Posts: 18,736
Thanks: 1,155
Thanked 6,407 Times in 3,874 Posts
|
Quote:
Big thank you from & lots of other members i would think, nice clear neat how to. What grease are you going to use, normal clear grey grease, or the gold grease.
__________________
Arctic Givology Learn to Give Everything is Achievable  ad altiora tendo. Check out our Nano meet dates http://www.midlandsnanomeets.co.uk/ http://www.the75andztclub.co.uk/index.php?thepage=howto " You do the work , we supply the expertise " |
||
|
|
|
|
26th February 2023, 06:44
|
#18 | |
|
Gets stuck in
75 Saloon Join Date: Apr 2022
Location: North Somerset
Posts: 559
Thanks: 13
Thanked 20 Times in 8 Posts
|
Quote:
. Thinking about the assembly procedure, it might be possible to put it together without doing the fiddly spring tensioning bit, provided the first thing you do after it's built is run the motor in reverse (lower the blind). I would want to test that theory before committing to it though.I'd appreciate a bit of advice on the grease actually. I don't know what the original yellow coloured grease was. Does anyone on here know?  I've seen posts from another member saying he used multipurpose lithium grease so I was planning to do the same.
__________________
Matt 2001 Rover 75 Connoisseur SE 2.5 (BRG) 1999 Rover 75 Club 2.5 (Dorchester Red) 1973 Triumph Dolomite (Honeysuckle) Last edited by Matt_75; 26th February 2023 at 06:59.. |
|
|
|
|
|
26th February 2023, 07:41
|
#19 | |
|
Doesn't do things by halves

Rover 75 2.5 Connoisseur Auto (1999) Dealer launch model. Join Date: Mar 2007
Location: Former Middlesex
Posts: 20,421
Thanks: 1,587
Thanked 3,749 Times in 3,181 Posts
|
Quote:
 Simon
__________________
"Whatever is rightly done, however humble, is noble." Sir Henry Royce. |
|
|
|
|
|
26th February 2023, 07:43
|
#20 |
|
Gets stuck in
75 Saloon Join Date: Apr 2022
Location: North Somerset
Posts: 559
Thanks: 13
Thanked 20 Times in 8 Posts
|
There's something else I want to test too. I've been thinking about why the stop screw is a separate piece and why it wasn't integrated into the housing.
When I tensioned the spring, I rotated the large wheel through about 90 degrees before it hit the stop. I'm wondering if this should be done without the stop screw in situ and whether the spring should be tensioned through 450 degrees of rotation (360, insert stop screw, then 90). When the assembly "exploded" it seemed to be under a lot of tension but it's hard to say as I didn't get a good look. When I did the dry assembly, there didn't seem to be as much.
__________________
Matt 2001 Rover 75 Connoisseur SE 2.5 (BRG) 1999 Rover 75 Club 2.5 (Dorchester Red) 1973 Triumph Dolomite (Honeysuckle) |
|
|
|
 |
|
|


 Linear Mode

