
|
|
|
|
|
|
||
|
|
||
 11th February 2020, 22:15
|
#301 |
|
Posted a thing or two
MG ZT 190 + and MKIV Supra Join Date: Jan 2009
Location: Plymouth
Posts: 1,551
Thanks: 224
Thanked 493 Times in 359 Posts
|
front sub frame all fitted. I did have to wait another day to lift up into place as I had forgotten to get new dowty seals and o seal for the steering rack hose connections
 Got them from a local hydraulic firm Monday morning Got them from a local hydraulic firm Monday morning Sub frame laid under the car ready to be lifted  IMG_20200209_162616 by Jon Christie, on Flickr IMG_20200209_162616 by Jon Christie, on Flickr IMG_20200209_162629 by Jon Christie, on Flickr IMG_20200209_162629 by Jon Christie, on FlickrThen to lift it in place I used a car jack at the rear and built up with wooden blocks at the front. Doing it by myself so no extra pair of hands available This photo is not the best but you get the idea  IMG_20200210_152751 by Jon Christie, on Flickr IMG_20200210_152751 by Jon Christie, on FlickrBefore I was close to lifting it in position but still had access I connected the hydraulic pipes to the steering rack. I take it that in normal circumstances the subframe needs dropping at the rear to get the rack off  Hydraulic hoses connected whilst I had access  IMG_20200210_150624 by Jon Christie, on Flickr IMG_20200210_150624 by Jon Christie, on FlickrThe hose from the steering cooler was then bolted back onto the subframe with new fastenings.  IMG_20200210_161527 by Jon Christie, on Flickr IMG_20200210_161527 by Jon Christie, on Flickronce fully up in position I did up all the mounting bolts (all renewed) hand tight, Checked the steering rack drive was sat correctly in the footwell and bolted up the cooling pipe up to the front of subframe mounting points. I actually used these 2 x points on the front of the subframe to help alignment whilst lifting into position. the subframe mounts x 6 were then fully fitted and torqued (115Nm) and the subframe is now in position. Drivers side  IMG_20200210_163729 by Jon Christie, on Flickr IMG_20200210_163729 by Jon Christie, on FlickrPassenger side  IMG_20200210_163803 by Jon Christie, on Flickr IMG_20200210_163803 by Jon Christie, on FlickrFrom underneath looking towards the rear  IMG_20200210_163931 by Jon Christie, on Flickr IMG_20200210_163931 by Jon Christie, on FlickrFinally the set up ready to receive hubs and struts 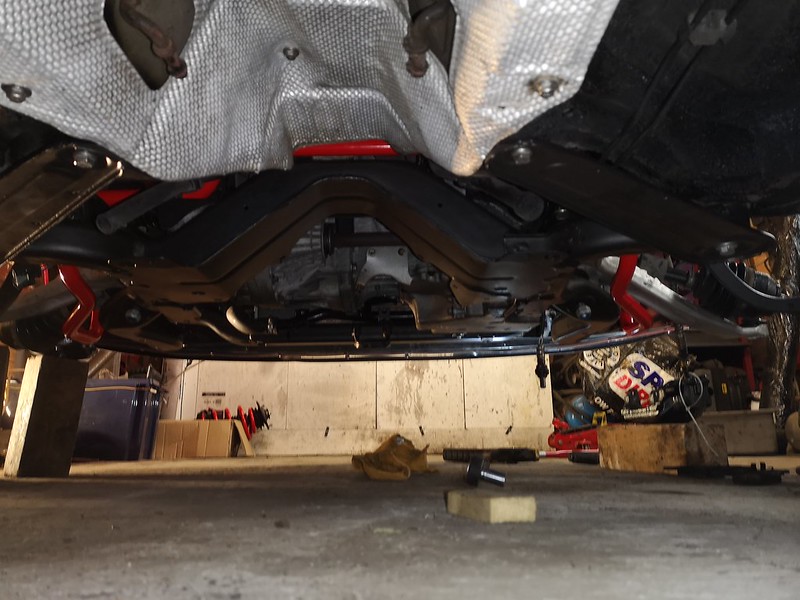 IMG_20200210_164920 by Jon Christie, on Flickr IMG_20200210_164920 by Jon Christie, on Flickr
__________________
Jon C Living the dream  MK IV VVTI Tiptronic TT Toyota Supra MG ZT 190+
BornTuesday, 10th July 2001 @ 09:01:10 259th ZT to run off the production line, out of 18,894 252nd ZT 190 + to be made out of 4,023 101st ZT in Solar Red (code: CEU) to be made out of 1,888 |

|

|
|
11th February 2020, 22:21
|
#302 |
|
Posted a thing or two
MG ZT 190 + and MKIV Supra Join Date: Jan 2009
Location: Plymouth
Posts: 1,551
Thanks: 224
Thanked 493 Times in 359 Posts
|
Some minor jobs completed this evening as i only had an hour or so.
Headlamp level sensor fitted and connected electrically. This was a bit of faff to be honest as the M6 threaded hole was knackered but I had not noticed when working on the subframe. I had to take the hole up to M8 but there was enough material to give a decent fastening.  IMG_20200211_194625 by Jon Christie, on Flickr IMG_20200211_194625 by Jon Christie, on FlickrAnd the wheel arches were fastened back in and the ABS and brake wear sensors reconnected 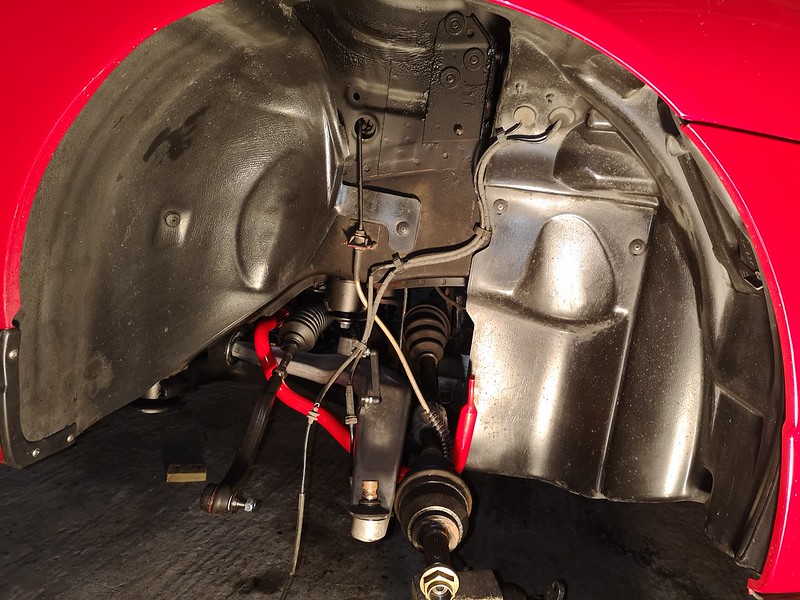 IMG_20200211_201208 by Jon Christie, on Flickr IMG_20200211_201208 by Jon Christie, on Flickr IMG_20200211_204733 by Jon Christie, on Flickr IMG_20200211_204733 by Jon Christie, on FlickrNext up hubs and struts
__________________
Jon C Living the dream MK IV VVTI Tiptronic TT Toyota Supra MG ZT 190+
BornTuesday, 10th July 2001 @ 09:01:10 259th ZT to run off the production line, out of 18,894 252nd ZT 190 + to be made out of 4,023 101st ZT in Solar Red (code: CEU) to be made out of 1,888 |
|
|
|
|
15th February 2020, 21:52
|
#303 |
|
Premium Trader
Rover 75 Join Date: Nov 2010
Location: Devon
Posts: 33,773
Thanks: 8,837
Thanked 14,831 Times in 8,030 Posts
|
You need to move away from the coast!!
Lovely work, I take my hat off to you. 
__________________
Lest we forget..
|
|
|
|
|
15th February 2020, 21:53
|
#304 |
|
This is my second home
Rover 75 cdt club + Rover 2.5 KV6 Conni SE Join Date: May 2008
Location: Birmingham
Posts: 11,394
Thanks: 6,587
Thanked 2,262 Times in 1,729 Posts
|
Hi Jon. I really admire what you have achieved with this rebuild. It is something I keep saying to myself I would like to do. I have a garage but it is not attached to the property (council garage) and have no electric.The repairs or replacement I do have to be done on my front drive, or outside the garage because it is not big enough to work inside it. The weather is another blight on the parade at the moment. But well done and thanks for posting up this epic..
__________________
Great Barr, Birmingham. |
|
|
|
|
17th February 2020, 17:45
|
#305 | ||
|
Posted a thing or two
MG ZT 190 + and MKIV Supra Join Date: Jan 2009
Location: Plymouth
Posts: 1,551
Thanks: 224
Thanked 493 Times in 359 Posts
|
Quote:
Quote:
I thought about posting this mamoth restoration thread so it might help others with the car being stripped. Also it gives me a decent historical line for the car  Appreciate your comments
__________________
Jon C Living the dream MK IV VVTI Tiptronic TT Toyota Supra MG ZT 190+
BornTuesday, 10th July 2001 @ 09:01:10 259th ZT to run off the production line, out of 18,894 252nd ZT 190 + to be made out of 4,023 101st ZT in Solar Red (code: CEU) to be made out of 1,888 |
||
|
|
|
|
17th February 2020, 18:24
|
#306 | |
|
Posted a thing or two
2004 mk1 Rover 75 1.8T Club SE saloon (auto) Join Date: Jul 2013
Location: Enniskillen
Posts: 1,307
Thanks: 670
Thanked 254 Times in 222 Posts
|
Quote:
Incredible work, Jon. All the pics really help bring the project to life (and can act as a useful aid to the rest of us). Quick question if I may - All of my rear suspension/brakes etc. is new (fitted by my mechanic). But now I'm going round all the wheel arches etc. tackling surface rust and rust-proofing and so on - in a similar, though much less involved, way as yourself Having had a look underneath at the rear, it looks at though I'll need to drop the tank and subframe to tackle all the surface corrosion at work about those areas. So, is it a big job to drop the rear suspension (I have a garage and a pit, thankfully). Or, is it as simple as removing the top 4 strut nuts, then undoing the 4 subframe bolts and the 6 trailing arm bolts - to drop everything? Shouldn't have to deal with any seized nuts/bolts (as these are all new  ). ).Might have to invest in a gearbox trolley to support all once it's worked loose.. Cheers, Karl. |
|
|
|
|
|
17th February 2020, 21:19
|
#307 | |
|
Posted a thing or two
MG ZT 190 + and MKIV Supra Join Date: Jan 2009
Location: Plymouth
Posts: 1,551
Thanks: 224
Thanked 493 Times in 359 Posts
|
Quote:
First thing off would be the exhaust back to the Cat to allow the subframe and fuel tank strap to drop. I would take off the calipers and place/hang to one side to keep the calipers and hoses safe. Next I would disconnect the ABS plugs and wires sensor and leave the leads hanging but place our the way of harm's way. If the suspension has just been done then you could then remove the abs sensors. Rear subframe wise it's really down to you on how you remove. When I took the old one off my car I took off the brake discs and hubs But I suppose you could leave them on. I would leave the struts where they are and disconnect them on the bottom bolt. I would then undo the trailing arm bolts. Your mechanic should have done a geometry alignment to make sure the rear wheels were running correct so mark carefully where the trailing arm plates sit The main subframe is held on the 4 x main bolts. These are supposed to be replaced after use. That's up to you. The subframe is quite light without the hubs and brake discs but I imagine these will make it heavier. I lowered my subframe on a car jack as I was working off stands. The one thing to be weary of is getting the centre of balance. The fuel tank can be dropped by undoing the 4 x strap bolts. Again the tank will be as heavy or light depending of fuel quantity. Again because I was working off stands I dropped the tank onto a couple of wooden pads so I didn't stretch the attached lines and cable. On a ramp you may want to make something up to drop the tank onto or disconnect all the attachments. Bolting the subframe on was a bit tedious lining it up because I was working by myself. I was pleasantly surprised by the lack of rust to be honest. Every spot weld had surface corrosion and where the fuel tank rubs the seat base. There was nothing nasty and having worked on this area on other British cars I have normally had to weld plate back in so MRG did a good job with these chassis. Thanks for your comments and hope the pictures help. Let me know if you need more info/explanation. Cheers Jon
__________________
Jon C Living the dream MK IV VVTI Tiptronic TT Toyota Supra MG ZT 190+
BornTuesday, 10th July 2001 @ 09:01:10 259th ZT to run off the production line, out of 18,894 252nd ZT 190 + to be made out of 4,023 101st ZT in Solar Red (code: CEU) to be made out of 1,888 |
|
|
|
|
|
18th February 2020, 19:47
|
#308 |
|
Posted a thing or two
2004 mk1 Rover 75 1.8T Club SE saloon (auto) Join Date: Jul 2013
Location: Enniskillen
Posts: 1,307
Thanks: 670
Thanked 254 Times in 222 Posts
|
Ok, maybe not quite as straightforward as I seemed to be suggesting...
 But thanks very much for explaining in such detail Jon - I think I should be able to manage the most of that. Much obliged, Karl. |
|
|
|
|
27th February 2020, 22:25
|
#309 |
|
Posted a thing or two
MG ZT 190 + and MKIV Supra Join Date: Jan 2009
Location: Plymouth
Posts: 1,551
Thanks: 224
Thanked 493 Times in 359 Posts
|
Been quite busy lately but I want to get the car on the road this weekend so the final push.
The front struts built up with the hubs fitted (but the bolts were not torqued). I decided that it would be easier to fit the hub as a whole. I used a cavity was on the upper bolt to save it corroding in place.  IMG_20200214_192913 by Jon Christie, on Flickr IMG_20200214_192913 by Jon Christie, on FlickrAnd lifted into place. The drive shaft nut was just put on to stop the drive shaft from slipping out whilst I was moving the strut around.  IMG_20200214_195827 by Jon Christie, on Flickr IMG_20200214_195827 by Jon Christie, on FlickrThen hand tightened the top mount nuts just to hold the strut in place 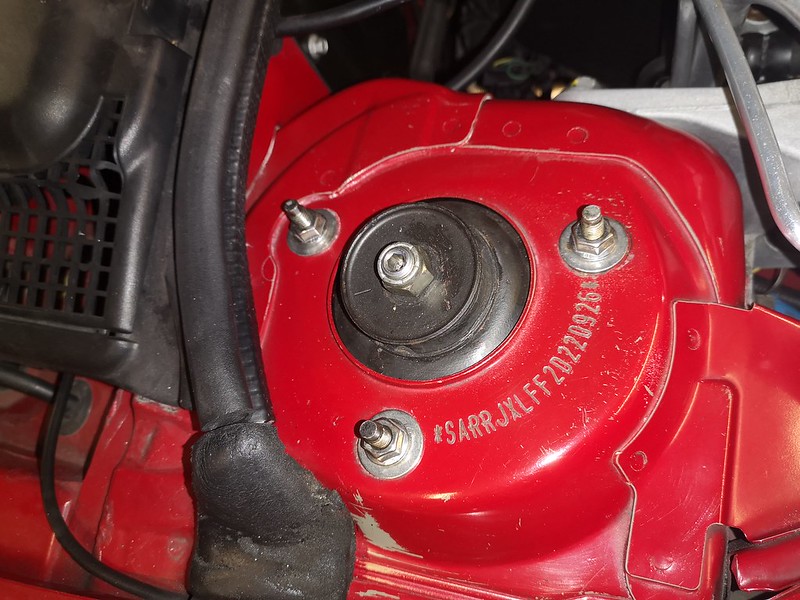 IMG_20200214_195837 by Jon Christie, on Flickr IMG_20200214_195837 by Jon Christie, on FlickrI then fitted the lower arm ball joint into the lower split joint on the hub and fitted the lower pinch bolt again using cavity wax to make sure it does not seize in. once all in place all the bolts were tightened. I torqued the bolts with the strut is under load. Next was the build up, First the brake hose and wiring was run in and the ABS sensor was fitted  IMG_20200223_163933 by Jon Christie, on Flickr IMG_20200223_163933 by Jon Christie, on FlickrThen the brake disc is fitted and held in place with the countersunk set screw. The disks were renewed a couple of years ago so i refitted them. I used coppercrest on this fastening because they can be a NAUGHTY WORD-NAUGHTY WORD-NAUGHTY WORD- to get out in the future.  IMG_20200223_173913 by Jon Christie, on Flickr IMG_20200223_173913 by Jon Christie, on FlickrNext up the caliper carriers were fitted  IMG_20200223_173918 by Jon Christie, on Flickr IMG_20200223_173918 by Jon Christie, on Flickrand the carrier bolts torqued up  IMG_20200223_173931 by Jon Christie, on Flickr IMG_20200223_173931 by Jon Christie, on Flickrnext up the calipers were offered up and secured to the carrier via the slide pins  IMG_20200223_174501 by Jon Christie, on Flickr IMG_20200223_174501 by Jon Christie, on FlickrAnd finally fitted and looking quite good. I am happy with the finish  IMG_20200223_175318 by Jon Christie, on Flickr IMG_20200223_175318 by Jon Christie, on Flickr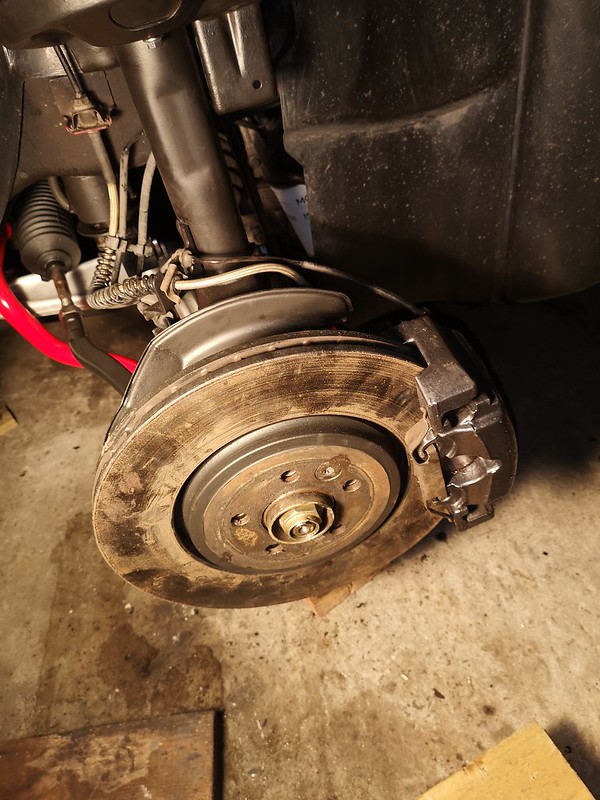 IMG_20200223_175404 by Jon Christie, on Flickr IMG_20200223_175404 by Jon Christie, on FlickrNext up the steering
__________________
Jon C Living the dream MK IV VVTI Tiptronic TT Toyota Supra MG ZT 190+
BornTuesday, 10th July 2001 @ 09:01:10 259th ZT to run off the production line, out of 18,894 252nd ZT 190 + to be made out of 4,023 101st ZT in Solar Red (code: CEU) to be made out of 1,888 Last edited by jonc3725; 27th February 2020 at 22:44.. |
|
|
|
|
27th February 2020, 22:38
|
#310 |
|
Posted a thing or two
MG ZT 190 + and MKIV Supra Join Date: Jan 2009
Location: Plymouth
Posts: 1,551
Thanks: 224
Thanked 493 Times in 359 Posts
|
so I centralised the rack on fitting it to the subframe and centred the steering wheel before fitting the column and rack
The coupling is in the foot well under a rubber cover.  IMG_20200223_195942 by Jon Christie, on Flickr IMG_20200223_195942 by Jon Christie, on Flickrthe coupling hinges over the drive from the rack. Unusual as I am used to splines on my other cars but this is a good engineering solution. The pin was also added  IMG_20200223_200927_BURST001_COVER by Jon Christie, on Flickr IMG_20200223_200927_BURST001_COVER by Jon Christie, on Flickrand a new M8 nyloc used. Again not torqued up that will be done with the wheels on the road.  IMG_20200223_201743 by Jon Christie, on Flickr IMG_20200223_201743 by Jon Christie, on Flickrand the suspension almost completely built up. The drive shaft nuts, steering column joint will be torqued when the wheels are on the floor.  IMG_20200223_203232 by Jon Christie, on Flickr IMG_20200223_203232 by Jon Christie, on Flickr IMG_20200223_203313 by Jon Christie, on Flickr IMG_20200223_203313 by Jon Christie, on Flickr IMG_20200223_203419 by Jon Christie, on Flickr IMG_20200223_203419 by Jon Christie, on FlickrJust for reference a before and after 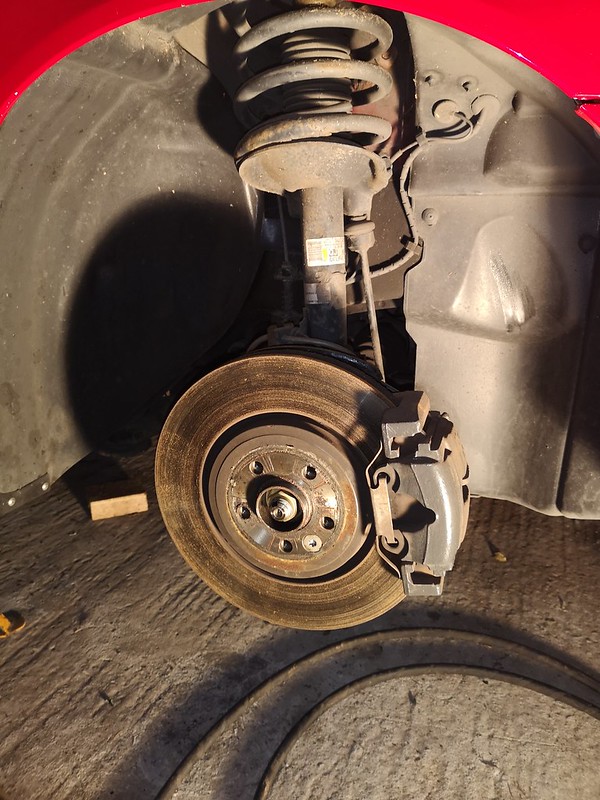 IMG_20200117_192755 by Jon Christie, on Flickr IMG_20200117_192755 by Jon Christie, on Flickr IMG_20200223_203511 by Jon Christie, on Flickr IMG_20200223_203511 by Jon Christie, on Flickr IMG_20200117_192923 by Jon Christie, on FlickrIMG_20200223_203232 by Jon Christie, on Flickr IMG_20200117_192923 by Jon Christie, on FlickrIMG_20200223_203232 by Jon Christie, on FlickrLower engine mount fitted (this was replaced a couple of years ago)  IMG_20200223_205327 by Jon Christie, on Flickr IMG_20200223_205327 by Jon Christie, on FlickrNext up will be the exhaust
__________________
Jon C Living the dream MK IV VVTI Tiptronic TT Toyota Supra MG ZT 190+
BornTuesday, 10th July 2001 @ 09:01:10 259th ZT to run off the production line, out of 18,894 252nd ZT 190 + to be made out of 4,023 101st ZT in Solar Red (code: CEU) to be made out of 1,888 |
|
|
|
 |
|
|


 Linear Mode

