
|
|
|
|
|
|
||
|
|
||
 22nd August 2012, 21:10
|
#1 |
|
Gets stuck in
MG ZT Join Date: Jun 2011
Location: Oxford
Posts: 847
Thanks: 124
Thanked 312 Times in 147 Posts
|
Thought I'd share some photos of my recent handy-work. I purchased a waterproof wide-angle rear view camera from eBay for just under £17 quid.
Whilst fitting my new headunit (a Pioneer SPH-DA100 'AppRadio 2') I also fitted the Harman amp and subwoofer in the boot. This required me to remove all the seats and carpets to run the loom, so whilst I was there I also ran a composite video cable for a future rear camera installation. 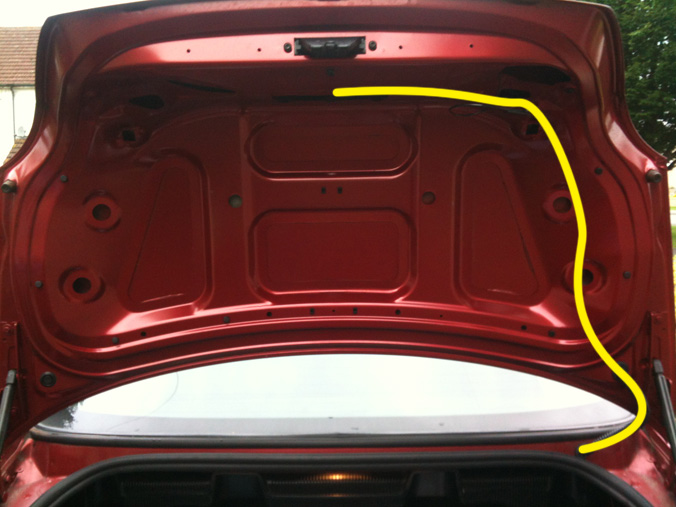 I opened the boot and removed the boot lid liner, disconnected the numberplate lamp wires and tailgate actuator wire, tied a piece of string to the end and pulled it out and down of the rubber sleeve at the bottom right hand corner, then used felt tape to attach the composite cable to the original wires, and then pulled the whole lot back up (routed inside the boot lid along the yellow line in the above photo). I also pulled up a +12v supply and earth for the rear view camera which I took off the reverse parking sensor loom which I found kicking about behind the offside boot trim. I decided not to supply the camera from the reversing lights, but instead an ignition switched supply. Next, I removed the rear MG badge and it's holder. Cut out an accurate slot on it for the camera to slide into: 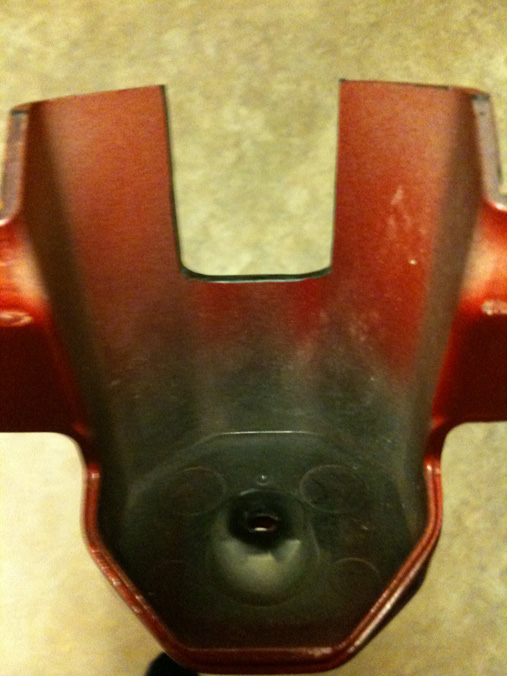 Camera fitted, I glued it in on the back after getting the alignment spot on. 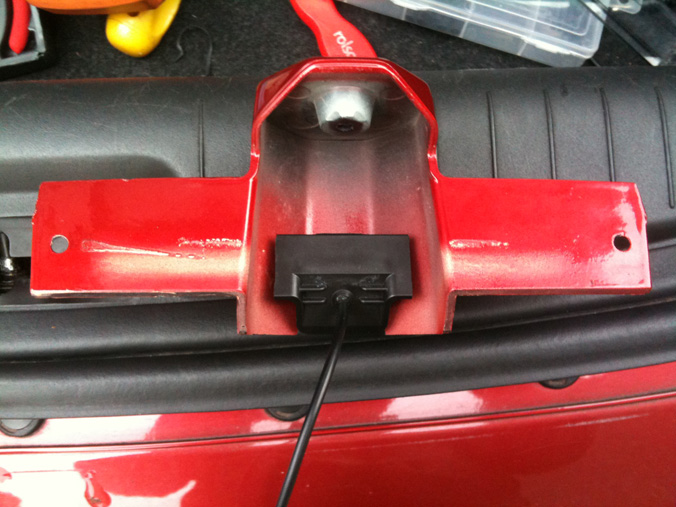 Next I drilled a 7mm hole in the boot lid, painted the edge of the metal to prevent future rust, and fitted a small rubber grommet. I cut the connector off the wire coming out of the camera, pushed the wires through, and then soldered and insulated the wires back together to keep the hole as small as possible: 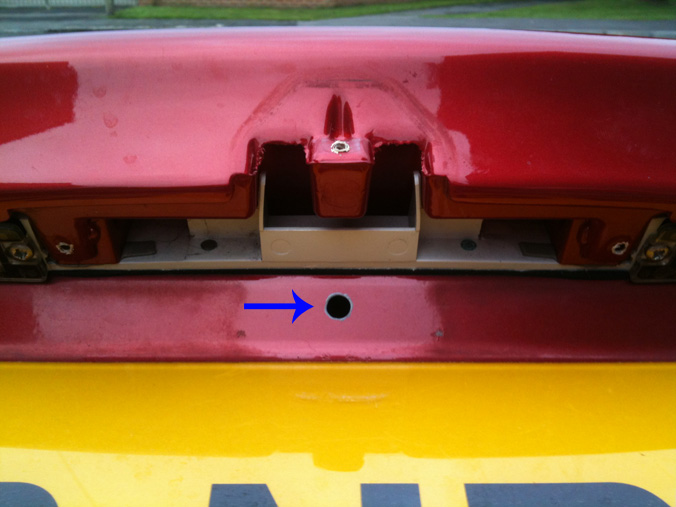 After that I put it all back together, with a new MG badge, and a small but neat smear of black silicone around the camera, and these are the results! 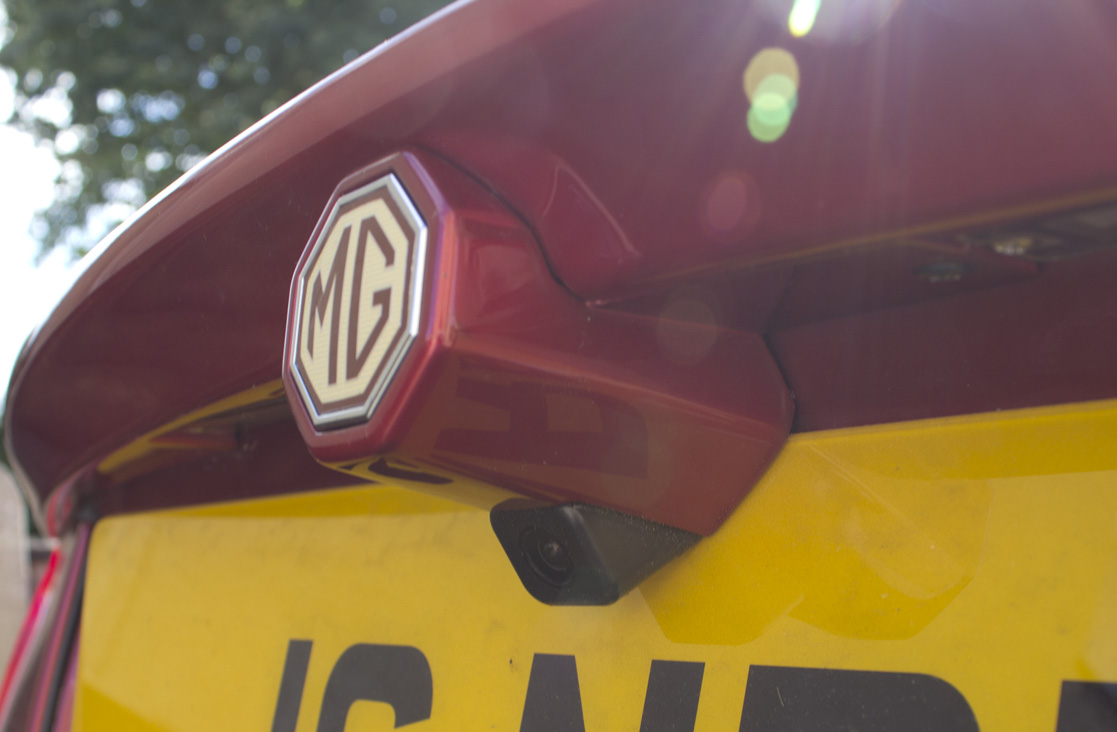 The headunit has an input from the reverse lights, so when reverse is selected this pops up: 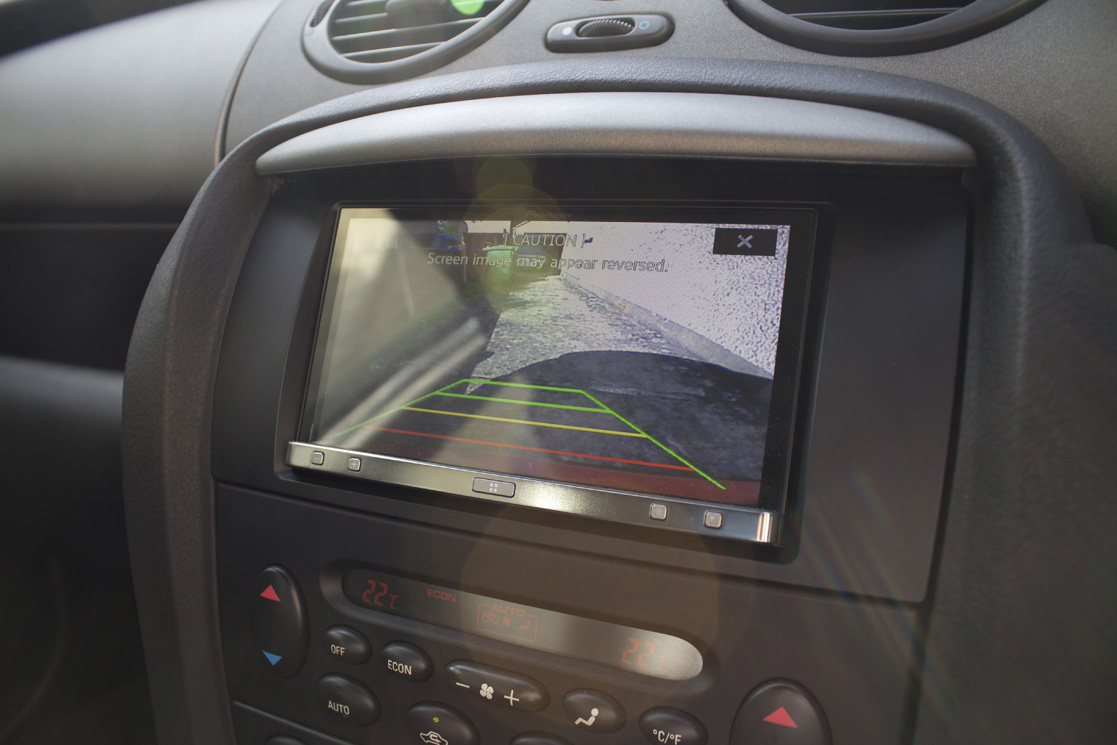 The alignment of the camera is spot on, as you can just see the edge of the rear bumper, but also horizontally backwards. And the camera is mounted right in the centre of the vehicle, not off to one side. Looking at the rear of the car, you'd barely even notice the camera.  |

|

|
|
22nd August 2012, 21:56
|
#2 |
|
This is my second home
Rover less ! Join Date: Jun 2011
Location: Tarbolton
Posts: 3,442
Thanks: 393
Thanked 888 Times in 542 Posts
|
Very neat work, I'm impressed
 JYJ |
|
|
|
|
22nd August 2012, 23:06
|
#3 |
|
Loves to post
MG ZT+ 1.8 turbo 160 Join Date: Apr 2012
Location: newton aycliffe
Posts: 297
Thanks: 5
Thanked 1 Time in 1 Post
|
looks very professional
I like the dd unit which one is it?? 
__________________
[SIGPIC]Only happy when its shiny!!![/SIGPIC] |
|
|
|
|
22nd August 2012, 23:57
|
#4 |
|
Gets stuck in
MG ZT Join Date: Jun 2011
Location: Oxford
Posts: 847
Thanks: 124
Thanked 312 Times in 147 Posts
|
Thanks for the kind comments folks!
 Here's the headunit: http://www.pioneer.eu/uk/products/25...100/index.html And the camera: http://www.ebay.co.uk/itm/120892369703 |
|
|
|
|
23rd August 2012, 07:12
|
#5 |
|
This is my second home
Small Join Date: Feb 2010
Location: Land of the Eel
Posts: 6,315
Thanks: 2,328
Thanked 2,991 Times in 1,431 Posts
|
MMMMMMMMMMMMMMMMMMMM!! Firefrost ...
Cheers Ian
__________________
The man behind redfive |
|
|
|
|
23rd August 2012, 08:47
|
#6 |
|
Loves to post
MG6 GT SE & Rover 25 IE Join Date: Mar 2007
Location: Staffordshire
Posts: 409
Thanks: 112
Thanked 23 Times in 14 Posts
|
Well done. What a great neat job you have done there. I have just fitted a cheap 12 quid camera from ebay too. It was a replacement for the radioguy one which cost 50 and was utter rubbish! I was promised that the radioguy one would have a crystal clear picture due to its Sony lens. However because I have the tourer, it wasn't a neat fit and looked awful. The new one is chrome and very neat, although not as good as your tidy installation! Welld done again that man!!
__________________
[SIGPIC][/SIGPIC]Above all it's a Rover
|
|
|
|
|
13th March 2014, 17:33
|
#7 | |
|
Gets stuck in
Rover 75 2.5 Manual Starlight Silver Join Date: Oct 2013
Location: Utrecht
Posts: 824
Thanks: 173
Thanked 254 Times in 199 Posts
|
Just installed my reverse camera today as per your description. The result is excellent!
 Just came by to say thanks for your utterly useful posting
__________________
Greetz, Sjonnie Rover 75 2.5 Manual MK2 MY 05 Starlight Silver - Miss March 2022 / Miss May 2023 MG F 1.8i MK2 MY 00 in Anthracite MG ZT-T 190+ MK2 MY 05 Xpower Grey (sold) - Mr Cover page 2021 Dearly missed: ꝉ ꝉ MG ZT 190+ MK2 MY 04 in Black Olive #8/8 R.I.P. - Miss February 2016 Quote:
|
|
|
|
|
|
13th March 2014, 18:39
|
#8 | |
|
Gets stuck in
MG ZT Join Date: Jun 2011
Location: Oxford
Posts: 847
Thanks: 124
Thanked 312 Times in 147 Posts
|
Quote:
|
|
|
|
|
|
19th March 2014, 08:26
|
#9 |
|
Gets stuck in
MG ZT-260SE Join Date: Nov 2006
Location: Norwich
Posts: 645
Thanks: 17
Thanked 8 Times in 7 Posts
|
Nice Install Neil
 |
|
|
|
|
22nd February 2019, 15:39
|
#10 |
|
Avid contributor
MG ZT 180+ Join Date: Jan 2013
Location: London - Wembely
Posts: 140
Thanks: 16
Thanked 1 Time in 1 Post
|
I know this is an old post but I'm trying to do mine now but have one question.
How do I remove the MG badge holder? Looking at your pics it looks like 3 screws with one hidden behind the badge so I assume I need to somehow remove my badge and once complete replace with a new one? Thanks, Pat |
|
|
|
 |
|
|


 Linear Mode

