Go Back   The 75 and ZT Owners Club Forums > The 75 and ZT Owners Club Forums > Technical Help Forum
Register FAQ Image Gallery Members List Calendar Mark Forums Read
Notices

Reply
 
Thread Tools Display Modes
Old 19th April 2020, 21:15   #21
edwardmk
Gets stuck in
 
edwardmk's Avatar
 
MG ZT 260, Rover 75 Connie SE auto

Join Date: Feb 2013
Location: Redruth
Posts: 984
Thanks: 1,324
Thanked 399 Times in 271 Posts
Default

Quote:
Originally Posted by Blink View Post
If it helps to confirm that DCD107701PMA is the right part, the new one I've got here is 134 cm long (near as heck) - as measured along the metal spine. The rubber strip that covers the spine is 2.5cm wide.

#6 in the main diagram here - https://rimmerbros.com/Item--i-GRID002000. If you buy one, make sure that all 8 clips* have got their pins (one of mine hasn't ).

* 10 clips altogether - the far left & far right clips don't have pins. The 3rd left & 3rd right clips have white rubber inserts.
Great pictures. Brings back memories of the struggle I had with my rear window clips and trim. Spent ages on the Rimmers website. Eventually called them and got a very helpful chap who said to send the stuff back if it wasn't right. I 'fettled' the new clips by trimming the ends carefully. The new clips don't fit otherwise unless the rear screen is removed. I applied silicone to all 8 of them as I didn't trust the foam seals to work longer term. The foam block inserts on two I think are only needed when installing a new rear screen to act as spacers to support the screen. They don't matter if the screen isn't being changed. They all fit through a single metal panel. There is no double panel on the eight at the back. The two at the side are just links for the trim.
I did every fix for boot leaks mentioned on the forum. Biggest bang for the buck in my case was Arctic's excellent fix instructions for sunroof drains. The thing that finally stopped all water ingress for my ZT was to silicone seal the entire boot seal. Even new boot seals can leak if they aren't silicone sealed. My ZT 260 has a factory fitted drain under the battery tray in the boot I think that speaks volumes.
edwardmk is offline   Reply With Quote
Old 20th April 2020, 14:40   #22
rab60bit
Posted a thing or two
 
rab60bit's Avatar
 
Rover 75 Saloon & Tourer

Join Date: Mar 2013
Location: Wilmslow
Posts: 1,513
Thanks: 433
Thanked 301 Times in 212 Posts
Default

Quote:
Originally Posted by edwardmk View Post
Great pictures. Brings back memories of the struggle I had with my rear window clips and trim. Spent ages on the Rimmers website. Eventually called them and got a very helpful chap who said to send the stuff back if it wasn't right. I 'fettled' the new clips by trimming the ends carefully. The new clips don't fit otherwise unless the rear screen is removed. I applied silicone to all 8 of them as I didn't trust the foam seals to work longer term. The foam block inserts on two I think are only needed when installing a new rear screen to act as spacers to support the screen. They don't matter if the screen isn't being changed. They all fit through a single metal panel. There is no double panel on the eight at the back. The two at the side are just links for the trim.
I did every fix for boot leaks mentioned on the forum. Biggest bang for the buck in my case was Arctic's excellent fix instructions for sunroof drains. The thing that finally stopped all water ingress for my ZT was to silicone seal the entire boot seal. Even new boot seals can leak if they aren't silicone sealed. My ZT 260 has a factory fitted drain under the battery tray in the boot I think that speaks volumes.
Lots of folk have asked about drilling a hole in their boot, have you got a pic or two of the ZT260 solution which I'm guessing is a bit more than a plain hole - and do think was it there in case the battery boiled out or indeed just to prevent the boot turning into a swimming pool!
I've just finished fitting a new set of lower trim clips to my Contemporary - like you, had to do a bit of trimming of the brackets to get them all to fit underneath the glass overlap and I removed the square foam washer before treating the bracket and the body work site with a matching activator and a generous coat of Sikaflex polyurethane based sealant to the bracket. Seems to have worked out OK, just hope it holds up once we have a good downpour.

Last edited by rab60bit; 20th April 2020 at 14:47..
rab60bit is offline   Reply With Quote
Old 2nd May 2020, 14:11   #23
Blink
Posted a thing or two
 
Blink's Avatar
 
Rover 75 Saloon

Join Date: Apr 2019
Location: Under the car
Posts: 1,840
Thanks: 210
Thanked 244 Times in 221 Posts
Default

What is #10 here? Looks like a block of foam.


Speaking of which, where did this bit of foam come from?


It appeared after I'd removed the side trims and blasted the dirt out of the rebate with water.
Blink is offline   Reply With Quote
Old 2nd May 2020, 17:49   #24
rab60bit
Posted a thing or two
 
rab60bit's Avatar
 
Rover 75 Saloon & Tourer

Join Date: Mar 2013
Location: Wilmslow
Posts: 1,513
Thanks: 433
Thanked 301 Times in 212 Posts
Default

Quote:
Originally Posted by hogweed View Post
Ron, I've been trying to do this, but am I mistaken in thinking that the ones at the bottom corner of each side are inside a double skin...?
The two at each of the lower corners are only attached (clipped) to the side trim and act as spacers (bump stops) between the bodywork and the trim; I'm waiting on Rimmers (who are out of stock) to make good my order for a couple but the underside appears to have a strip of felt/foam stuck to them which I guess acts to prevent the bodywork paint from being fretted away - I would imagine that in practice the spacer barely touches the body shell anyway.
rab60bit is offline   Reply With Quote
Old 3rd May 2020, 15:10   #25
Blink
Posted a thing or two
 
Blink's Avatar
 
Rover 75 Saloon

Join Date: Apr 2019
Location: Under the car
Posts: 1,840
Thanks: 210
Thanked 244 Times in 221 Posts
Default

Quote:
Originally Posted by hogweed View Post
Ron, I've been trying to do this, but am I mistaken in thinking that the ones at the bottom corner of each side are inside a double skin...?
Roger - open the boot and look through the hole on the right side (marked with blue tape in 1st pic below). You'll be able to see/feel the retaining clip on the RH end of the Finisher assembly-backlight lower - DCD107701PMA poking through the metalwork. NB. The spacer mentioned in post 24 is to the right of it and above the metalwork - you can see the mark it left in the dirt (2nd pic).


I've just taken the finisher assembly off and seven out of the eight retaining clips on the bodywork broke - they're as brittle as hell.

This could get expensive!
Blink is offline   Reply With Quote
Old 3rd May 2020, 15:32   #26
Blink
Posted a thing or two
 
Blink's Avatar
 
Rover 75 Saloon

Join Date: Apr 2019
Location: Under the car
Posts: 1,840
Thanks: 210
Thanked 244 Times in 221 Posts
Default

Quote:
Originally Posted by Blink View Post
Seven out of the eight retaining clips on the bodywork broke
And here they are (left to right).


Looks like the glass will have to come out now.
Blink is offline   Reply With Quote
Old 3rd May 2020, 15:46   #27
marinabrian
 
marinabrian's Avatar
 
MG ZT

Join Date: Jan 2011
Location: Newcastle Upon Tyne
Posts: 20,151
Thanks: 3,565
Thanked 10,837 Times in 5,718 Posts
Default

Quote:
Originally Posted by Blink View Post
What is #10 here? Looks like a block of foam.


Speaking of which, where did this bit of foam come from?


It appeared after I'd removed the side trims and blasted the dirt out of the rebate with water.
Simon, the block #10 you picture, is one of the natural coloured neoprene rubber spacers which are employed to ensure the rear screen is positioned correctly during fitting.

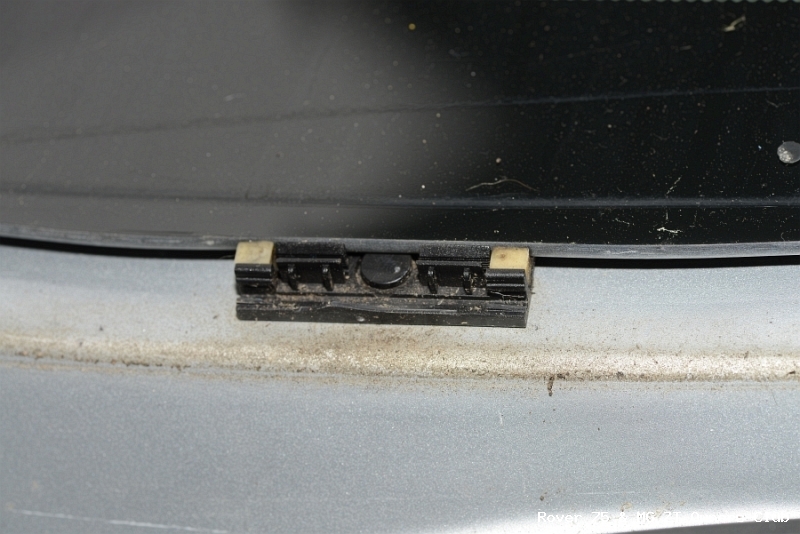
They sit on the black clips, and the glass rests on them until the adhesive cures

The foam rubber looks like a stray glass pad, disposable closed cell pads, which are attached during glass final manufacture, when glass is stored to prevent the screen contacting the adjacent screen when they are stored in stillages post heat treatment.

When they are split up into "retail" packaging, these pads are normally replaced with what could be best described as a small version of split pipe insulation, to protect the vulnerable edges of the glass, then shrink wrapped in polythene.

Chuck it in the bin, or save it to cure an annoying rattle in the future, the choice is yours

Brian
marinabrian is offline   Reply With Quote
Old 3rd May 2020, 17:51   #28
marinabrian
 
marinabrian's Avatar
 
MG ZT

Join Date: Jan 2011
Location: Newcastle Upon Tyne
Posts: 20,151
Thanks: 3,565
Thanked 10,837 Times in 5,718 Posts
Default

Quote:
Originally Posted by Blink View Post
And here they are (left to right).


Looks like the glass will have to come out now.
Simon don't despair, this is how to sort it out


Drill off the head of the pushbutton that expands the four legs securing the clip.

Push the remnant through the body, this will allow the clip to be lifted up and the legs of the clip to be trimmed off using a Stanley knife, enabling them to be removed from the car.

Once that is done, clean and dry the area thoroughly.

Next take some self adhesive aluminium tape, something like this LINK, and fashion some to cover the holes, ensuring the tape is longer than the length of the clip, and linish the edges where it meets the bodywork with a plastic spudger (I used a plastic chopstick, shaped at the end)

Once the tape is on, and it sticks like brown stuff to a blanket, prime the tape with a suitable primer using an artist's brush, then once dry a coat of suitable touch up, ensuring the edges are well covered.

Your new clips which you have already ordered, when they arrive, remove the central pin, cut off the legs, abrade it with coarse production paper P40 to P60, then using your recently purchased Araldite Rapid, glue the clip into position.

This is really very easy to do, as the shape of the outline of the underlying square hole in the body is visible and the hole in the centre of the clip is manoeuvred into position, tucking the leading edge of the clip under the glass.

Once you leave overnight, the chances of removing the clips from the body is minuscule, and you can then refit first the skirt trim, then the outer bright finisher.

Now this may seem like a bit of a bodge, however it's better viewed as an upgrade, in as much as once you do this, the boot will never leak in through the window clips ever again

Plus the advantage of not risking the removal and refitting of the back window, along with the risks that job entails are easy to see.

I've done this on three of my saloons now, with a 100% success rate, the fourth one was done by soft soldering offcuts of a Peek Freans biscuit tin using a 1" wide 125 watt Henley Solon soldering iron over the holes

Provided you do the job right, you will not end up with mouldy boot, and steamed up back windows ever again

Brian
marinabrian is offline   Reply With Quote
Old 4th May 2020, 11:17   #29
Blink
Posted a thing or two
 
Blink's Avatar
 
Rover 75 Saloon

Join Date: Apr 2019
Location: Under the car
Posts: 1,840
Thanks: 210
Thanked 244 Times in 221 Posts
Default

Quote:
Originally Posted by marinabrian View Post
Simon, the block #10 you picture, is one of the natural coloured neoprene rubber spacers which are employed to ensure the rear screen is positioned correctly during fitting.

They sit on the black clips, and the glass rests on them until the adhesive cures
Ok, got it. Thanks Brian.

Quote:
Originally Posted by marinabrian View Post
The foam rubber looks like a stray glass pad, disposable closed cell pads, which are attached during glass final manufacture,......

Chuck it in the bin, or save it to cure an annoying rattle in the future, the choice is yours

Brian
I'll keep it - you never know when it might come in useful elsewhere.


Now for the more serious stuff.

Quote:
Originally Posted by marinabrian View Post
Simon don't despair, this is how to sort it out

Drill off the head of the pushbutton that expands the four legs securing the clip.

Push the remnant through the body, this will allow the clip to be lifted up and the legs of the clip to be trimmed off using a Stanley knife, enabling them to be removed from the car.

Once that is done, clean and dry the area thoroughly.

Next take some self adhesive aluminium tape, something like this LINK, and fashion some to cover the holes, ensuring the tape is longer than the length of the clip, and linish the edges where it meets the bodywork with a plastic spudger (I used a plastic chopstick, shaped at the end)

Once the tape is on, and it sticks like brown stuff to a blanket, prime the tape with a suitable primer using an artist's brush, then once dry a coat of suitable touch up, ensuring the edges are well covered.

Your new clips which you have already ordered, when they arrive, remove the central pin, cut off the legs, abrade it with coarse production paper P40 to P60, then using your recently purchased Araldite Rapid, glue the clip into position.

This is really very easy to do, as the shape of the outline of the underlying square hole in the body is visible and the hole in the centre of the clip is manoeuvred into position, tucking the leading edge of the clip under the glass.

Once you leave overnight, the chances of removing the clips from the body is minuscule, and you can then refit first the skirt trim, then the outer bright finisher.

Now this may seem like a bit of a bodge, however it's better viewed as an upgrade, in as much as once you do this, the boot will never leak in through the window clips ever again

Plus the advantage of not risking the removal and refitting of the back window, along with the risks that job entails are easy to see.

I've done this on three of my saloons now, with a 100% success rate, the fourth one was done by soft soldering offcuts of a Peek Freans biscuit tin using a 1" wide 125 watt Henley Solon soldering iron over the holes

Provided you do the job right, you will not end up with mouldy boot, and steamed up back windows ever again

Brian
Thanks for the above How To. I'd already decided to attack the pins with a drill but I hadn't figured out the rest of it.

Anyway, I've made a start and the first clip is out (seven more to go). I started with a 3mm bit in a small drill, then a 4.5mm bit. Rotating the drill in an 360 arc gets rid of all 4 legs on the clip and it can be slid out from under the glass, leaving this:


This puny bit of foam rubber is the only thing stopping water from getting into the car! Which lunatic designer thought this was a good idea.


Here's what's left of the first clip.


And this is the 'sealing' side (faces the metalwork). The four locking legs have been drilled to bits, most of which are now trapped inside the metal crossbeam.


Btw, take a look at this nifty piece of factory work - it's the main window seal! (between the 3rd & 4th retaining clip from the left).


I'm off to demolish the other seven clips now. Back later!

Blink is offline   Reply With Quote
Old 4th May 2020, 11:28   #30
marinabrian
 
marinabrian's Avatar
 
MG ZT

Join Date: Jan 2011
Location: Newcastle Upon Tyne
Posts: 20,151
Thanks: 3,565
Thanked 10,837 Times in 5,718 Posts
Default

Yes, it's fairly poor design indeed Simon, I can't for the life of me understand why they didn't simply carry on the same method of attaching the clips as they did for the side and top

Still you can see why people struggle to seal those clips........you can just see the design brief now, the same person seems to have been involved elsewhere too

marinabrian is offline   Reply With Quote
Reply

Thread Tools
Display Modes

Posting Rules
You may not post new threads
You may not post replies
You may not post attachments
You may not edit your posts

BB code is On
Smilies are On
[IMG] code is On
HTML code is Off

Forum Jump


All times are GMT. The time now is 19:40.


Powered by vBulletin® Version 3.8.11
Copyright ©2000 - 2024, vBulletin Solutions Inc.
Copyright © 2006-2023, The Rover 75 & MG ZT Owners Club Ltd