
|
|
|
|
|
|
||
|
|
||
 13th July 2015, 10:24
|
#11 |
|
This is my second home
Rover75 and Mreg Corsa. Join Date: Nov 2006
Location: Sumweer onat mote o'dust (Sagin)
Posts: 21,753
Thanks: 341
Thanked 3,660 Times in 2,924 Posts
|
Well done.
I noticed the rear susension arm looks flaky. Is it OK? 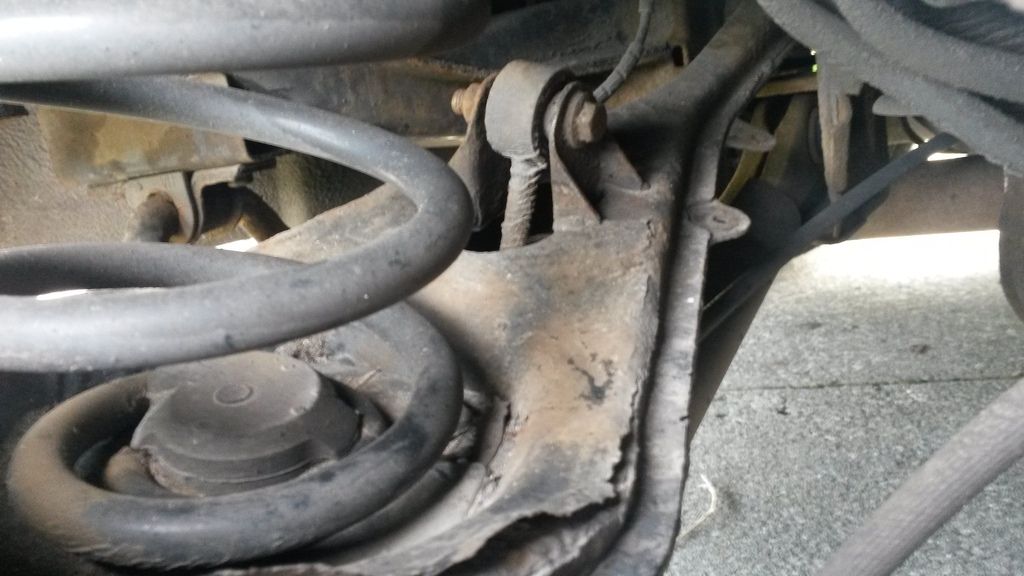 TC |

|

|
|
14th July 2015, 00:33
|
#12 | |
|
This is my second home
None * DROWNED Join Date: Aug 2007
Location: Cardigan
Posts: 33,339
Thanks: 1,257
Thanked 1,664 Times in 1,081 Posts
|
Quote:
 That is what I did That is what I did 
__________________
Andrew Ich Dien Problem solving is... lateral thinking SEARCH FIRST ...ASK LATER... |
|
|
|
|
|
26th July 2015, 19:14
|
#13 |
|
Gets stuck in
Rover 75 Tourer & Arden Green Project Join Date: Jul 2012
Location: Ormskirk
Posts: 932
Thanks: 159
Thanked 200 Times in 155 Posts
|
Just to tie up thread.
MOT passed yesterday with only advisories being low tyre tread, unfortunatly it has taken me more than 10 days to do required work so it was a full Test again, at least I have piece of mind that it has had a thorough going over and has a fresh bill of health. Wishbone replacement turned into a trauma due to the middle peg refusing to come free of subframe, ended up borrowing a garages lift for 10 minutes and huge ball joint splitter fork with sledge hammer to beat it. The other problem I struggled with and had to sort on the garage lift was the larger M12 union under the drivers seat bulk head refused to come undone. The problem is trying to brace the union block while you employ enough torque without twisting the pipes, the solution was a small set of quality mole grips locked on the union and braced against the bulkhead while you get a small turn to crack it, space is very limited. Few pics of work:  OSF brake pipe, yes its wonky and not neat but it will do the job. If you want it looking good on the eye you need a small pair of pipe bending pliers to work in close quarters under the arch, I did this by hand and it shows. It follows the original run and is quite easy to get it clipped in the original clips I took battery box and air filter cover off to aid access routing pipe and found it easier to clip into the clips from underneath near the steering rack. Next job was the dreaded NS rear, for some reason I expected this to be a ****** and expected to admit defeat and route around the tank. I can safely say it is quite easy to thread it over the top of the tank along original route, no joins needed. The old pipe had to be cut to remove and the key is to remove rear seat squab and both tanks inspection covers so you can see what is going on, also the tank has to be dropped a little, not by much just so there is a bit of give and play in it. Thanks for advising that this is possible as I would not have attempted it otherwise I threaded the pipe through the inspection covers 1st as getting it accross the top of the tank is the tricky bit. I cut the pipe oversize and once it is accross the tank a bit of to-ing and fro-ing is needed to manipulate it but it is quite possible with easy to bend copper. I know Kuniffer is preffered but I was worried that my cheap flaring tool may not be up to the task so settled for copper. I connected wheel side first then cut the long run under car to lenght and connected to splitter union. Next task was the Inner Tie rod failure. Polish import failed to arrive so I ordered this from ECP  £28 including P+P and arrived in 3 days. A few pics of job, the part to be replaced is here:  Wheel of and undo track Rod end:  This makes life much easier, not recommended without:  Pops it off with ease:  Track Rod now unscrews, counting the turns to retain a rough tracking, the cable tie was on the rack end of the bellows and a pain to get off:  Left with this:  The fubared ball joint:  The bellows really hamper you and get in the way. I had to grind the nut off to allow the bellows to slip off and out of way:  So far very straight forward, now I hit the brick wall. I have read they just unscrew with mole grips or water pump pliers:  Could not get it to budge, the clever Rover design of a smooth rounded body with no flats and the spot weld made it tricky. I had to resort to grinding flats onto it to get a large spanner on it:  It took quite a lot of force to crack it off, which contradicts what some people have said. I think mine might have had a larger welding tack than most:  It took a bit of the rack with it:  Not good but hopefully it wont cause a problem, the new Tie Rod was screwed tight on with threadlock. Job done and the steering feels alot tighter and more positive. Once I have chased up the missing Polish import I will do the other side. All good 12 months ticket, in reply to T-Cut yes the arms are flaky but MOT man was happy with them and they are next on the list to do. Rome wasnt built in a day.  |
|
|
|
 |
|
|


 Linear Mode

