
|
|
|
|
|
|
||
|
|
||
 21st January 2020, 20:26
|
#291 |
|
Posted a thing or two
MG ZT 190 + and MKIV Supra Join Date: Jan 2009
Location: Plymouth
Posts: 1,551
Thanks: 224
Thanked 493 Times in 359 Posts
|
A bit of an update.
Firstly I repainted the rear calipers, this time with the correct caliper paint but in the same colour.  IMG_20200114_203527 by Jon Christie, on Flickr IMG_20200114_203527 by Jon Christie, on Flickr IMG_20200114_203538 by Jon Christie, on Flickr IMG_20200114_203538 by Jon Christie, on FlickrAdditionally the hand brake was set up on the shoe adjusters. The steering rack has been refurbished by a professional steering rack repairer and is now sat on the refurbished front subframe. I use the same company all the time and they have never let me down. 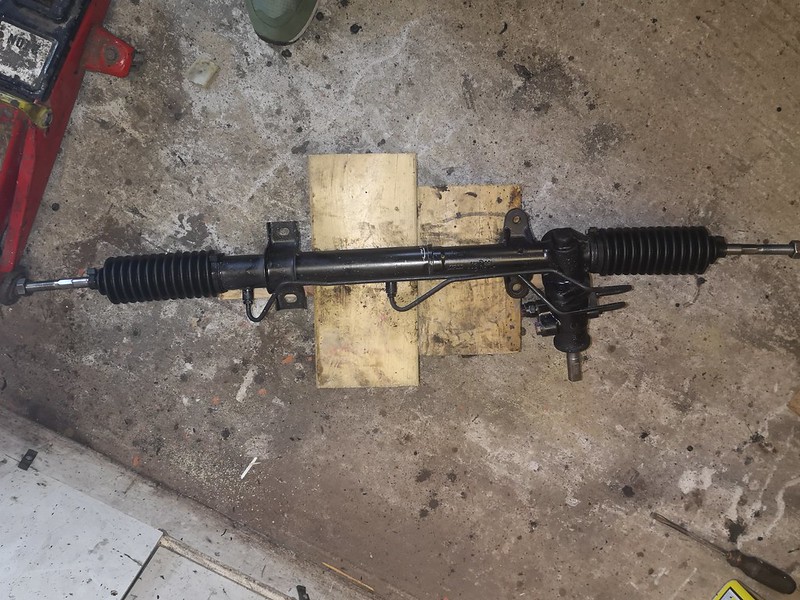 IMG_20200111_113239 by Jon Christie, on Flickr IMG_20200111_113239 by Jon Christie, on FlickrNow onto the front suspension. I have been looking forward to this fight  Firstly my only use for the steel spare wheel is to enable me to remove the hub nuts. On the front wheels I remove the calipers and caliper carriers, fit the spare then using a 3ft 1/2 inch drive breaker bar and a small extension and the car on the ground I have never failed to undo a hub nut with too much problem  IMG_20200119_170847 by Jon Christie, on Flickr IMG_20200119_170847 by Jon Christie, on FlickrThe passenger side was a struggle to undo once the torque was broken. Once undone I could see the drive shaft end thread was damaged. I dont know why but I suspect a previous job had been done and maybe the thread got damaged then  . It was not cross threaded so I dressed up the damage and now the thread runs true. . It was not cross threaded so I dressed up the damage and now the thread runs true.Next up the strip down begins. Firstly I recommend the following: Use penetrating oil on all the fastenings and give it time to work Use decent 6 point sockets rather than 12 points I use a 1/2 inch breaker bar I use a fox wedge to open the pinch collars on the hub but only ever so slightly. Too much and you can damage the hub. I wont go through the breakdown as its easier to show on build up but both side stripped down  IMG_20200121_201104 by Jon Christie, on Flickr IMG_20200121_201104 by Jon Christie, on Flickrand the struts removed 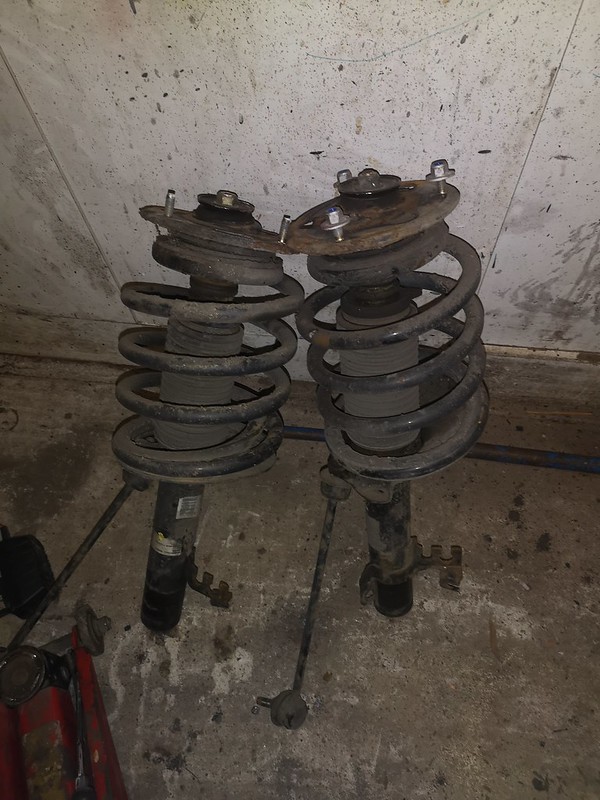 IMG_20200121_201050 by Jon Christie, on Flickr IMG_20200121_201050 by Jon Christie, on FlickrAs the front links have not given me any issues I have new boots to fit and will give them a refurb rather than buying Chinese NAUGHTY WORD-NAUGHTY WORD-NAUGHTY WORD-NAUGHTY WORD- in the numerous guises out there. Also I will re use the passenger side hub after a refurb. The front strip down goes on and an update to follow,
__________________
Jon C Living the dream  MK IV VVTI Tiptronic TT Toyota Supra MG ZT 190+
BornTuesday, 10th July 2001 @ 09:01:10 259th ZT to run off the production line, out of 18,894 252nd ZT 190 + to be made out of 4,023 101st ZT in Solar Red (code: CEU) to be made out of 1,888 |

|

|
|
29th January 2020, 22:17
|
#292 |
|
Posted a thing or two
MG ZT 190 + and MKIV Supra Join Date: Jan 2009
Location: Plymouth
Posts: 1,551
Thanks: 224
Thanked 493 Times in 359 Posts
|
A small update but loads done on the front and almost ready for rebuild
So after the hubs and struts were removed I worked my around the subframe:- Unbolted the power steering hose which is bolted on the drivers side of the frame Unbolted the oil cooler coolant pipework which is bolted on the front of the frame Removed the cat from the 2 x manifolds  IMG_20200122_201714 by Jon Christie, on Flickr IMG_20200122_201714 by Jon Christie, on FlickrRemove the lower engine mount ( I replaced this a couple of years ago) Remove the sub frame rear bolts and front chassis plates. Working in the foot well undo the steering column clamp bolt. I unclamped the top power steering hose from the engine. This enables me to lower the subframe with the steering rack still connected hydraulically. With a jack on the rear end of the frame and blocks of 4 x 4 wood ( I made these up years ago) under the front end to support the frame I undid the remaining 4 x subframe bolts. Once all undone I lowered the jack and wooden blocks equally until the frame was sat on the jack. This allowed me room to get to the steering rack to undo the hydraulic flexi pipes. I then dragged the frame from under the car  IMG_20200125_151000 by Jon Christie, on Flickr IMG_20200125_151000 by Jon Christie, on FlickrThe ARB has gone off to the powder coater All the remaining parts I needed for my build which I didnt have from my scrap car for overhaul were then prepped for painting 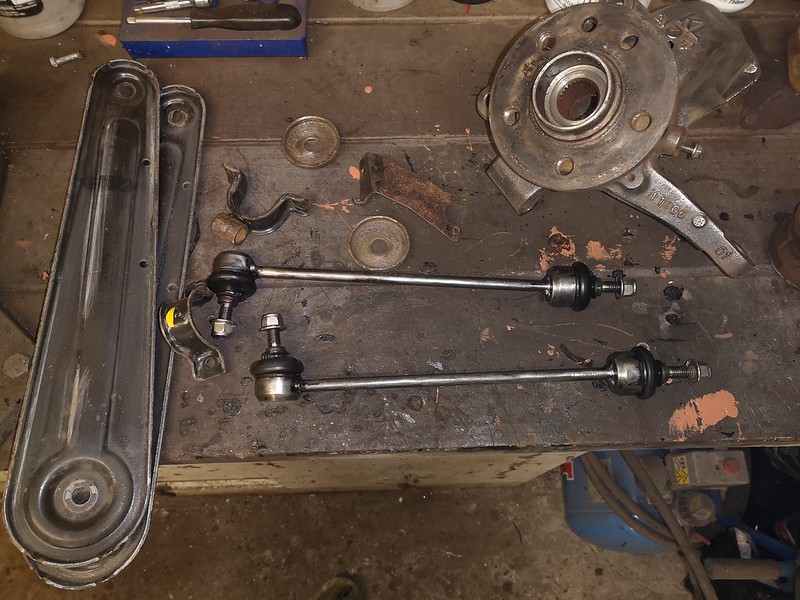 IMG_20200127_202519 by Jon Christie, on Flickr IMG_20200127_202519 by Jon Christie, on Flickrand Primed with the same corroless primer ready for top coat.  IMG_20200129_193000 by Jon Christie, on Flickr IMG_20200129_193000 by Jon Christie, on FlickrNext up the cars strut tunnels were prepped for painting. 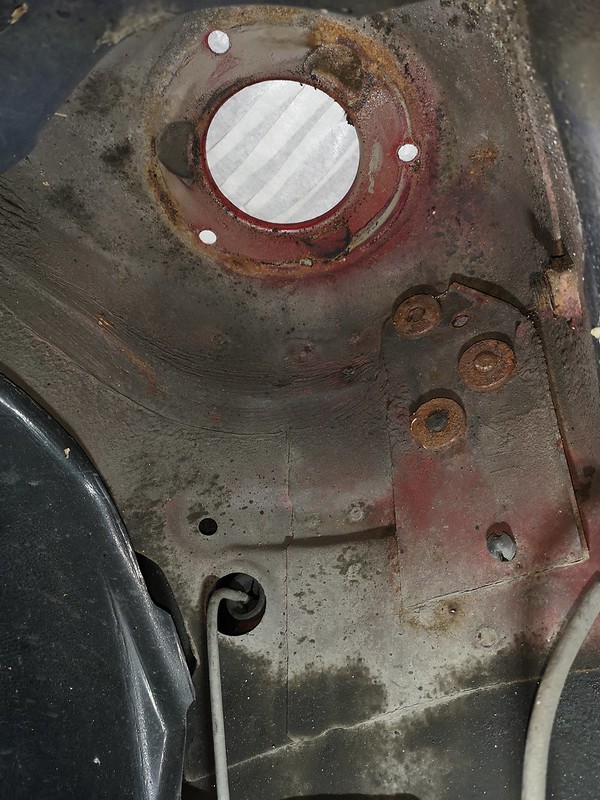 IMG_20200127_204302 by Jon Christie, on Flickr IMG_20200127_204302 by Jon Christie, on FlickrAll the rust was wire brushed off  IMG_20200127_205120 by Jon Christie, on Flickr IMG_20200127_205120 by Jon Christie, on Flickrand treated before painting  IMG_20200130_202726 by Jon Christie, on Flickr IMG_20200130_202726 by Jon Christie, on Flickr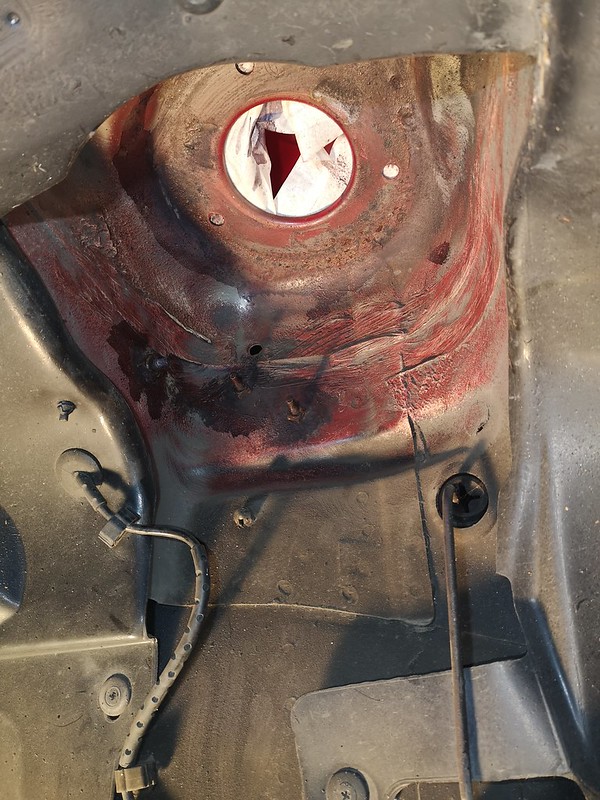 IMG_20200130_202740 by Jon Christie, on Flickr IMG_20200130_202740 by Jon Christie, on FlickrNow onto the drop links.
__________________
Jon C Living the dream MK IV VVTI Tiptronic TT Toyota Supra MG ZT 190+
BornTuesday, 10th July 2001 @ 09:01:10 259th ZT to run off the production line, out of 18,894 252nd ZT 190 + to be made out of 4,023 101st ZT in Solar Red (code: CEU) to be made out of 1,888 Last edited by jonc3725; 30th January 2020 at 20:10.. |
|
|
|
|
29th January 2020, 22:38
|
#293 |
|
Posted a thing or two
MG ZT 190 + and MKIV Supra Join Date: Jan 2009
Location: Plymouth
Posts: 1,551
Thanks: 224
Thanked 493 Times in 359 Posts
|
Because my drop links had not given me any issues I decided to refurb them rather than renew with Chinese chocolate ones we are taking a lottery on.
Firstly all the paint was stripped off. I did this before removing the boots to stop contamination getting into the ball joints 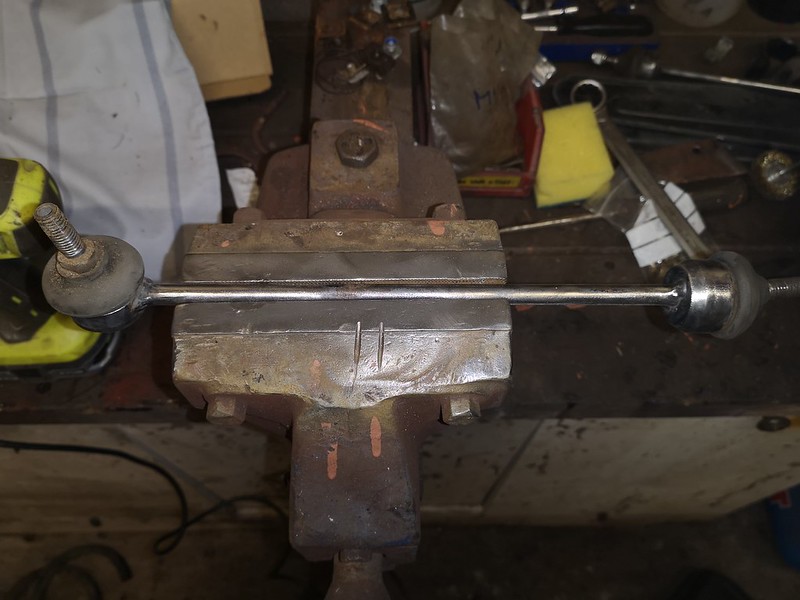 IMG_20200126_195408 by Jon Christie, on Flickr IMG_20200126_195408 by Jon Christie, on FlickrNext up I cleaned up the M10 threads by running a die nut down them. Additionally replacement Nyloc nuts were bought  IMG_20200126_195433 by Jon Christie, on Flickr IMG_20200126_195433 by Jon Christie, on FlickrOnce the paint was removed I noted these are Delphi manufactured items but I cannot believe original.  IMG_20200126_195659 by Jon Christie, on Flickr IMG_20200126_195659 by Jon Christie, on FlickrNext i removed the spring clips and rubber bands on the boots and removed the boots. I laid out all the parts including replacement parts on a cloth so as not to contaminate the ball joints.  IMG_20200127_170031 by Jon Christie, on Flickr IMG_20200127_170031 by Jon Christie, on FlickrThe ball joints had little grease in them and the grease was quite dry so I suspect failure would start occurring in the not too distant future   IMG_20200127_170052 by Jon Christie, on Flickr IMG_20200127_170052 by Jon Christie, on FlickrSo I cleaned out all the old grease by moving the ball joints and flushing out with oil being careful not to score or damage the balls.  IMG_20200127_170653 by Jon Christie, on Flickr IMG_20200127_170653 by Jon Christie, on FlickrNext up I charged the ball joint with new grease. this looks really messy but what I was doing was packing in the grease and moving the ball joint around to get the grease in the right areas.As the joint was moved the grease would squirt out.  IMG_20200127_170859 by Jon Christie, on Flickr IMG_20200127_170859 by Jon Christie, on FlickrNext up I packed the joints with grease  IMG_20200127_171021 by Jon Christie, on Flickr IMG_20200127_171021 by Jon Christie, on FlickrI then packed the boots with grease and fitted them over the ball shafts. At this point grease squirted out the top and bottom which tells me the joints are well charged  IMG_20200127_171137 by Jon Christie, on Flickr IMG_20200127_171137 by Jon Christie, on FlickrThe area around the boots was cleaned off and the spring clips were refitted and I used very thin tie wraps for the top joint to maintain integrity. I fitted 2 x new boots to replace worn ones  IMG_20200127_172503 by Jon Christie, on Flickr IMG_20200127_172503 by Jon Christie, on FlickrBoth units rebuilt ready for painting.  IMG_20200127_202353 by Jon Christie, on Flickr IMG_20200127_202353 by Jon Christie, on FlickrI really hope with this remedial work these units last longer than the ones we can buy. Additionally the aluminium lower arm ball joints have been through the same process as the drop link ball joints and new boots fitted.  IMG_20200130_202643 by Jon Christie, on Flickr IMG_20200130_202643 by Jon Christie, on FlickrAll the primed parts are now in top coat corroless drying .
__________________
Jon C Living the dream MK IV VVTI Tiptronic TT Toyota Supra MG ZT 190+
BornTuesday, 10th July 2001 @ 09:01:10 259th ZT to run off the production line, out of 18,894 252nd ZT 190 + to be made out of 4,023 101st ZT in Solar Red (code: CEU) to be made out of 1,888 Last edited by jonc3725; 30th January 2020 at 20:07.. |
|
|
|
|
29th January 2020, 23:37
|
#294 |
|
This is my second home
ZT 260 SE Twilight and 10 other 75 ZT's :O Join Date: Jan 2007
Location: Conwy NORTH WALES
Posts: 11,094
Thanks: 512
Thanked 1,116 Times in 763 Posts
|
You can stop it all now and just sell it to me😀
Agree entirely on the drop links theory !!
__________________
[SIGPIC][/SIGPIC] Newbies do now!! 1. Plenum drains..all 3 or 4 year dependent 2. Cooling fan..All speeds functioning 3. Bonnet cable divider block |
|
|
|
|
30th January 2020, 21:05
|
#295 | |
|
Posted a thing or two
MG ZT 190 + and MKIV Supra Join Date: Jan 2009
Location: Plymouth
Posts: 1,551
Thanks: 224
Thanked 493 Times in 359 Posts
|
Quote:
Just sent you a PM
__________________
Jon C Living the dream MK IV VVTI Tiptronic TT Toyota Supra MG ZT 190+
BornTuesday, 10th July 2001 @ 09:01:10 259th ZT to run off the production line, out of 18,894 252nd ZT 190 + to be made out of 4,023 101st ZT in Solar Red (code: CEU) to be made out of 1,888 |
|
|
|
|
|
8th February 2020, 11:43
|
#296 |
|
Posted a thing or two
MG ZT 190 + and MKIV Supra Join Date: Jan 2009
Location: Plymouth
Posts: 1,551
Thanks: 224
Thanked 493 Times in 359 Posts
|
Hopefully get the subframe back up this weekend on the car. I have been waiting for the front ARB to come back from powder coating and I picked it up yesterday
 So an update on progress The Front links completed 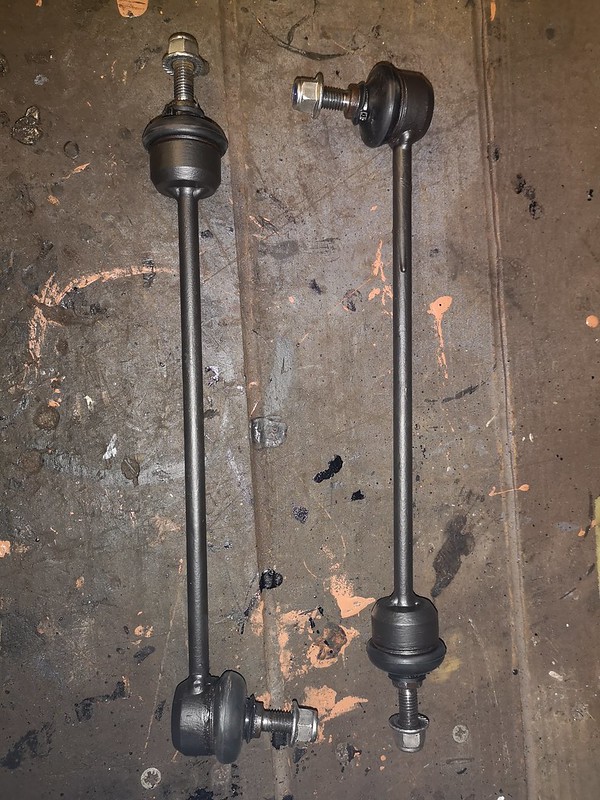 IMG_20200131_161131 by Jon Christie, on Flickr IMG_20200131_161131 by Jon Christie, on FlickrThe remaining suspension parts completed painting 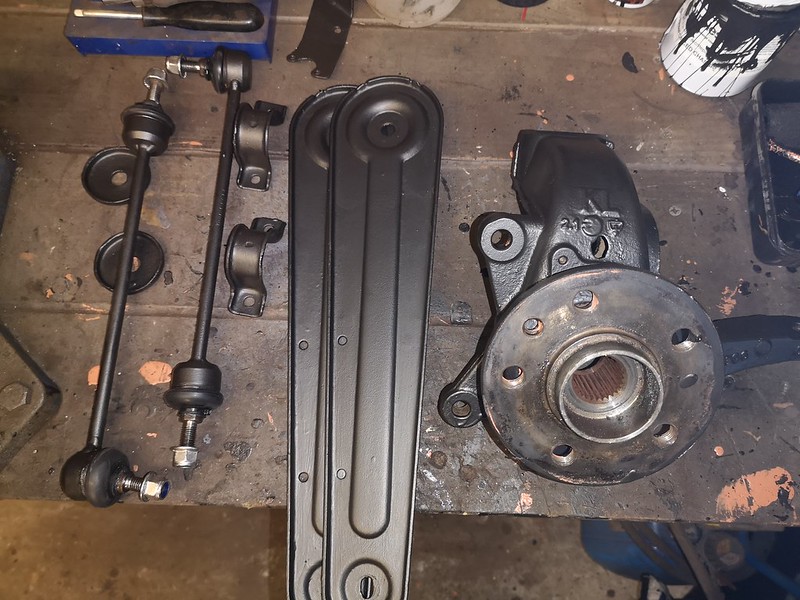 IMG_20200131_161304 by Jon Christie, on Flickr IMG_20200131_161304 by Jon Christie, on FlickrThe front strut towers completed ready to take the front struts  IMG_20200203_195426 by Jon Christie, on Flickr IMG_20200203_195426 by Jon Christie, on Flickr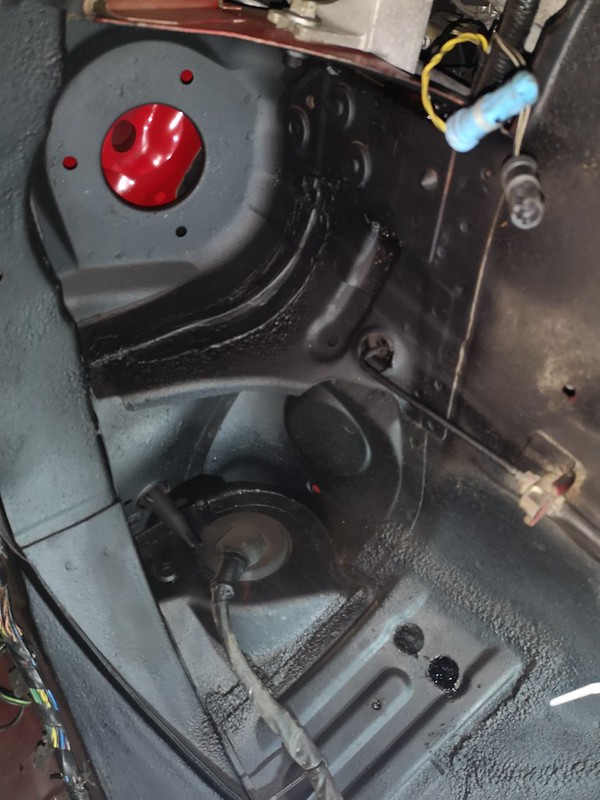 IMG_20200203_195341 by Jon Christie, on Flickr IMG_20200203_195341 by Jon Christie, on FlickrAnd a small but important job was completed. The front headlamp level sensor and bracket was refurbished When removed  IMG_20200126_191712 by Jon Christie, on Flickr IMG_20200126_191712 by Jon Christie, on FlickrNow with new arms, fastenings and the bracket refurbed ready to fit  IMG_20200202_131714 by Jon Christie, on Flickr IMG_20200202_131714 by Jon Christie, on Flickrso next up was build up the front struts and hubs ready for bolting up Brake dust covers and new clamp fastenings fitted to the hubs and the Hubs readied for fitting 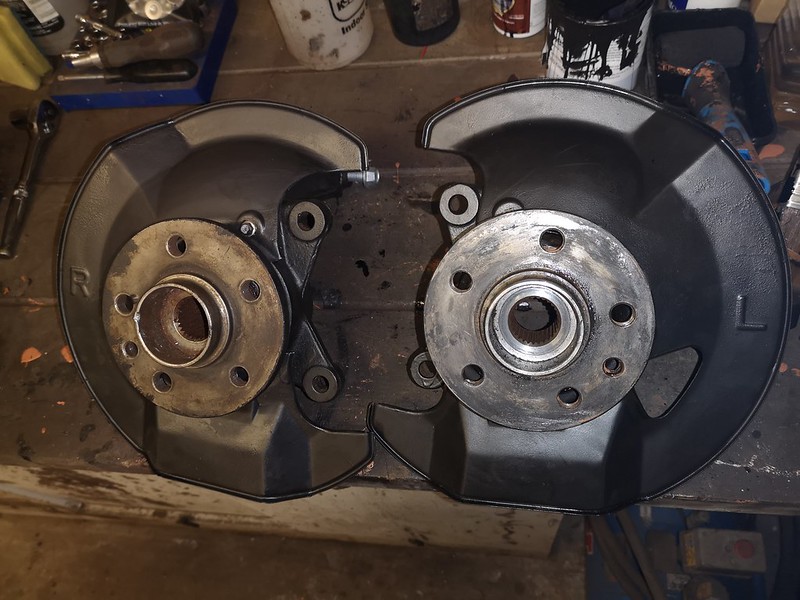 IMG_20200131_163943 by Jon Christie, on Flickr IMG_20200131_163943 by Jon Christie, on Flickr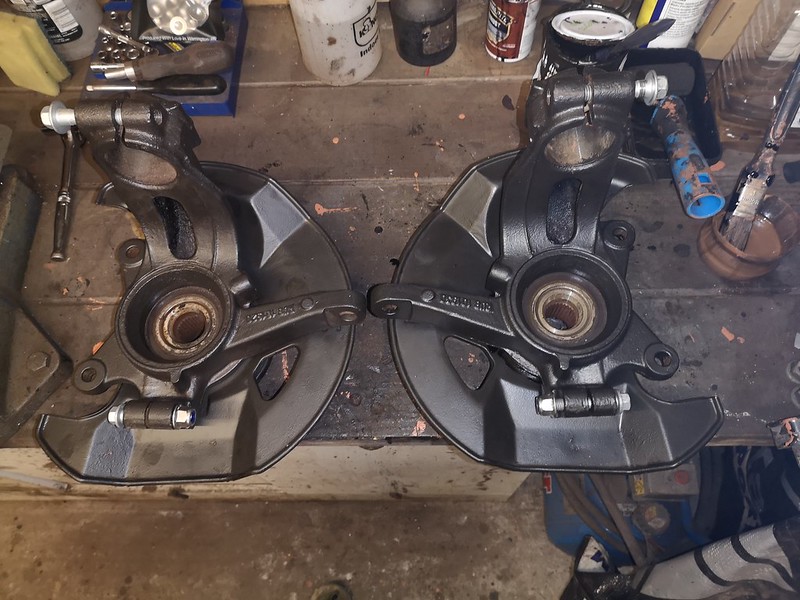 IMG_20200131_164118 by Jon Christie, on Flickr IMG_20200131_164118 by Jon Christie, on FlickrOnto the struts Top mounts all overhauled and new fastenings 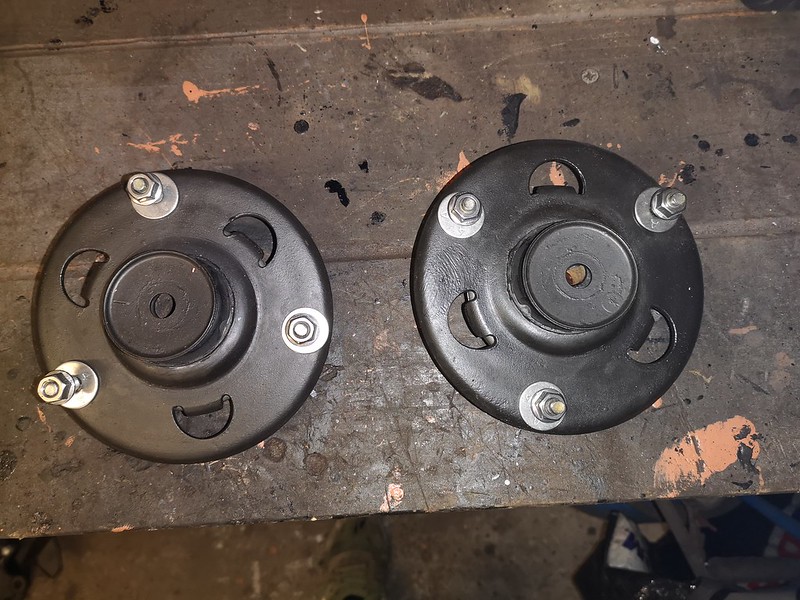 IMG_20200131_170853 by Jon Christie, on Flickr IMG_20200131_170853 by Jon Christie, on FlickrAnd new bearings fitted. My originals were fubard 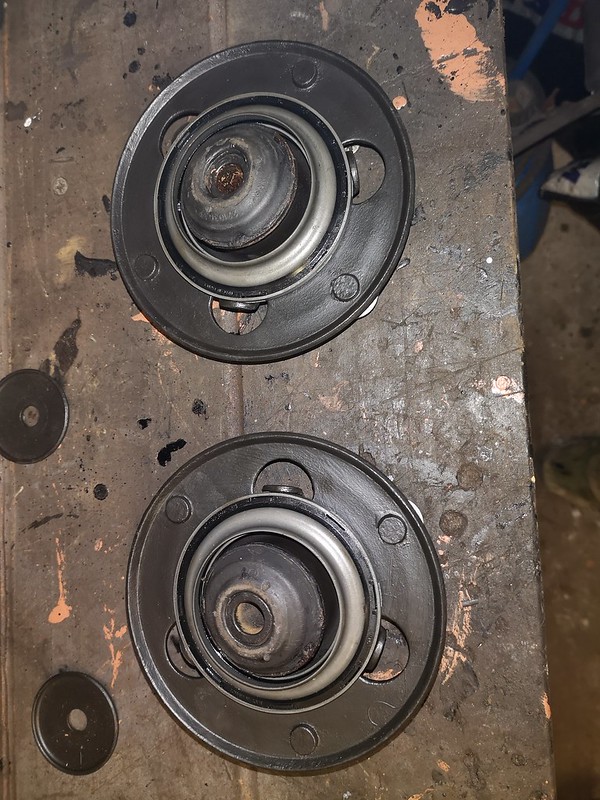 IMG_20200131_170908 by Jon Christie, on Flickr IMG_20200131_170908 by Jon Christie, on FlickrDust covers, bump stops and top plate all cleaned/renewed/painted and clipped together ready to fit 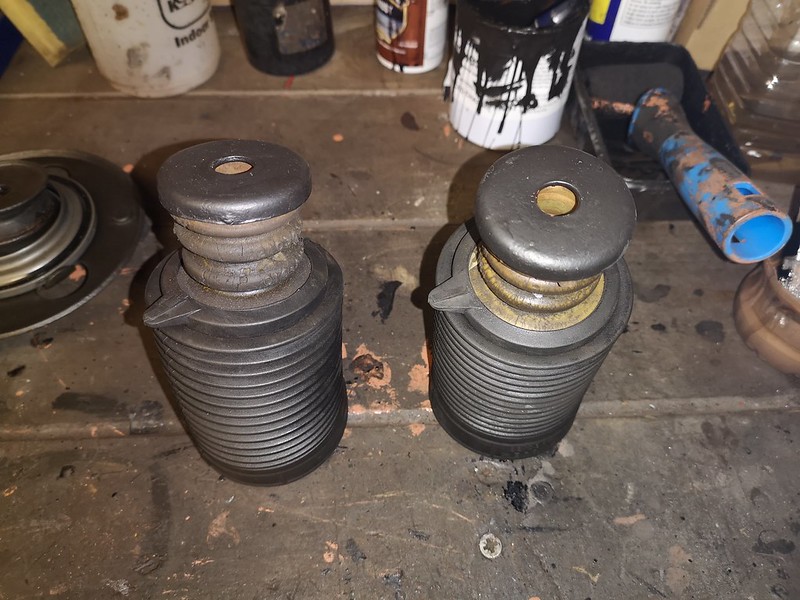 IMG_20200131_170936 by Jon Christie, on Flickr IMG_20200131_170936 by Jon Christie, on FlickrPowder coated springs ready to fit. These are lowering springs so dont need compression to fit  IMG_20200131_171119 by Jon Christie, on Flickr IMG_20200131_171119 by Jon Christie, on FlickrAnd the struts with tyre protectors and front links complete ready to fit 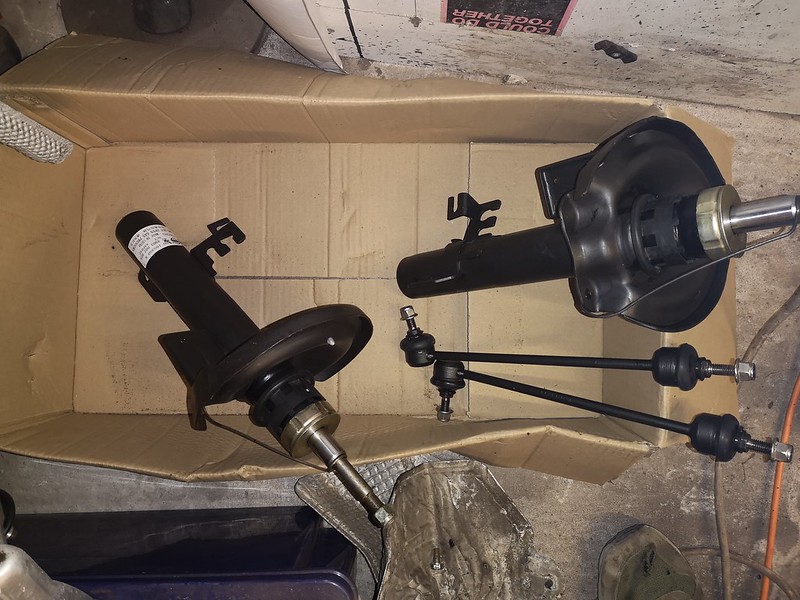 IMG_20200131_171140 by Jon Christie, on Flickr IMG_20200131_171140 by Jon Christie, on FlickrApologies for the quality of photo (obviously shaking with excitement ) but the dust cover and bumpstop are fitted to the strut. There is a clip on the bottom of the duct cover which clips over the top of the strut to hild the cover in place.Next the front links were fitted. The studious people reading this will notice I cut the threaded lengths to just above the nyloc. If change is required in the future this makes removal much easier. 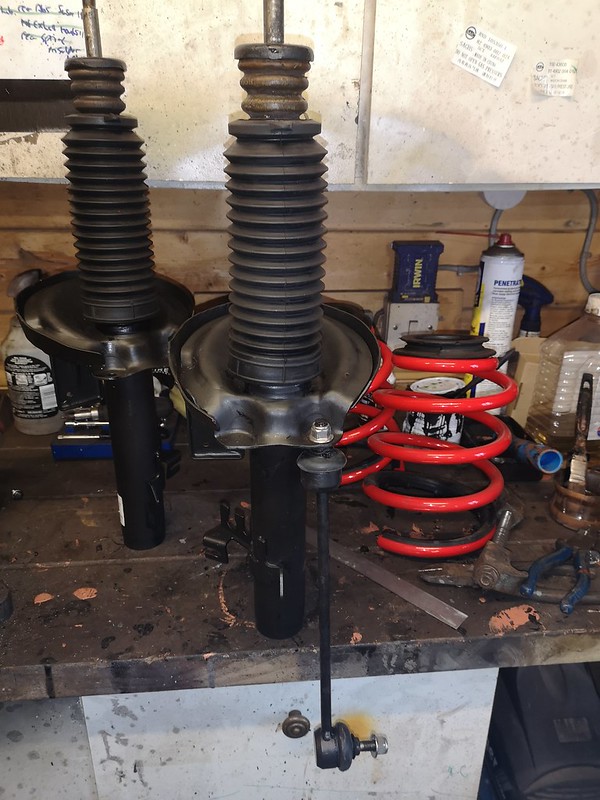 IMG_20200202_132747 by Jon Christie, on Flickr IMG_20200202_132747 by Jon Christie, on FlickrSprings with top and bottom insulator and top mount added to complete the unit. Because these are lowering springs they did not need compression however normal springs need compressing to get the top mount on.  IMG_20200202_141016 by Jon Christie, on Flickr IMG_20200202_141016 by Jon Christie, on FlickrSat to one side ready to fit once the subframe is up on the car  IMG_20200202_183830 by Jon Christie, on Flickr IMG_20200202_183830 by Jon Christie, on FlickrAs I say hoping to get the subframe back on the car this weekend
__________________
Jon C Living the dream MK IV VVTI Tiptronic TT Toyota Supra MG ZT 190+
BornTuesday, 10th July 2001 @ 09:01:10 259th ZT to run off the production line, out of 18,894 252nd ZT 190 + to be made out of 4,023 101st ZT in Solar Red (code: CEU) to be made out of 1,888 |
|
|
|
|
8th February 2020, 13:05
|
#297 |
|
This is my second home
ZT 260 SE Twilight and 10 other 75 ZT's :O Join Date: Jan 2007
Location: Conwy NORTH WALES
Posts: 11,094
Thanks: 512
Thanked 1,116 Times in 763 Posts
|
Bravo nice work as usual

__________________
[SIGPIC][/SIGPIC] Newbies do now!! 1. Plenum drains..all 3 or 4 year dependent 2. Cooling fan..All speeds functioning 3. Bonnet cable divider block |
|
|
|
|
8th February 2020, 18:32
|
#298 |
|
This is my second home
1979 Capri 1.6L, 1982 Capri 1.6L, 2016 Dacia Stepway Join Date: Jun 2009
Location: Dorset
Posts: 8,595
Thanks: 3,496
Thanked 3,397 Times in 2,218 Posts
|
Awesome work Jon.
|
|
|
|
|
8th February 2020, 22:50
|
#299 |
|
Posted a thing or two
MG ZT 190 + and MKIV Supra Join Date: Jan 2009
Location: Plymouth
Posts: 1,551
Thanks: 224
Thanked 493 Times in 359 Posts
|
Thank you Jules and Dallas your comments are always welcome
so for a couple of hour this afternoon I built up the subframe ready to go up under the car Firstly the sub frame was laid back down in front of the car and the steering rack fitted and centralised. 4 x bolts for the rack. doing the bottom then top ones before torquing down  IMG_20200208_163756 by Jon Christie, on Flickr IMG_20200208_163756 by Jon Christie, on FlickrThen I fitted the lower arms and ARB. The torque on the lower arm bushes is fairly hefty  IMG_20200208_204937 by Jon Christie, on Flickr IMG_20200208_204937 by Jon Christie, on FlickrThats the front sub frame ready to go back under the car. Oh that will be a fight by myself but where theres a will theres a way  IMG_20200208_204948 by Jon Christie, on Flickr IMG_20200208_204948 by Jon Christie, on Flickr IMG_20200208_205006 by Jon Christie, on Flickr IMG_20200208_205006 by Jon Christie, on Flickr IMG_20200208_205015 by Jon Christie, on Flickr IMG_20200208_205015 by Jon Christie, on FlickrI have to say I am very happy with the finish, I just hope it gives the cars many more years of life. Before refurb IMG_20200125_151000 by Jon Christie, on FlickrPost refurb IMG_20200208_204937 by Jon Christie, on Flickr
__________________
Jon C Living the dream MK IV VVTI Tiptronic TT Toyota Supra MG ZT 190+
BornTuesday, 10th July 2001 @ 09:01:10 259th ZT to run off the production line, out of 18,894 252nd ZT 190 + to be made out of 4,023 101st ZT in Solar Red (code: CEU) to be made out of 1,888 Last edited by jonc3725; 8th February 2020 at 22:55.. |
|
|
|
|
9th February 2020, 17:02
|
#300 |
|
This is my second home
1979 Capri 1.6L, 1982 Capri 1.6L, 2016 Dacia Stepway Join Date: Jun 2009
Location: Dorset
Posts: 8,595
Thanks: 3,496
Thanked 3,397 Times in 2,218 Posts
|
That subframe!
 what an incredible transformation. what an incredible transformation. |
|
|
|
 |
|
|


 Linear Mode

