
|
|
|
|
|
|
||
|
|
||
 26th February 2023, 07:45
|
#21 | |
|
Gets stuck in
75 Saloon Join Date: Apr 2022
Location: North Somerset
Posts: 557
Thanks: 13
Thanked 20 Times in 8 Posts
|
Quote:
__________________
Matt 2001 Rover 75 Connoisseur SE 2.5 (BRG) 1999 Rover 75 Club 2.5 (Dorchester Red) 1973 Triumph Dolomite (Honeysuckle) |
|

|

|
|
26th February 2023, 07:50
|
#22 | |
|
This is my second home
Rover 75 Saloon & Tourer Join Date: Sep 2012
Location: Lincoln
Posts: 14,936
Thanks: 1,630
Thanked 3,032 Times in 2,181 Posts
|
Quote:
macafee2 |
|
|
|
|
|
26th February 2023, 09:13
|
#23 | |
|
Gets stuck in
75 Saloon Join Date: Apr 2022
Location: North Somerset
Posts: 557
Thanks: 13
Thanked 20 Times in 8 Posts
|
Quote:
__________________
Matt 2001 Rover 75 Connoisseur SE 2.5 (BRG) 1999 Rover 75 Club 2.5 (Dorchester Red) 1973 Triumph Dolomite (Honeysuckle) |
|
|
|
|
|
26th February 2023, 19:25
|
#24 | ||
|
Give to Learn

Freelander 2 Join Date: Aug 2010
Location: West Midlands
Posts: 18,735
Thanks: 1,155
Thanked 6,407 Times in 3,874 Posts
|
Quote:
I use these quite a lot for inside locks and such with cogs etc.  1 1
__________________
Arctic Givology Learn to Give Everything is Achievable  ad altiora tendo. Check out our Nano meet dates http://www.midlandsnanomeets.co.uk/ http://www.the75andztclub.co.uk/index.php?thepage=howto " You do the work , we supply the expertise " |
||
|
|
|
|
26th February 2023, 21:10
|
#25 |
|
Gets stuck in
75 Saloon Join Date: Apr 2022
Location: North Somerset
Posts: 557
Thanks: 13
Thanked 20 Times in 8 Posts
|
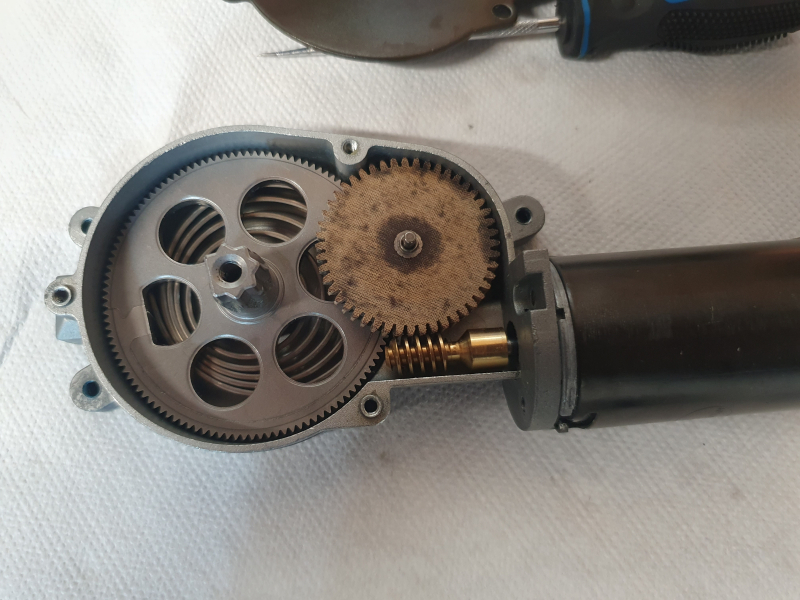
This is how I reassembled the rear blind gear mechanism. Several of these photos were taken when I did a "dry run" without grease, but on final assembly a lithium based multipurpose grease was used. Be careful not to use too much grease as this can cause excessive drag and slow the mechanism down.
1. Attach the spring to the large diameter wheel, ensuring the outer tang locates properly in the groove as shown at the top of this photo.  2. The inner tang now needs to locate in this slot near the brass bushing in the main body. This is a bit fiddly and I used a pick tool to help locate it.   3. Locate the shaft of the smaller diameter wheel in the corresponding blind hole.  4. Put the brown coloured smaller diameter wheel onto the shaft ensuring it meshes with the large diameter wheel properly.  5. Insert the motor into the housing, ensuring the worm gear meshes with the brown wheel correctly. Attach the motor to the housing with the three T10 Torx screws. One of the screws is a bit difficult to access, I found that a screwdriver couldn't get a good hold on it but a thinner t-handled tool could. Don't worry about tensioning the spring at this stage.   6. Put the top plate on. I used a thin trim tool to push the shaft of the brown wheel to get it to locate properly in the brass bushing of the top plate. Insert the three T10 Torx top plate screws.  7. Now it's time to tension the spring. Notice that the flat on the interface with the blind mechanism is at the 6 o'clock position on the photo above. Ensure that the T20 Torx stop screw is not inserted.  8. Using a 12V battery and some wire, run the motor in the clockwise direction to tension the spring. This is done by connecting pin 1 to positive and pin 3 to negative. Run the motor till the large gear completes a 360 degree rotation i.e. the flat mentioned previously ends up back at the 6 o'clock position.   9. Insert the stop screw.  10. Use the battery and wire again to continue to run the motor in the same direction. It'll rotate clockwise through about 80 degrees before hitting the stop screw. Note the flat is now at the 8-9 o'clock position.  11. The motor can now be reattached to the blind. If the blind is still attached to the parcel shelf, there is one T20 screw that is difficult to access. I found a T20 bit and 1/4" spanner to be the easiest way.  I have tested the blind after completing reassembly with fresh grease and the blind raises in about 4-5 seconds.
__________________
Matt 2001 Rover 75 Connoisseur SE 2.5 (BRG) 1999 Rover 75 Club 2.5 (Dorchester Red) 1973 Triumph Dolomite (Honeysuckle) Last edited by Matt_75; 26th February 2023 at 21:17.. |
|
|
|
 |
|
|


 . Thinking about the assembly procedure, it might be possible to put it together without doing the fiddly spring tensioning bit, provided the first thing you do after it's built is run the motor in reverse (lower the blind). I would want to test that theory before committing to it though.
 Linear Mode

