
|
|
|
|
|
|
||
|
|
||
 2nd August 2011, 11:50
|
#141 | |
|
Gets stuck in
Rover 75 Saloon Join Date: Jan 2010
Location: Preston
Posts: 626
Thanks: 50
Thanked 44 Times in 32 Posts
|
Quote:
|
|

|

|
|
3rd August 2011, 00:31
|
#142 | |
|
Give to Learn

Freelander 2 Join Date: Aug 2010
Location: West Midlands
Posts: 18,837
Thanks: 1,155
Thanked 6,407 Times in 3,874 Posts
|
Quote:
These photos were taken yesterday evening from Carl's car when i visited him note the gap between the two plates it should be 3mm but as you can see it is infact treble that 9mm which would make 39mm on the handbrake nut insted of the 25mm yes  i have also added a video of the brake being applied on and taken off, there seems to be no cable stretch in either the single or double cables. It is infact floating above the large rubber bung which i have heard the compensator can be got to through, even though i would not like to try note how we must have that all round movement which as been stated back in this thread. i have also added a video of the brake being applied on and taken off, there seems to be no cable stretch in either the single or double cables. It is infact floating above the large rubber bung which i have heard the compensator can be got to through, even though i would not like to try note how we must have that all round movement which as been stated back in this thread.Once cover plate is removed you can get to compensator. Fig 1  1 1Right away note that gap which is the stretch in the compensator rod.  2 2This pic fig 3 shows the cable nut adjustment with washer also note the earth wires which can get easly broken when removing the carpet if you had to at any time but not to do this repair thank god  3 3Fig 4 a full view of handbrake cables and compensators  4 4View from above fig 5 note the angle of the double wired compensator to allow for adjustment on either back wheels  5 5Fig 6 again you can see the twist  6 6plate back in place fig 7  7 7I am at the moment in the process of fitting my modified compensator with out removing the centre console or rear seats i will post this up at a later date i doubt anyone else will want to do what i am doing, but through this process i may find an easier way for others or not Click the link below for video of handbrake cables working the compensators. http://youtu.be/pqNtnf5BMxo Arctic https://www.youtube.com/watch?v=nGrq-HeLvYQ
__________________
Arctic Givology Learn to Give Everything is Achievable  ad altiora tendo. Check out our Nano meet dates http://www.midlandsnanomeets.co.uk/ http://www.the75andztclub.co.uk/index.php?thepage=howto " You do the work , we supply the expertise " Last edited by Arctic; 16th August 2021 at 19:58.. |
|
|
|
|
|
3rd August 2011, 03:08
|
#143 | |
|
Give to Learn
Freelander 2 Join Date: Aug 2010
Location: West Midlands
Posts: 18,837
Thanks: 1,155
Thanked 6,407 Times in 3,874 Posts
|
Quote:
just a thought as not much room if not you will still get all the movement needed nice very nice, just that space between top of plate and top extra bar welded on can it be tested and or measured so we can find out.
__________________
Arctic Givology Learn to Give Everything is Achievable ad altiora tendo. Check out our Nano meet dates http://www.midlandsnanomeets.co.uk/ http://www.the75andztclub.co.uk/index.php?thepage=howto " You do the work , we supply the expertise " |
|
|
|
|
|
3rd August 2011, 09:53
|
#144 |
|
Loves to post
Rover 75 1.8T SE Join Date: Apr 2011
Location: Southport
Posts: 402
Thanks: 1
Thanked 72 Times in 37 Posts
|
Hey great pics! Fig 5 nicely illustrates the purpose of the compensator "compensating" for the "different length in cables" (which is most probably not down to thehm stretching but because each side of the brakes is adjusted/worn slightly differently.
According to the official workshop manual the compensator is access through that rubber bung but you have to remove the exhaust and heatshields first. Not sure about the T-cut weld it on top mod. If you do that then the whole point of having that bar being able to rotate round the pin is lost - must be there for a reason. I think its to compensate for the primary cable becoming higher as you pull the handbrake lever up. If this worked surely it would be designed in the first place to all be one part???? Always worth remembering that what is trying to do is take 2 slightly different lengths of cable and turn it into one cable which is moving around so this "lose" joint takes up all the slack. BTW Can we see the video? DOes it have a "release" date yet? ;-') Top work :-) |
|
|
|
|
3rd August 2011, 09:54
|
#145 |
|
This is my second home
Rover75 and Mreg Corsa. Join Date: Nov 2006
Location: Sumweer onat mote o'dust (Sagin)
Posts: 21,754
Thanks: 341
Thanked 3,660 Times in 2,924 Posts
|
It might, but again this is just a conceptual image. Instead of the upper rod maybe you could use a flat bar, say an eighth inch thick by half an inch wide. Is the cover plate level with the floor? In your Photo 1 the cover plate seems quite higher than floor level around the hatch.
TC |
|
|
|
|
3rd August 2011, 21:10
|
#146 | |
|
Give to Learn
Freelander 2 Join Date: Aug 2010
Location: West Midlands
Posts: 18,837
Thanks: 1,155
Thanked 6,407 Times in 3,874 Posts
|
Quote:
Click the link below for video of handbrake cables working the compensators.  http://youtu.be/pqNtnf5BMxo
__________________
Arctic Givology Learn to Give Everything is Achievable ad altiora tendo. Check out our Nano meet dates http://www.midlandsnanomeets.co.uk/ http://www.the75andztclub.co.uk/index.php?thepage=howto " You do the work , we supply the expertise " |
|
|
|
|
|
3rd August 2011, 21:12
|
#147 | |
|
Give to Learn
Freelander 2 Join Date: Aug 2010
Location: West Midlands
Posts: 18,837
Thanks: 1,155
Thanked 6,407 Times in 3,874 Posts
|
Quote:
I cant quite remember now but will take a look tomoz and let you know. Arctic
__________________
Arctic Givology Learn to Give Everything is Achievable ad altiora tendo. Check out our Nano meet dates http://www.midlandsnanomeets.co.uk/ http://www.the75andztclub.co.uk/index.php?thepage=howto " You do the work , we supply the expertise " |
|
|
|
|
|
6th August 2011, 12:55
|
#148 |
|
Give to Learn
Freelander 2 Join Date: Aug 2010
Location: West Midlands
Posts: 18,837
Thanks: 1,155
Thanked 6,407 Times in 3,874 Posts
|
Yesterday i managed to make sometime to get over to use Carl's to use his car to test out the modified compensator,a new compensator it worked well and i am sure this is going to solve the dubious handbrake query we all seem to suffer from one time or another, i noted also the cables do not stretch only the compensator bar.
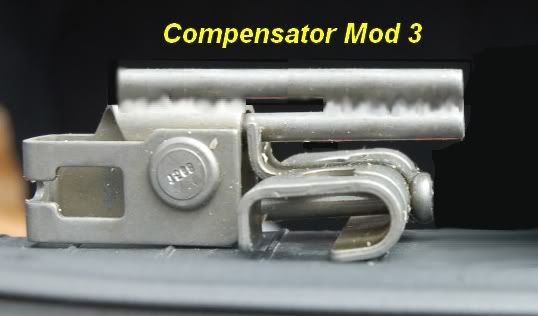
Note the used and stretched compensator above the modified one how it as opened up Fig 1  1 1Adjusted nut to 25mm as it should be Fig 2  2 2This photo shows all three compensators modified fitted above from left used compensator again note that gap and a new un-modified one which as the 3mm gap Fig 3  3 3This time we have the un-modified compensator fitted and the others above still note that gap which on a new one is 3mm on a used and stretched one becomes 8mm on this subject but could be more on others Fig 4  4 4Both the modified compensator and the new one felt more tight and held on three clicks but i suspect after a time only the modified one would remain like this as the new one (un-modified) would eventually stretch and again take up that adjustment on the threaded handbrake. The next photos show the compensators off the car and how when held you can see how the stretched one will fold over on it's self loose, as to the other two un-modified and modified stay on the bend this is because of the stretch making the 3mm gap become 8mm + maybe in some cases. Figs 5/6/7  5 5 6 6 7 7Below i have showed the measurement of the gap in all pics more so in the last two pics. Figs 8/9/10  8 8 9 9 10 10I hope to post up some video's of the modified compensator working and the new un-modified compensator later today or this evening. Arctic.
__________________
Arctic Givology Learn to Give Everything is Achievable ad altiora tendo. Check out our Nano meet dates http://www.midlandsnanomeets.co.uk/ http://www.the75andztclub.co.uk/index.php?thepage=howto " You do the work , we supply the expertise " |
|
|
|
|
6th August 2011, 14:49
|
#149 |
|
This is my second home
75 Contemporary SE Mk II 2004 Man. Sal. CDTi 135ps, FBH on red diesel, WinCE6 DD Join Date: May 2010
Location: Leeds
Posts: 17,274
Thanks: 2,160
Thanked 2,061 Times in 1,586 Posts
|
Thanks Arctic - good detailed comparison.
All we need now, is for someone to find an easy way to get at it without pulling most of the interior out.
__________________
Harry How To's and items I offer for free, or just to cover the cost of my expenses... http://www.the75andztclub.co.uk/foru...40#post1764540 Fix a poor handbrake; DIY ABS diagnostic unit; Loan of the spanner needed to change the CDT belts; free OBD diagnostics +MAF; Correct Bosch MAF cheap; DVB-T install in an ex-hi-line system; DD install with a HK amp; FBH servicing. I've taken a vow of poverty. To annoy me, send money. |
|
|
|
|
6th August 2011, 15:50
|
#150 |
|
This is my second home
75 Contemporary SE Mk II 2004 Man. Sal. CDTi 135ps, FBH on red diesel, WinCE6 DD Join Date: May 2010
Location: Leeds
Posts: 17,274
Thanks: 2,160
Thanked 2,061 Times in 1,586 Posts
|
I've been giving this suggestion of the compensator being a deliberate designed in weak point some thought. Everything mechanical has one part which is that bit weaker than the rest of the system, the part which when it comes under too much strain, will break. Given wear and tear, the weakest part may in time change due to one part wearing to become weaker as time passes.
I don't for one minute believe that Rover deliberately designed this to be a weak point, a fail safe, because it doesn't really fail safe does it? It gradually just makes the handbrake less effective as it stretches and there have been a few reports of these cars rolling when parked, because the handbrake has not been fully applied due to the excess play. Surely the weakest link ought to be that of the amount of pressure you can physically apply with your left arm?
__________________
Harry How To's and items I offer for free, or just to cover the cost of my expenses... http://www.the75andztclub.co.uk/foru...40#post1764540 Fix a poor handbrake; DIY ABS diagnostic unit; Loan of the spanner needed to change the CDT belts; free OBD diagnostics +MAF; Correct Bosch MAF cheap; DVB-T install in an ex-hi-line system; DD install with a HK amp; FBH servicing. I've taken a vow of poverty. To annoy me, send money. |
|
|
|
 |
|
|


 Linear Mode

