
|
|
|
|
|
|
||
|
|
||
 27th March 2020, 06:15
|
#21 | |
|
This is my second home
Rover 75 Saloon & Tourer Join Date: Sep 2012
Location: Lincoln
Posts: 14,991
Thanks: 1,630
Thanked 3,032 Times in 2,181 Posts
|
Quote:
In fact you may not need to remove the head, drift the bolt out with nut still on for as far as you can then remove nut and drift/hammer the bolt all the way out. macafee2 |
|

|

|
|
27th March 2020, 07:38
|
#22 |
|
MG ZT Join Date: Jan 2011
Location: Newcastle Upon Tyne
Posts: 20,151
Thanks: 3,565
Thanked 10,837 Times in 5,718 Posts
|
You will not be able to drift the bolt out, so in light of that here is the definitive answer to the problem
 Chop off the bolt, remove the upper arm, then belt the middle out of the bush with a mash hammer, it will not resist I promise Of course you will have bought your new rose joint bush, if not.... phew you won't need to break the bank, as the identical part is fitted to E46 BMW rear suspension, so treat yourself.........LINK Now comes the interesting part, without further dismantling of the rear suspension, buy yourself one of these.......LINK, I'm sure I don't need to elaborate on how this is used, or do I? I've got a Vectra B rose joint tool, for which I machined up a deeper mandrel to accommodate the longer 75 bush, however I would have probably bought the tool in the link if it had been available at the time. So, no need to start dismantling any further, if you wanted to be creative, after bopping the middle out of the bush, you could hacksaw through the outer part left in the trailing arm, then simply drift it out, remove the boot from the new bush, then after cleaning out the hole in the trailing arm, pull it into place using threaded bar, and a suitable size socket, or even the old bush housing with a big washer. It's up to you, with the tool I use, the whole operation will take you less than ten minutes, I'm sure improvisation may take longer, but the end result is a whole lot cheaper and more satisfying than paying for an unnecessary part. Brian  ____________ |
|
|
|
|
27th March 2020, 08:54
|
#23 | ||
|
Give to Learn

Freelander 2 Join Date: Aug 2010
Location: West Midlands
Posts: 18,819
Thanks: 1,155
Thanked 6,407 Times in 3,874 Posts
|
Quote:
Hope you & your are keep well & safe, even better to see you are posting fantastic information once again than you. 
__________________
Arctic Givology Learn to Give Everything is Achievable  ad altiora tendo. Check out our Nano meet dates http://www.midlandsnanomeets.co.uk/ http://www.the75andztclub.co.uk/index.php?thepage=howto " You do the work , we supply the expertise " |
||
|
|
|
|
27th March 2020, 09:41
|
#24 | |
|
Avid contributor
Rover 75 saloon Join Date: May 2019
Location: West Sussex
Posts: 226
Thanks: 54
Thanked 41 Times in 26 Posts
|
Quote:
|
|
|
|
|
|
27th March 2020, 12:29
|
#25 | |
|
Posted a thing or two
Rover 75 Saloon Join Date: Apr 2019
Location: Under the car
Posts: 1,840
Thanks: 210
Thanked 244 Times in 221 Posts
|
Quote:
The RH upper arm captive nut on mine started to spin because I didn't soak the protruding tip of the bolt with penetrating oil before I started. I should have lowered the subframe first (to gain access). Here are the upper arm captive nuts - they're not visible from any other angle. If they start to spin the bolts won't come out and you'll have to take the subframe off. 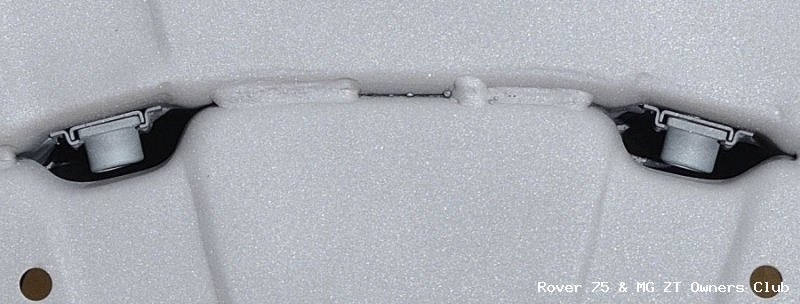 The lower arm captive nuts can be seen from underneath - access is easy.  Lower arm pair again - closer (split) view 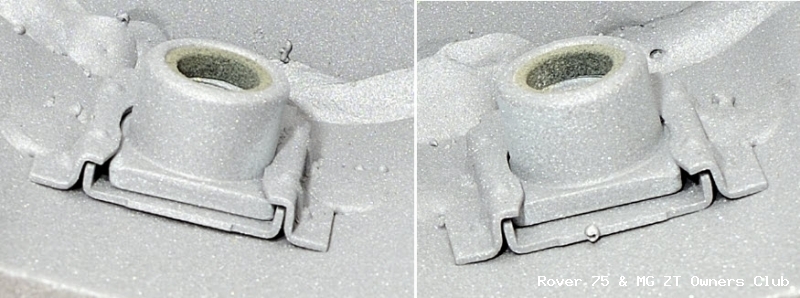 More access through here (arrows) 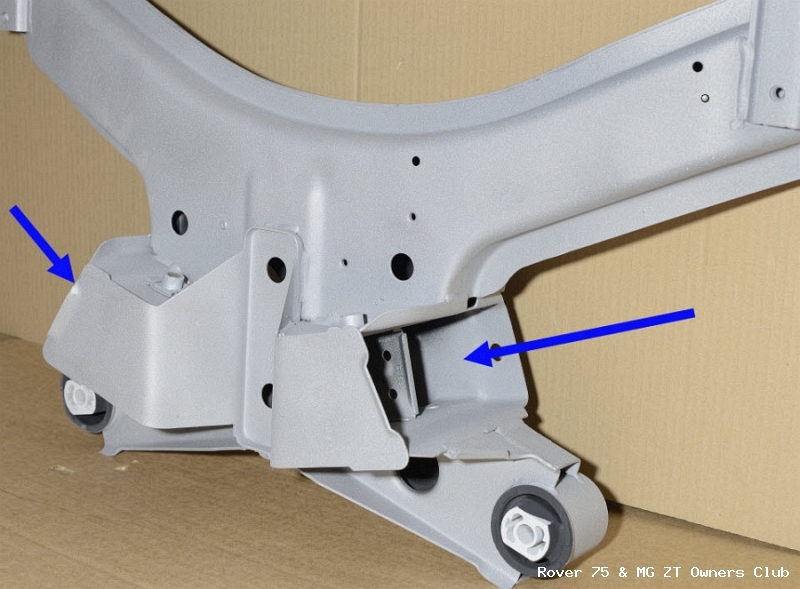 For reference, here's a full view of top side (not visible from under the car). 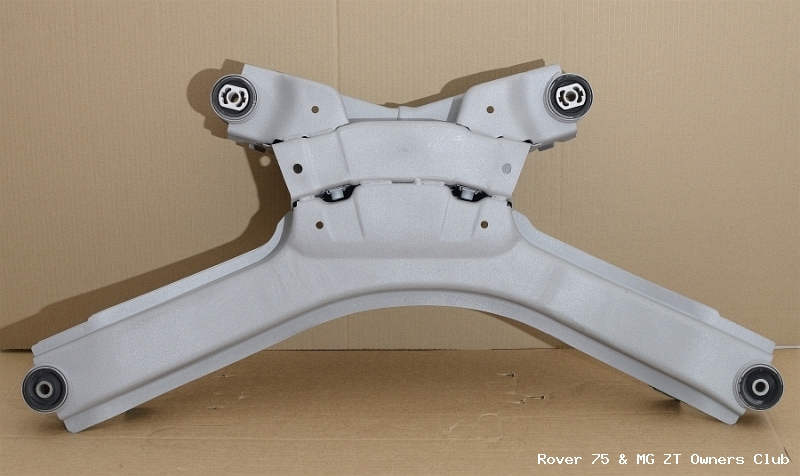 And this is the bottom side. 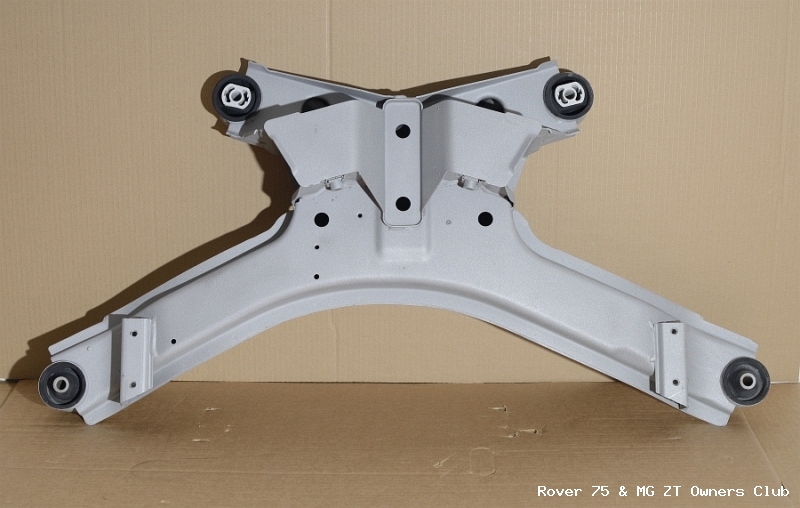 Here's the tip of the RH upper arm bolt protruding from the captive nut (on a new subframe). De-rusting the tip and bombarding it with penetrating oil is the key. 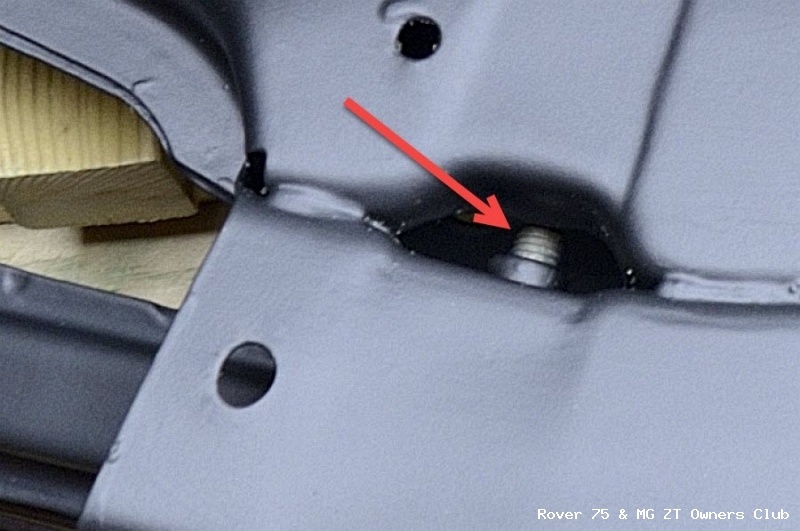 |
|
|
|
|
|
27th March 2020, 12:33
|
#26 | |
|
Posted a thing or two
Rover 75 Saloon Join Date: Apr 2019
Location: Under the car
Posts: 1,840
Thanks: 210
Thanked 244 Times in 221 Posts
|
Quote:
 |
|
|
|
|
|
27th March 2020, 13:22
|
#27 | |
|
This is my second home

Roverless + 1.7D Sportage Join Date: Aug 2014
Location: East Norfolk
Posts: 7,093
Thanks: 729
Thanked 2,021 Times in 1,449 Posts
|
Quote:
__________________
Oil in my veins! Last edited by roverbarmy; 27th March 2020 at 13:25.. |
|

|
|
|
27th March 2020, 13:37
|
#28 | |
|
Posted a thing or two
Rover 75 Saloon Join Date: Apr 2019
Location: Under the car
Posts: 1,840
Thanks: 210
Thanked 244 Times in 221 Posts
|
Quote:
* Mini wire brush with steel bristles. |
|
|
|
|
|
27th March 2020, 14:00
|
#29 |
|
MG ZT Join Date: Jan 2011
Location: Newcastle Upon Tyne
Posts: 20,151
Thanks: 3,565
Thanked 10,837 Times in 5,718 Posts
|
I've done fifteen pairs of arms now and never needed to resort to subframe removal.
The trick is tighten first, before attempting to slacken, which breaks the rust hold without stressing the cage securing the captive nut, and as soon as the bolt starts moving, switch immediately to 3/8" drive sockets, which allows much greater "feel" and if the bolt starts to tighten, reverse the ratchet and tighten the bolt once more. Lots of plusgas through the hole in the bottom of the box section of the subframe, and I tend to use a mini maglite, an incandescent one not an LED so you can spray the penetrant directly onto the end of the bolt. If the bolt is attempted to be wound straight out, it will almost certainly end badly, working this bolt patiently will pay off in as much as the resultant work of subframe removal can be avoided completely Brian |
|
|
|
|
27th March 2020, 14:39
|
#30 |
|
Posted a thing or two
Rover 75 Saloon Join Date: Apr 2019
Location: Under the car
Posts: 1,840
Thanks: 210
Thanked 244 Times in 221 Posts
|
Brian - once the new bolt is back in*, what do you think of spraying the protruding thread with Dynax S50?
(*After it's torqued up) |
|
|
|
 |
|
|


 Linear Mode

