
|
|
|
|
|
|
||
|
|
||
 13th July 2019, 13:20
|
#1 |
|
Gets stuck in
Rover 75 Contemporary SE 2.0 Diesel Auto 2005 Facelift Join Date: Dec 2010
Location: Norwich
Posts: 618
Thanks: 90
Thanked 67 Times in 47 Posts
|
So I'm finally getting round to fitting my towbar.
I installed the main harness (rover genuine) some time back, but never managed to get time to fit the actual towbar and the electrical connections in the dash. Anyway, reading the 'how to' and the instructions that came with the link kit I have to remove the fuse board behind the glove box and remove the fuses in the LH side then remove the RED ANTI BACK-OUT FRAME. I've put my head in as far as I can but can't see any fixings. Also had a look on fleabay for pictures, but again no help. How do I remove the back out frame? how is it held in place? Moving on: Then I have to route a green wire across to the LSM. I currently have the radio out as I just installed a GSM unit for my FBH so I have good access behind the centre console. However how do I remove the LSM to get at the connector? Any help would be appreciated. Thanks Steve
__________________
Mods Fitted: Cruise Control; FBH with GSM (was FrenchMike's Remote) & dash button; Rear Blind; In-line Thermostat; wired in front & rear cameras; Mercedes DRL +DRL2; twin horns, twin usb power outlets, digital coolant temperature readout, Real Walnut dash, Walnut & black leather steering wheel, Walnut Handbrake grip, Towbar with full Rover harness. Rear seat cup holders. Wanted: Walnut auto gear stick handle Mods to do: all done  , need to come up with some more. , need to come up with some more.
|

|

|
|
13th July 2019, 14:14
|
#2 |
|
This is my second home
fiat panda Join Date: Sep 2009
Location: haverhill
Posts: 6,720
Thanks: 96
Thanked 586 Times in 526 Posts
|
the anti reversing back out frame the red one just clips on. as for the green wire that goes over. for some strange reason when i fitted mine i think it went to the ipk plug .but this was about nine years ago.if it does go the lsm i imagine remove the lower dash panel plus the surround above it this pulls off btw and you should be able to get to the plug.oh back to the fuse board it is also held on by two nuts 8mm i think on each corner.undo pull the board pull forward then turn it you then be able to poke the wire in the back.if you cannot work out from the rear which one poke something through the relevant position from the front so you can see.hope this helps
__________________
fiat panda 1.2 eco |
|
|
|
|
13th July 2019, 14:56
|
#3 |
|
Precise
Rover 75 Tourer 2.5KV6 Connoisseur SE Join Date: Mar 2013
Location: Fleet
Posts: 2,973
Thanks: 630
Thanked 617 Times in 480 Posts
|
Onc you access to the LSM (as above) you can remove the screw that holds the LSM to the dash frame and pull the whole unit towards you, wiring then very easy to see and do.
|
|
|
|
|
14th July 2019, 10:08
|
#4 |
|
Gets stuck in
Rover 75 Contemporary SE 2.0 Diesel Auto 2005 Facelift Join Date: Dec 2010
Location: Norwich
Posts: 618
Thanks: 90
Thanked 67 Times in 47 Posts
|
Thanks for the reply guys.
I plan to run the link wire to the LSM this morning   With your help and this thread -> https://www.the75andztclub.co.uk/for...d.php?t=203800 <- I can access the LSM, so thanks .For Info, this is the 'How to' I'm using, -> https://www.the75andztclub.co.uk/for...ad.php?t=23097 <- Taken from above: 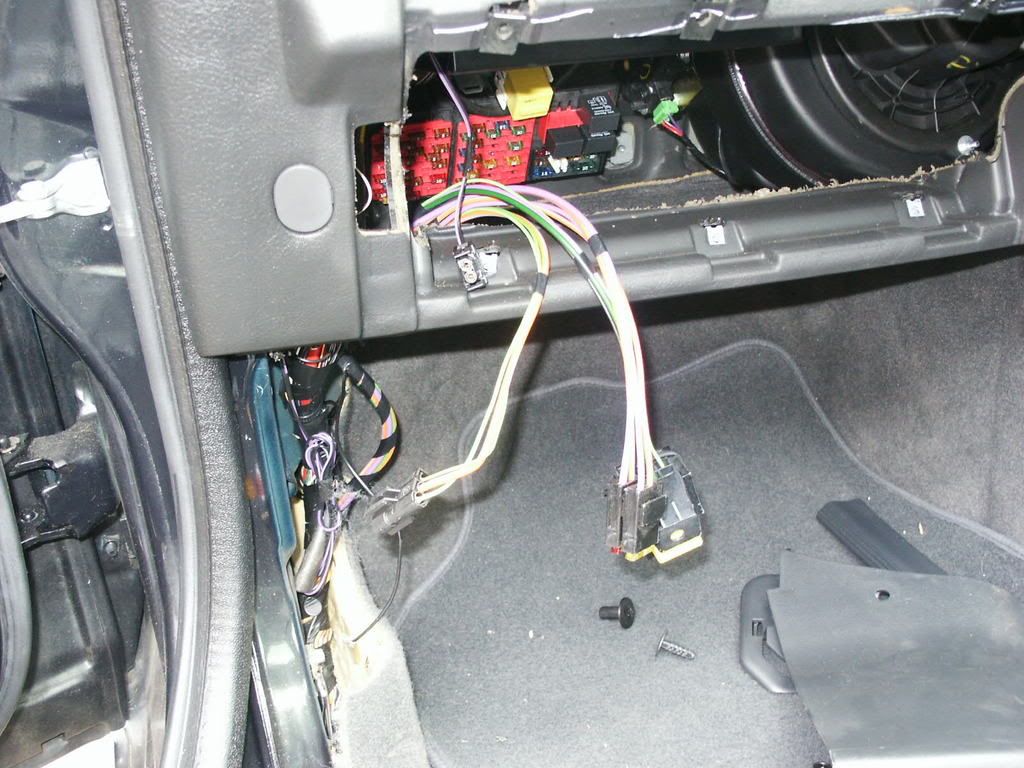 In this image there is 3 groups of cables coming out of the glovebox. 1 has the 2 fuse holders, 2 has the 3 pin plug (hanging to the left), this connector is missing from my harness, must have been left on the car the harness was removed from  and 3 which is a black multi-pin connector (just to the right of the fuses). Where does the multi-pin connector go  I can't see it mentioned in the how to. I can't see it mentioned in the how to.EDIT: after a bit of tralling the internet I have established that this is in fact a relay socket. Does anyone have a wiring diagram to help me source a new relay? EDIT2: Searching here I have found this thread, -> https://the75andztclub.co.uk/forum/s...d.php?t=241708 <- which has the wiring diagrams  SteveN
__________________
Mods Fitted: Cruise Control; FBH with GSM (was FrenchMike's Remote) & dash button; Rear Blind; In-line Thermostat; wired in front & rear cameras; Mercedes DRL +DRL2; twin horns, twin usb power outlets, digital coolant temperature readout, Real Walnut dash, Walnut & black leather steering wheel, Walnut Handbrake grip, Towbar with full Rover harness. Rear seat cup holders. Wanted: Walnut auto gear stick handle Mods to do: all done , need to come up with some more.
Last edited by sln8458; 14th July 2019 at 13:42.. |
|
|
|
 |
|
|


 Linear Mode

