
|
|
|
|
|
|
||
|
|
||
 19th January 2019, 11:26
|
#11 |
|
This is my second home

Audi Q3 TDI S-Line Quattro Join Date: Jul 2007
Location: Clacton On Sea/On the boat somewhere
Posts: 51,270
Thanks: 9,890
Thanked 12,235 Times in 8,232 Posts
|
I'm here guys.
Your camera is fine for printing to A3 Phil. Your image will be compressed on Flickr for image hosting purposes and will not enlarge without pixalating. The original file (not the BB code) should be fine to print from. Can't see the exif data as you have made that image private but I'm pretty sure all will be good from your original uncompressed file 
__________________
Jeff.  |

|

|
|
19th January 2019, 11:35
|
#12 | |
|
This is my second home
Rover 75 CDT Connoisseur SE Join Date: Nov 2006
Location: Wales
Posts: 12,227
Thanks: 469
Thanked 523 Times in 241 Posts
|
Quote:
Thanks for that. I made the image private as I was still playing with it. Here's a public version, slightly tweaked... What do you think? Colour balance etc... Any further improvements I could make do you think? 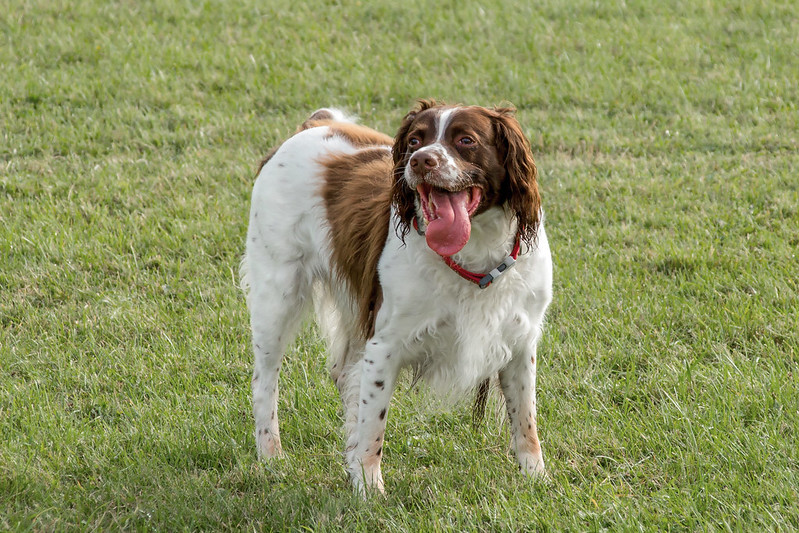 Oscar! by Philip Davies, on Flickr Oscar! by Philip Davies, on Flickr
__________________

|
|
|
|
|
|
19th January 2019, 14:31
|
#13 | |
|
This is my second home

MG ZT CDTi Join Date: Jan 2014
Location: carrick
Posts: 7,859
Thanks: 3,494
Thanked 2,657 Times in 1,973 Posts
|
Quote:
 (although I dont think many printers will print at 1200 dpi, it has been a while) (although I dont think many printers will print at 1200 dpi, it has been a while)When you look at the properties on most camera for resolution, they will display something. Canon are 240 dpi, Nikon if I recall are 72. Neither matter without the other two dimensions (number of pixels recorded length and breadth) As a general rule of thumb, to work it all out, use 200 dpi (dots for printing) as a minimum, and 150 as an absolute minimum if you are desperate. Take the resolution of the image (right click on the file and go to properties). Divide 200 into the dimensions, and that will give you a good idea of physical size that you can print up to. For canvases, as these can give an effect of softening the image anyway, we used to warn customers if we couldnt get 150 dpi out of an image for the size they required. The software though, was very good, and could manage to interpolate from an equivalent of 80 dpi. To make the maths simple on an 18 mp camera, let's say pixel dimension of the sensor is 6000x3000 pixels = 18,000,000 pixels . For a high grade art print (galleries etc), I would not print larger than 20 inches by 10. (6000/300dpi and 3000/300dpi). Regular prints (for the house etc). 30 inches by 15 (200dpi) Canvases 40 inches by 20 (150dpi) There is an additional consideration. If you are considering a massive print, you generally look at it from a distance, so dpi becomes less of an issue. Look at a billboard up close, and you can see how low the dpi can go, yet still be effective. (I have read of as low as 6-8 dpi). Wet printing a digital image (as you would get at Jessops, Boots etc), is a completely different ball game using lasers, dyes and photographic paper and is a lot more forgiving. This is not used for printing canvases though. ------------------------------------------- As far as 'improving' the image, I would consider cropping into a square format or portrait format, as there is a too much dead space on the left and right of the image. If it must be a landscape format image, try cropping out the right hand side grass, leaving some on the left for Oscar to 'look into'. The image is sharp and focused on my screen. My monitor is no longer calibrated, so I cannot say anything about the colours.
__________________
It is not gloss primer .............. it is duct tape silver! Last edited by clf; 19th January 2019 at 14:36.. |
|
|
|
|
|
19th January 2019, 18:51
|
#14 | |
|
This is my second home
Rover 75 CDT Connoisseur SE Join Date: Nov 2006
Location: Wales
Posts: 12,227
Thanks: 469
Thanked 523 Times in 241 Posts
|
Quote:
I hadn't thought of cropping the right side to be honest, but will do that I think. I got three images printed onto 12x8 just to see how they came out. Oscar looks slightly green to me, when printed out which is rather irritating, but much less irritating than it would have been if I'd have forked out for a canvas print. Oh, the local shop does acrylic prints, they look awesome. Very modern looking...
__________________
|
|
|
|
|
|
19th January 2019, 19:16
|
#15 |
|
This is my second home
Rover less ! Join Date: Jun 2011
Location: Tarbolton
Posts: 3,442
Thanks: 393
Thanked 888 Times in 542 Posts
|
Can I just say what a lovely photo, it obviously means a lot to you.
I printed some photos of my rebuilt SD1 Vitesse onto canvas myself. I cant remember the exact setting on the printer but I do remember it took ages to print the image but this was just on A4 size. One thing to remember when the image is printed to canvas I assume youre framing it so you will lose approx 1 inch all round your image and I note you dont have a large area to lose at the bottom of the print. Good luck with the finished work. |
|
|
|
|
19th January 2019, 19:57
|
#16 | |
|
This is my second home
MG ZT CDTi Join Date: Jan 2014
Location: carrick
Posts: 7,859
Thanks: 3,494
Thanked 2,657 Times in 1,973 Posts
|
Quote:
The green hue could be coming from the sheen from the grass. There can be other things that will affect it. One big issue we used to have was people shooting and editing with different colour spaces as they read them to be better. However, whilst that can be true, the problem arises when it comes to printing. I even went as far to find the Fuji Frontier (the system we used) colour space. Tried it, within the monitor and photoshop, it was hideous. Did a little more digging, and it turned out our software utilised a standard sRGB all along lol. This lead to a colour shift. After years of experimenting on and off, I gave up lol, but it explained a lot of complaints we would get from enthusiastic photographers. In terms of colours, keep it simple, keep it the basic sRGB (if you have changed it) and then have faith in the printers. If there is an issue, discuss it with them. I mention the colour space as the grass looks a little washed out, but that could just be the grass, my monitor or AdobeRGB set on the camera. In photoshop, you can select the white fur of the dog, and desaturate it gently (also you could use the desaturate brush). With the images you have printed, try covering the right hand side to give you and idea of how it will look. To my eye, it gives it a little more of a dynamic look.
__________________
It is not gloss primer .............. it is duct tape silver! |
|
|
|
|
|
19th January 2019, 20:00
|
#17 | |
|
This is my second home
MG ZT CDTi Join Date: Jan 2014
Location: carrick
Posts: 7,859
Thanks: 3,494
Thanked 2,657 Times in 1,973 Posts
|
Quote:
like this (without the black lines) 
__________________
It is not gloss primer .............. it is duct tape silver! Last edited by clf; 19th January 2019 at 20:18.. |
|
|
|
|
|
19th January 2019, 20:27
|
#18 | |
|
This is my second home
Rover 75 CDT Connoisseur SE Join Date: Nov 2006
Location: Wales
Posts: 12,227
Thanks: 469
Thanked 523 Times in 241 Posts
|
Quote:
That is a very good point, If it comes to that, I will enlarge the photo area (without stretching) and then clone the grass. Or, as CLF says, I could ask the printing shop to mirror the edges. (I really like that idea....)
__________________
|
|
|
|
|
|
19th January 2019, 20:34
|
#19 | |
|
This is my second home
Rover 75 CDT Connoisseur SE Join Date: Nov 2006
Location: Wales
Posts: 12,227
Thanks: 469
Thanked 523 Times in 241 Posts
|
Quote:
I asked how they were hung and they said "with four screws" but it looked a bit of a pain. I think you are right about it coming from the grass. I moved the picture to another room and it looked fine... Also the other half said the colour looked fine. Maybe it's my eyes!! What do you mean by "colour spaces?" You are totally right about cropping it, leaving Oscar on the right side of the image, instead of central. Thank you.
__________________
|
|
|
|
|
|
19th January 2019, 20:50
|
#20 | |
|
This is my second home
MG ZT CDTi Join Date: Jan 2014
Location: carrick
Posts: 7,859
Thanks: 3,494
Thanked 2,657 Times in 1,973 Posts
|
Quote:
Colour space is the colour 'palette' cameras, printers monitors etc use to display colours. sRGB is from memory 16.7 million colours, Adobe is so many billion (I cannot remember the value). It allows for subtle colour tones and variation to be printed and displayed. But the vast majority of what we use on a day to day basis is sRGB(version number I forget also). Essentially sRGB is 256 tones of red, 256 tones of green and 256 tones of blue. (multiply them together you get 16.7 million). If I recall Adobe is 1056 tones of each (or something like that lol) . If you shoot in Adobe RGB or another colour space, the printer hardware if using sRGB, has to best guess or downsample colours, which can lead to subtle tone changes - hence me mentioning it in the first place when you spoke of the green hue. In real world situations, it is unlikely to be noticed. After you asking about this, I dont believe this is the issue, and is just the green reflection coming from the grass onto the white coat. The acrylic and aluminium prints we did, were held up with U shaped brackets stuck to the back of the print with strong double sided tape, which were then hung on screws in the wall. It was the thought of the hooks prising off the print that concerned me, as the acrylics especially were quite heavy and had sharp edges and corners.
__________________
It is not gloss primer .............. it is duct tape silver! |
|
|
|
|
 |
|
|


 Linear Mode

