
|
|
|
|
|
|
||
|
|
||
 16th October 2019, 23:50
|
#1 |
|
Posted a thing or two
Rover 75 Saloon Join Date: Apr 2019
Location: Under the car
Posts: 1,840
Thanks: 210
Thanked 244 Times in 221 Posts
|
Has anyone actually removed the fuel tank completely (i.e. not just lowered it)? I'm looking for a How To.
I'm not getting much response in the Technical forum so I thought I'd ask here too. I've got 2-3 gallons in the tank and I don't want to rip all the pipes/connections off by accidentally dropping it. |

|

|
|
17th October 2019, 00:05
|
#2 | |
|
This is my second home

MG ZT CDTi Join Date: Jan 2014
Location: carrick
Posts: 7,859
Thanks: 3,494
Thanked 2,657 Times in 1,973 Posts
|
Quote:
I cannot find my copy of RAVE to check it out, but get yourself a copy, and it could help you out a lot for such instances as this. I reckon the info you are looking for will be in it. LINK
__________________
It is not gloss primer .............. it is duct tape silver! |
|
|
|
|
|
17th October 2019, 08:48
|
#3 | |
|
Posted a thing or two
Rover 75 Saloon Join Date: Apr 2019
Location: Under the car
Posts: 1,840
Thanks: 210
Thanked 244 Times in 221 Posts
|
Quote:
This tank has been taken out before (to fit copper brake pipes) but I didn't do it myself - that's when the hexagon nuts were sheared off the jubilee clips. I don't think these clips are going to come off because there's nothing to turn the worm drive with. I already have RAVE - this is what is says: 1) Page 549 / Adjustments 19-2-3 - drain tank using a 'fuel recovery appliance'  2) Page 571 / Repairs 19-2-25 - removing tank 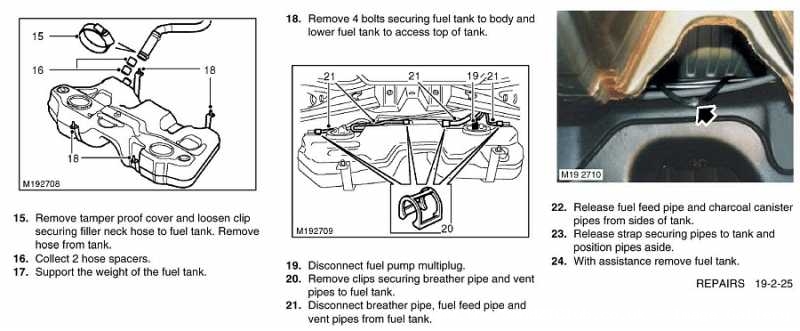 That says lower the tank before trying to disconnect any wires or hoses. Last edited by Blink; 17th October 2019 at 09:24.. |
|
|
|
|
|
17th October 2019, 09:24
|
#4 | |
|
I really should get out more.......
Rover 75 Saloon Join Date: Jul 2011
Location: Gävle
Posts: 2,554
Thanks: 395
Thanked 823 Times in 652 Posts
|
Quote:
Regards |
|
|
|
|
|
17th October 2019, 09:52
|
#5 | |
|
This is my second home
MG ZT CDTi Join Date: Jan 2014
Location: carrick
Posts: 7,859
Thanks: 3,494
Thanked 2,657 Times in 1,973 Posts
|
Quote:
They mention lowering the tank before un plugging, I imagine to make easier to access them. As I said I haven't done it, so cannot say for sure. As far as releasing the clips, I would try using a pair pliers, grips or forcing a socket onto it. Failing that, I would cut it off and replace the hose (which i assume you'll be doing) Sent from my SM-A600FN using Tapatalk
__________________
It is not gloss primer .............. it is duct tape silver! |
|
|
|
|
|
17th October 2019, 09:58
|
#6 | |
|
Posted a thing or two
Rover 75 Saloon Join Date: Apr 2019
Location: Under the car
Posts: 1,840
Thanks: 210
Thanked 244 Times in 221 Posts
|
Quote:
 It can be done without getting a mouthful but you need clear tubing to gauge the right moment to pinch off the tube. I only have 15 inches of clear tubing anyway - it's not long enough so I'll have to try an ordinary hosepipe. It can be done without getting a mouthful but you need clear tubing to gauge the right moment to pinch off the tube. I only have 15 inches of clear tubing anyway - it's not long enough so I'll have to try an ordinary hosepipe.How hard is it to release the fuel filter & fuel pump from the tank (3 & 4 in Rave above)? I've taken the access covers off under the seat and the tops of the filter and pump are covered in dirt & dust - I don't want any of that muck to get inside the tank. |
|
|
|
|
|
17th October 2019, 10:10
|
#7 | |
|
Posted a thing or two
Rover 75 Saloon Join Date: Apr 2019
Location: Under the car
Posts: 1,840
Thanks: 210
Thanked 244 Times in 221 Posts
|
Quote:
Re the clips - a socket is never going to turn them because the hexagon heads aren't there at all (they've sheared off and disappeared). The bit that's left is just cylindrical and they're seized up pretty solid. Even if I cut the hose in two (Stanley knife) I'll still have to get the old clips off the two hose ends before I can put a new hose on. |
|
|
|
|
|
17th October 2019, 13:06
|
#8 | |
|
I really should get out more.......
Rover 75 Saloon Join Date: Jul 2011
Location: Gävle
Posts: 2,554
Thanks: 395
Thanked 823 Times in 652 Posts
|
Quote:
Avoid removing the pump & filter if at all possible, lots of plumbing, fuel sensors etc. not worth it, the tops might be dirty but when you remove the tank and get it on its side then you can clean the tops. Not had much problem with old clips even rusty ones, blunt force with an old screwdriver/hammer into the worm drive - they'll surrender. Regards |
|
|
|
|
|
17th October 2019, 13:24
|
#9 |
|
Doesn't do things by halves

Rover 75 2.5 Connoisseur Auto (1999) Dealer launch model. Join Date: Mar 2007
Location: Former Middlesex
Posts: 20,508
Thanks: 1,587
Thanked 3,749 Times in 3,181 Posts
|
Simon,
It seems to me that your project is becoming unnecessarily complicated. Can you remind me why you want to lower the fuel tank? If it is to renew brake pipes, it's a lot easier and perfectly satisfactory to replace the corroded sections only. Pipes across the top of the tank are isolated from rainwater, salt, dirt and impact from stones. They will outlast the car. You don't need to renew them. Simon
__________________
"Whatever is rightly done, however humble, is noble." Sir Henry Royce. |
|
|
|
|
17th October 2019, 16:52
|
#10 | ||
|
Posted a thing or two
Rover 75 Saloon Join Date: Apr 2019
Location: Under the car
Posts: 1,840
Thanks: 210
Thanked 244 Times in 221 Posts
|
Quote:
Quote:
 Once the tank was down on the dollies and I had better access, I managed to get a pair of grips on the pesky hose clip and it soon surrendered (Hoorah). Then I syphoned about 1.3 gallons out of the right tank using a 20ml syringe to suck fuel into the clear tube and get the flow started. (I'd forgotten I had a spare syringe - I bought them for sucking paint out of POR15 tins. This stops the lid welding itself to the tin!). Mike - I didn't touch the pump & filter. I took one look at them and thought "No thanks!"  Simon - the main reason is to wax above the tank, plus change the perished filler hose. The brake pipes have already been changed (front to back) - that was done a few years ago. Anyway, the tank is now 'de-vapourising'. I'll give it a good wash tomorrow. Btw, these tanks are heavier than they look, even when empty - and the handle contraption is completely useless. |
||
|
|
|
 |
|
|


 Linear Mode

