Following on from my thread about replacing the clutch on my car, here are the lessons learnt which I hope will help the next person who has to change their clutch.
Preparation and introduction
My car is a 2004 2.0 CDTi Tourer and the clutch had been really heavy ever since I bought it 8 years ago when it had around 65k miles. It lasted until 127k miles, when I began having trouble engaging 1st and reverse. On the lead-up to this happening, I'd noticed that the clutch felt slightly different: vague and slightly spongy.
In truth, if I'd added some fluid to the master cylinder and re-bled it, it would probably have lasted for a while longer, but I've got a busy summer of driving planned so I decided to replace it to be on the safe side.
We used an upside-down large cardboard box to keep track of all the bolts that were removed. This was a good move because the gearbox, especially, uses different length mounting bolts.
 Special Tools needed:
6 mm Allen key (hex) socket to remove and re-torque the clutch pressure plate. Also useful for front brake calipers
Approximately 40 cm of heavy duty chain that you can get one of the gearbox bolts through.
Clutch Alignment tool
Torque Wrench with a scale between 20Nm and 160Nm
Wooden Blocks
Lessons Learnt
I used a Haynes Manual and followed the procedure outlined in it so these are my observations and lessons learnt from those instructions.
Disassembly
1. Early in the instructions you're told to remove the bonnet - you do not need to do this
2. Prior to making a start, if you're replacing the master cylinder and have electric seats, move the driver's seat as far back as it will go.
3. Later on in the instructions, you're told to undo the driveshaft nuts to get the driveshafts out of the hubs, but only after the subframe is off, so if you intend to do this, un-stake the hub nuts and loosen them before you raise the car.
The alternative approach (which I took) was to remove the entire front suspension assembly on both sides by removing the brake caliper and tying it out of the way, undoing the three nuts on the top mount, the ABS and brake wear indicator multiplugs and separating the trackrod balljoint before then withdrawing the driveshafts from the gearbox and lowering the entire assembly down on a jack, located under the brake disc. Don't forget to drain the gearbox of oil first!
This approach is possibly better because you don't need to buy replacement hub nuts and you also gain a lot of space to work without the hubs in place.
4. Raise the car onto axle stands and ensure that there's enough clearance under the front bumper to get the gearbox out. I placed the front wheels that I'd removed under the sills, just behind the axle stands, with a large block of wood on top so that should anything happen with the axle stands, the car wouldn't fall onto me.

5. Remove the exhaust system from the car if you're concerned about damaging it. I think I have damaged my flexible joint because the subframe over-extended it - I'm wishing now that I'd removed it!
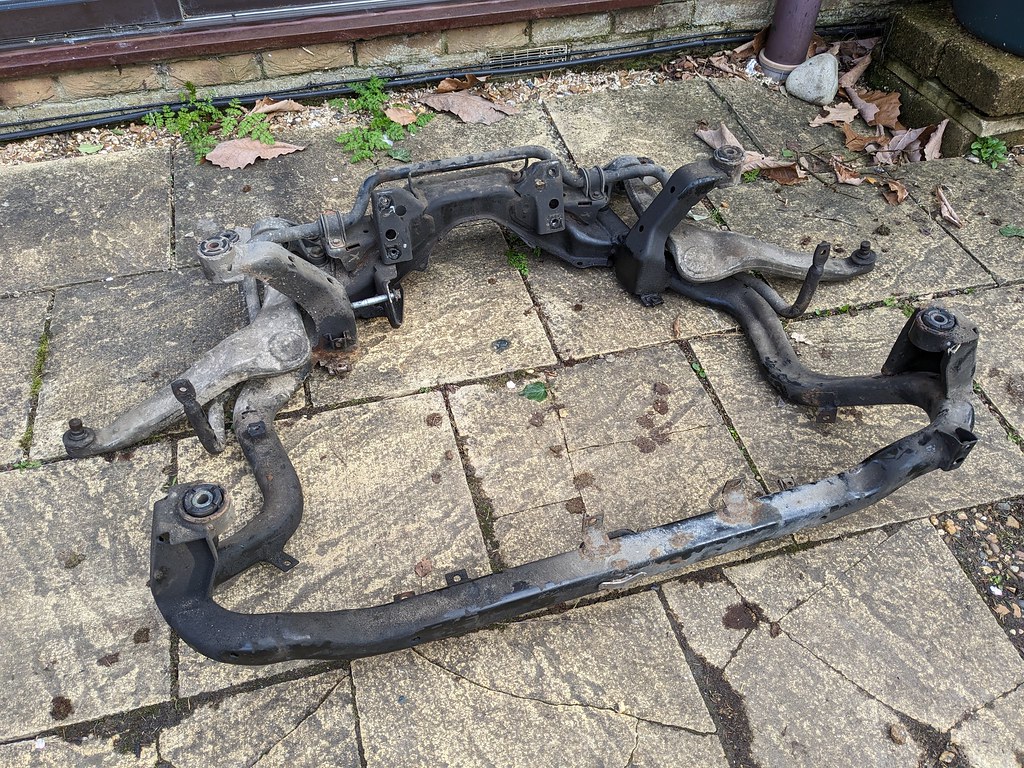
6. The subframe is a heavy chunk of metal and is awkward to manhandle down off the car. We put a jack underneath the front of it and then lowered the rear mounts down onto blocks of wood, before dragging it from underneath the car.
7.Now is a good time to inspect the lower arm rear bushes and if they're at all perished it's a lot easier to replace them with the subframe off the car
8. Hayes says you need to two jacks when lowering the gearbox - one on the gearbox and one to support the engine. In practice, you don't - we used an axle stand with a block of wood to support the engine, under the middle of the sump, and used our one jack under the gearbox to drop the engine down onto it.
9. When it came to removing the gearbox, we rested the front of the box on the jack (with a block of wood to spread the load) and then lowered the final drive part of the box onto wooden blocks before removing all the bolts and then pivoting it down onto a large piece of cardboard on the jack.

10. To lock the flywheel/clutch assembly in place so you can undo all the bolts, thread the bottom gearbox bolt through a chain link of your piece of chain, then remove one of the Allen bolts that holds the clutch plate in place and use a longer bolt through another of the chain links to stop the flywheel from turning.
Reassembly
1. Replacing the master cylinder is a horrible job but is easiest to do while the gearbox is removed.
2. The black insert in the top of the master cylinder is NOT a filter and you need to remove this prior to filling the reservoir with DOT4 fluid. Ask me how I know this!
3. Put rags and/or pastic sheeting in the Driver's footwell to catch dropped fluid.
4. The black insert in the master cylinder is what raises the pedal back up when you change gear. WIthout it fitted, the pedal will stay on the floor and needs to be raised manually. This is not indicative of a fault.
5. The new DMF will most likely come with new bolts - if not you need to clean and threadlock the old ones
6. My new Borg and Beck clutch kit from DMGRS didn't come with new bolts for the clutch plate - I had to cut a couple of the old ones off so needed to buy new bolts.
7. The new clutch kit does come with a satchet of new grease, but seeing as I didn't realise this I bought my own pot and used a good blob of it on the release bearing face and gearbox shaft.
8. The gearbox oil capacity is stated as 2.2L, but you only need to buy 2 litres of replacement MTF94 fluid - I couldn't get all of it into the box either.
9. You really need a clutch alignment tool. I initially tried to line it up using the hole in the middle of the crankshaft but found it impossible to be accurate. We made our own alignment tool on a wood lathe:
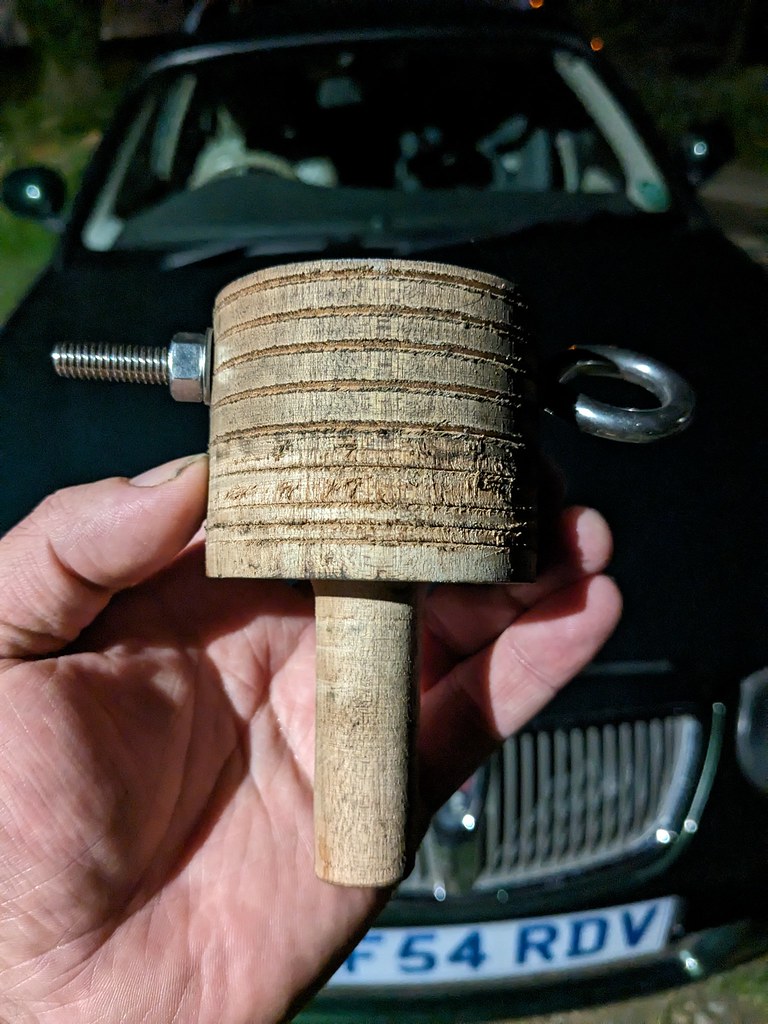

Ask me and you can borrow it!
10 The gearbox is heavy, but not *that* heavy. We tried several different ways of getting it back onto the engine and in the end, we attached our length of chain to the top of the gearbox using the inner two mount bolts, and threaded a length of rope through it. We then laid a plank of wood diagonally across the engine bay, on blocks from the slam panel to the left hand suspension turret top. One of us used the rope slung over that to keep the 'box steady, while the other one got under the car, put an an arm under the gearbox and bench-pressed it up, back onto the engine. Removing the remaining bit of the top gearbox mount from the car gave more clearance.
11. Getting the subframe back up was awkward - we used wooden blocks to raise the rear of it up, and a jack to raise the front. The long bolts helped lift it back up.
12. When re-fitting the control-arm ball joint to hub pinch-bolt, we used a lot of copper-slip grease to prevent it corroding together in the future.
13. Don't forget to get your wheels aligned after the work.
Think that's about all I can remember - Good luck!