
|
|
|
|
|
|
||
|
|
||
 8th May 2016, 21:26
|
#11 | |
|
Posted a thing or two

Rover 75 saloon, manual. Rover 75 Tourer, Auto. Join Date: Jan 2013
Location: Newry
Posts: 1,785
Thanks: 574
Thanked 443 Times in 371 Posts
|
Quote:
Ross, would this be more accessible by removing the air filter housing? Just a thought. Sent from my iPhone using Tapatalk
__________________
2006 75 Contemporary SE diesel manual (#1  ) )2003 75T Connoisseur SE diesel auto (For Comfort  ) )2005 75 Connoisseur SE diesel auto (Marmite duotone  ) )2006 75 Connoisseur SE diesel auto (The last one?  ) )2009 E220 (For a change) 2018 L200 (For Big & Heavy Things) 1976 W114 250 Manual (For Sundays) |
|

|

|
|
9th May 2016, 13:37
|
#12 |
|
Gets stuck in
MG ZT-T Join Date: Feb 2016
Location: Horsham
Posts: 874
Thanks: 197
Thanked 239 Times in 207 Posts
|
Interesting thread, as I'm just about to fit the same sort of kit and was wondering about the best way to go about it.

__________________
My garage. 03/53 MG ZT-T+ CDTi auto in XPG. 232k and much to do! 21/21 MG ZS ev. Daily. 85/C Capri 2.8i Special. Mine 30+ years. 82/X Talbot Tagora SX V6. Restoration project. 11/11 Hyundai I Load CRDi. Van....... nuff said. |
|
|
|
|
9th May 2016, 18:20
|
#13 | |
|
Posted a thing or two
Rover 75 Saloon Join Date: Apr 2007
Location: Edinburgh
Posts: 1,535
Thanks: 137
Thanked 229 Times in 156 Posts
|
Quote:
Removing the top half of the air filter housing doesn't really give any more clearance. The bottom half is part of the cam cover and that's a potential can of worms with oil leaks and new gaskets, broken leak-off connectors etc. It's difficult to get to the bolts from underneath. They are a Torx T40 fitting and there's a water pipe in the way that makes it "sporting" to get a socket on. The way to do it is by removing the battery and battery box, and going in from the side. I'm off to do this now. Isn't it great to have daylight until 9pm 
__________________
Copperleaf R75 CDT 160 |
|
|
|
|
|
9th May 2016, 21:37
|
#14 |
|
Posted a thing or two
Rover 75 Saloon Join Date: Apr 2007
Location: Edinburgh
Posts: 1,535
Thanks: 137
Thanked 229 Times in 156 Posts
|
Ok. As suspected, the EGR supply pipe was almost completely detached at the flexi joint, it came apart when I touched it. After a good look from underneath and from the front, there is no easy way to get to the bolts holding the pipe to the exhaust manifold without stripping some stuff out of the engine bay.
You have to remove the battery, battery box, battery box mounting tray and the engine bay fuel pump/fuel filter. Be careful to remove the clips attaching the clutch slave hose and the fuel pipes and electrical wiring to the battery box before you yank it out. 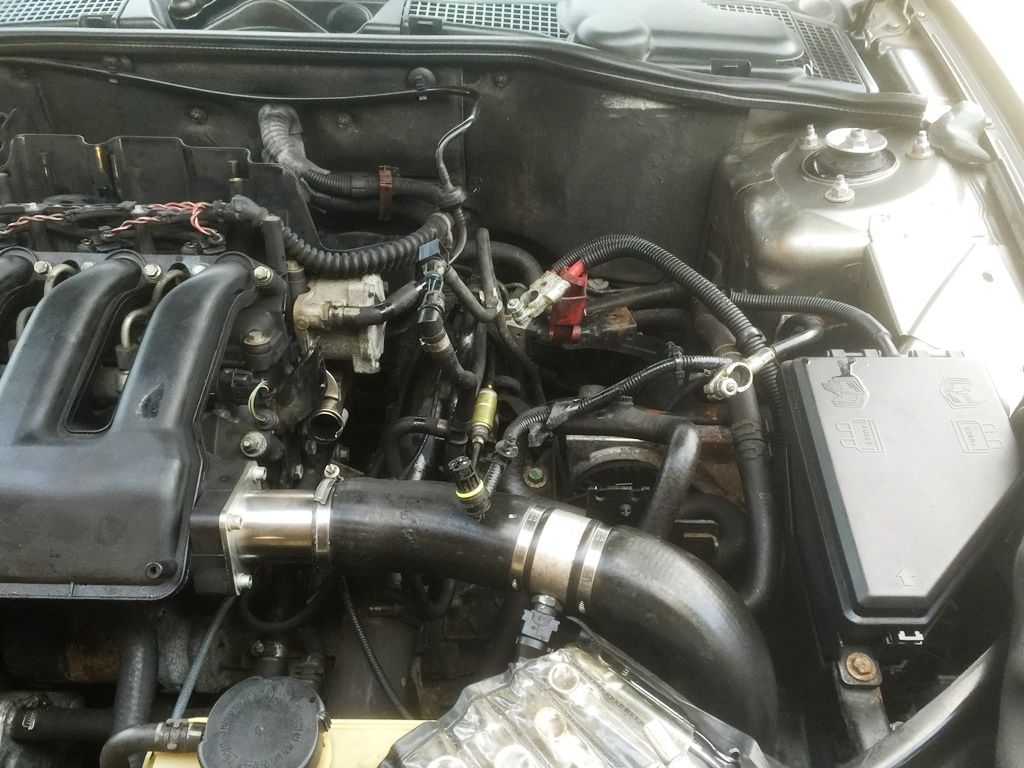 You can see that the EGR supply pipe has given up the ghost, and it's front mounting bolt here. This bolt needs to be removed, it's 12mm if I recall: 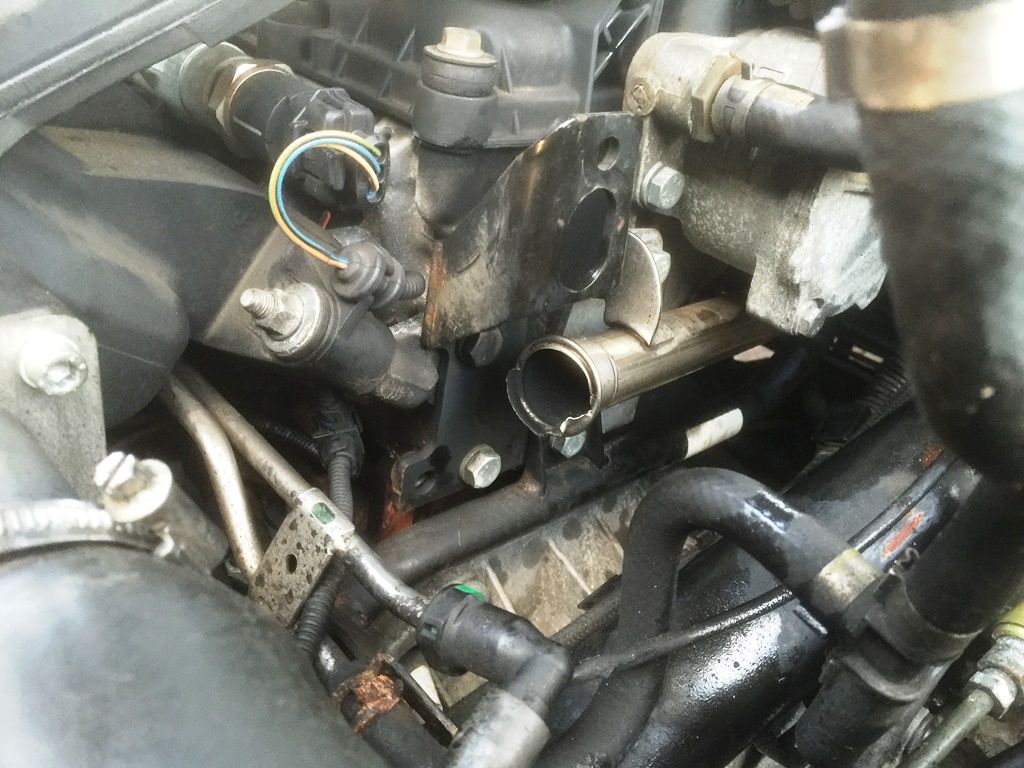 Next you can just see the Torx 40 bolts that mount the supply pipe to the manifold. Both of these need to come out. I used a long extension bar and a torx bit on the end. The top one was pretty tight, needing a long ratchet to start it moving. The bottom one was easy to remove with a standard torque wrench on the long extension bar: 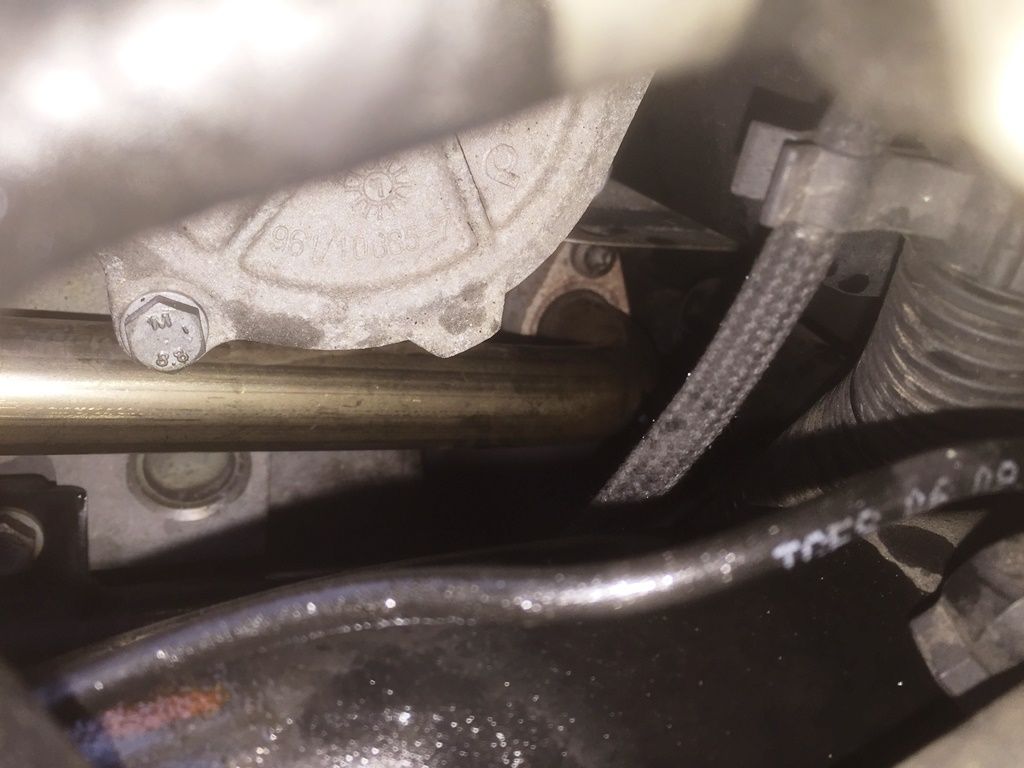 With those 3 bolts removed, the EGR supply pipe will fall off easily (probably through the bottom of the engine bay unless you catch it quickly), and you'll be left with this. Yours will likely be in 1 piece: 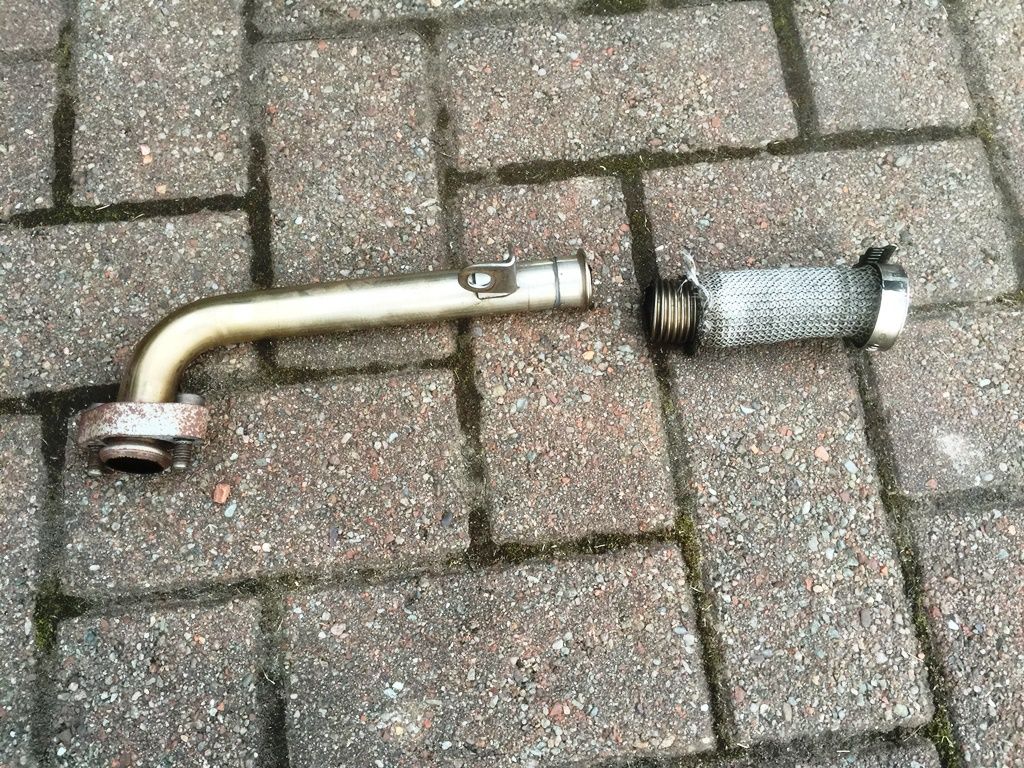 This is the blanking plate and gasket. It comes with 2 new 12mm hex bolts: 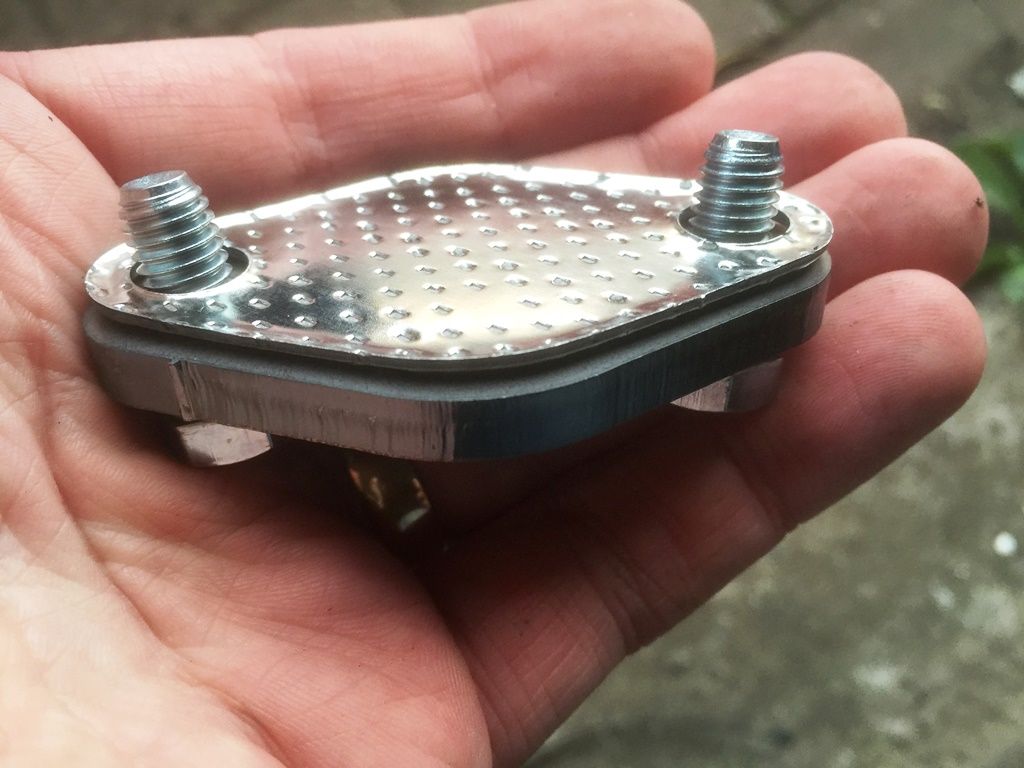 This can be fitted by feel from the front of the car. Just get the bolts in a couple of turns and do the rest with an extension bar from the side, just as you did when you removed the torx bolts. Do them up nice and tight and put everything back together. This isn't a difficult job at all. It took me about 50 minutes from start to finish, including taking photographs, and I wasn't rushing. I hope it's helpful to anybody fitting this type of EGR bypass. It's definitely the best type to have, because you're NAUGHTY WORD-NAUGHTY WORD-NAUGHTY WORD-NAUGHTY WORD-NAUGHTY WORD-NAUGHTY WORD-NAUGHTY WORD-NAUGHTY WORD- if your flexi pops and you don't have a blanking plate. I took the car for a test drive, and it's back to behaving itself. The throttle response is vastly improved with the bypass fitted and the flexi removed. I think mine had been leaking since I got it, and the bypass finished it off.
__________________
Copperleaf R75 CDT 160 Last edited by Ross R75; 9th May 2016 at 21:40.. |
|
|
|
|
10th May 2016, 14:41
|
#15 |
|
This is my second home
N/A Join Date: Feb 2010
Location: Suffolk
Posts: 6,867
Thanks: 0
Thanked 397 Times in 302 Posts
|
Very interested in this - no fault on my car, but I have an EGR bypass already so the exhaust bit is completely redundant so just another thing that take up space, weight and could fail.
Can you get the bits separately? I already have a bypass. |
|
|
|
|
10th May 2016, 19:56
|
#16 |
|
Avid contributor
rover 75 saloon and tourer Join Date: Jul 2015
Location: Hythe
Posts: 162
Thanks: 31
Thanked 9 Times in 9 Posts
|
I ve also fitted the one with the egr blanking plate fitted to the side of the new body , and have fitted the one you show at the start of this thread ,i was lucky enought to remove the flexi pipe and one of the retaining clips , i then used one of the round discs supplied and the retaining clip to hopefully blank off the egr pipe, i say hopefully as i havent used the car yet ,having seen the picture of the length of the pipe i am now wondering if it will fracture over time and am wishing i had purchased the first one i tryed,
|
|
|
|
|
16th May 2016, 20:30
|
#17 |
|
Avid contributor
rover 75 saloon Join Date: Feb 2012
Location: NW London-Colindale
Posts: 221
Thanks: 108
Thanked 41 Times in 35 Posts
|
 I wonder if this one will fit....i all ready have a bypass |
|
|
|
|
16th May 2019, 21:51
|
#18 |
|
Loves to post

Rover 75 Saloon & MGZT 190 Join Date: Jun 2012
Location: Leek
Posts: 390
Thanks: 333
Thanked 57 Times in 39 Posts
|
Hi everybody
Just changed removed my EGR and replaced with older model bypass kit so had to blank the Exhaust manifold. Just a heads up on the Torx screws i used a T40 tool and just slipped on the screws mine were T45 Torx screws and were very tight. hope this helps somebody. |
|
|
|
|
15th June 2024, 11:58
|
#19 |
|
Newbie
Rover 75 saloon Join Date: May 2024
Location: Scarborough
Posts: 26
Thanks: 0
Thanked 0 Times in 0 Posts
|
Post revival!
I undertook this job today having fitted an egr blank kit last weekend but using the two blanking discs on the flexi pipe. I tried the full removal of the flexi pipe but backed out of it, I felt like I couldn't get to the lower torx bolt at all! Having driven the car I was worried about the flexi pipe cracking and don't want to run it like this permanently. Today I tried again to get the flexi pipe off with more determination this time. Thanks so much for the guide, Ross R75! My torx screws were T45 (thanks janker). I ended up working out how to feed my double extension bar set up through the various pipes that get in the way (see first pic), being constantly afraid of rounding off the torx heads by not keeping it straight! Or dropping things in the abyss of the engine bay! I even needed a breaker bar to help carefully crack off the bottom torx screw, it was tight! I did that one first in case I couldn't do it. Even with small hands to fit the new blank plate, this was one of the more awkward jobs I've ever done! So pleased to get it done! Whilst my flexi pipe was perfectly intact, the disc blank seems to have been letting air past, judging by the black soot marks...not ideal?
__________________
2003 2.0 CDT Classic SE Last edited by White Gold 03; 15th June 2024 at 12:06.. |
|
|
|
|
15th June 2024, 21:44
|
#20 | ||
|
Give to Learn

Freelander 2 Join Date: Aug 2010
Location: West Midlands
Posts: 18,835
Thanks: 1,155
Thanked 6,407 Times in 3,874 Posts
|
Quote:
First well done for tackling the job in the first place, but i have to say it is a lot of work, when you could have just used an original EGR gutted and bolted that on, also remember that the manifold will still be gunked up unless that is removed and cleaned along with the MAP sensor.  1 1 2 2 3 3 4 4It needs to be like this below inside.  5 5EGR gutted  6 6Been doing them since 2012  7 7 8 8 9 9 10 10These get swapped out at our Nano meets in 25 minutes if required by the owner 
__________________
Arctic Givology Learn to Give Everything is Achievable  ad altiora tendo. Check out our Nano meet dates http://www.midlandsnanomeets.co.uk/ http://www.the75andztclub.co.uk/index.php?thepage=howto " You do the work , we supply the expertise " |
||
|
|
|
 |
|
|


 Linear Mode

